[Mongo] MongoDB Shell 指令操作(Shell CLI)
# 啟動 MongoDB Shell
$ mongosh

# 查看指令
> help            # 檢視和 shell 有關的指令
> db.help()          # 檢視和 db 有關的指令
> db.[collection].help()   # 檢視和 collections 有關的指令
基本觀念
-
NoSQL: not only SQL
-
階層關係:
- database:在 MongoDB server 中可以有多個 database(DB)
- collection: 用來整理組織 document,類似 SQL 中的 table。一個 db 中可以有多個 collections。
- document: 個別的紀錄(record),類似 SQL 中的 row。一個 collections 中可以有多個 documents
- collection: 用來整理組織 document,類似 SQL 中的 table。一個 db 中可以有多個 collections。
- database:在 MongoDB server 中可以有多個 database(DB)
-
MongoDB 將資料儲存成 BSON 的文件,BSON 是一種以二進位(binary)方式來表徵 JSON 的方法
- 在操作 MongoDB 時,我們提供的是 JSON,MongoDB 的 drivers 會把這個 JSON 轉成對應的 BSON 在保存在 MongoDB 中
- BSON 可以包含比 JSON 更多的資料類型
- BSON 的儲存效率更高
-
MongoDB 的原子性(Atomicity)是建立在 Document Level,也就是說,一個 Document 要嘛有被完整保存成功,要嘛失敗完全沒存,不會有只存了「部分 Document」的情況。
當你使用 insertMany() 或 updateMany() 這類方法一次改動多個 documents 時,是可能會發生部分失敗的情況。但要留意的是,這裡的部分失敗指的是這個「操作」,而不是「document」。如果需要確保整個操作的原子性,需要使用 transaction。
基本指令
> help                 # 檢視常用指令
> show dbs             # 檢視目前所有的 database
> show collections     # 檢視當前 db 有的 collections
> db                   # 顯示當前所在資料庫
> quit          # 離開
資料庫相關
db                  # 顯示當前所在資料庫
show dbs            # 顯示現有資料庫(database)
show collections    # 顯示當前資料庫內所有的 collections
use [DatabaseName]  # 使用此資料庫,如果該資料庫不存在則自動「建立」並使用

##
# 針對 database
##
db.getCollectionNames()    # 顯示當前資料庫中的 collection 名稱
db.dropDatabase()          # 刪除資料庫

##
# 針對 collection
##
db.myCollection.drop()    # 刪除 myCollection 這個 collection
- 在 MongoDB 中,如果該 database 不存在,MongoDB 會在第一次儲存資料到該 database 時建立該 database。
CREATE
##
# Create
# db.collection.insertOne({})
# db.collection.insertMany([{}, {}])
##
db.todos.insertOne({ title: 'Hello Mongo' });    # 建立 document
Ordered Behavior
預設的情況下,MongoDB 使用的是 ordered behavior,在新增資料時如果發生錯誤(例如,duplicate key error):
- 它不會有 rollback 的行為,成功寫進去的資料不會因為其中一個資料寫不進去而被還原
- 預設當
ordered是true時,一旦發生錯誤,在錯誤發生後的資料就不會繼續寫入。如果希望它能夠忽略掉這個錯誤,繼續寫入後面的資料,則可以把orderer設成false
db.hobbies.insertMany(
  [
    {
      _id: 'hiking',
      name: 'hiking',
    },

    {
      _id: 'yoga',
      name: 'yoga',
    },
    {
      _id: 'cooking',
      name: 'cooking',
    },
  ],
  { ordered: false },
);
Write Concern
Write Concern 的目的是確保 MongoDB 對寫操作的確認程度(acknowledgement level)。它允許用戶指定在寫操作被認為成功之前,MongoDB 必須接收到的確認數量。這可以確保數據的耐久性(durability)和一致性(availability),例如在單一伺服器、複寫集(replica sets)或分片集群(shared clusters)�中,提供不同程度的數據安全保障。較高的 Write Concern 能增加數據安全性,但可能會降低效能。
如同這張圖所示:
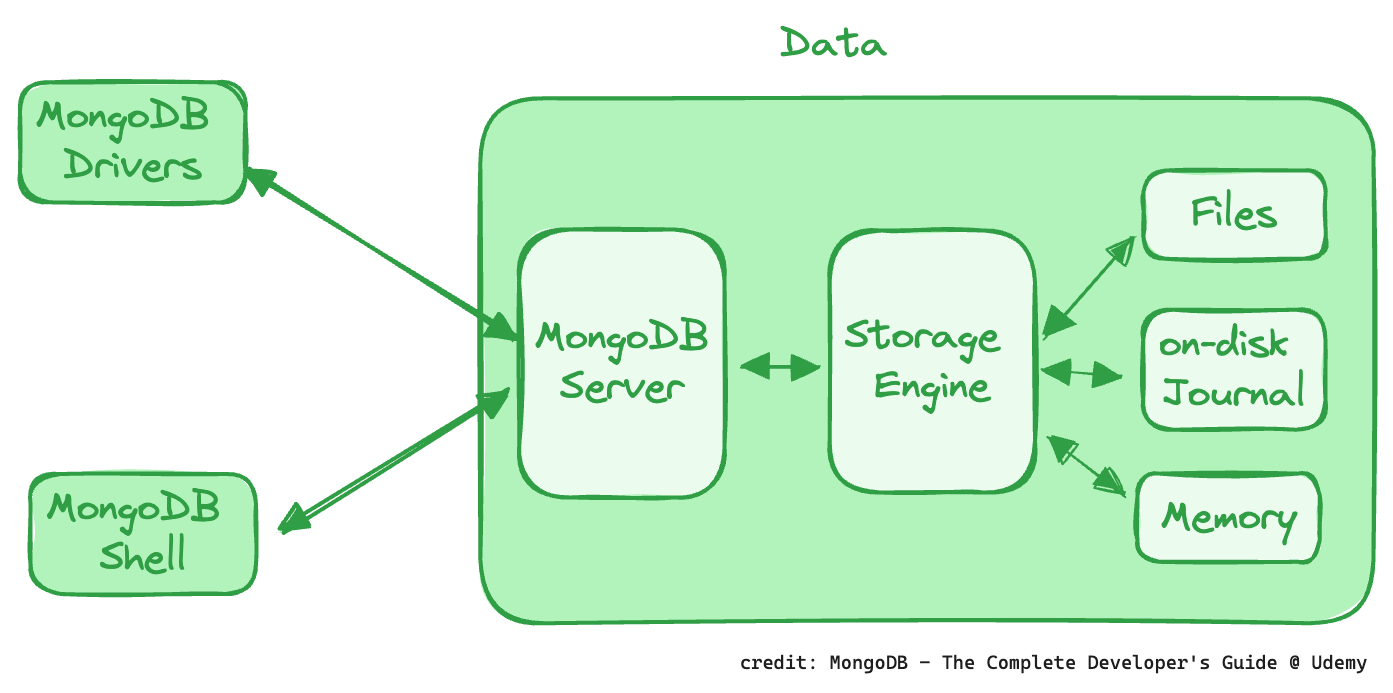
MongoDB 在把資料寫進資料庫時,為了效能,實際上還有一個 Memory 存在;另外,需要的話,還可以寫一個實體的 Journal 檔,如此,一旦資料庫發生錯誤,只要有寫了 Journal 檔,還是可以把沒有寫入到資料庫中的資料復原。
透過 Write Concern 就可以設定這個行為:
{ w: <value>, j: <boolean>, wtimeout: <number> }
w- Durability:預設的情況下是
w: majority,表示大部分的 replica set 需要確認完成寫的東西後,才算成功。當資料是不可遺失的話,可以設定更高的 write concerns。 - Performance:如果你的使用情境非常重視寫入的效能,並且能夠容忍可能的資料流失,則可以把 write concern 設成
w: 1或w: 0。
- Durability:預設的情況下是
j:用於指定寫操作在資料寫入日誌(journal)後才會得到確認(acknowledge)。日誌是一種預寫日誌(write-ahead log),用來確保在錯誤發生時數據的完整性- 當
j是true時,表示 MongoDB 確保寫操作只有在數據成功寫入日誌(on-disk journal)後才會被確認,但相對的會犧牲效能
- 當
wtimeout:單位是 ms,目的是避免w設定的節點無限期等待
當使用情境不同的,例如在 Standalone 或 Replica Sets 時,w 和 j 會有不同的行為,詳細可以參考官方文件的說明。
不等待資料是否寫進 memory 中:
db.hobbies.insertOne('writing', { writeConcern: { w: 1, j: true, wtimeout: 200 } });
// {
//   acknowledged: false,
//   insertedId: ObjectId('66782454b1ed5d2a0fbe0dce')
// }
READ
keywords: find(), findOne(), count(), distinct()
/**
 * Read
 * db.collection.find()
 * db.collection.findOne()
 * db.collection.countDocuments()
 * db.collection.estimatedDocumentCount()
 * db.collection.distinct()
 */
db.todos.countDocuments(); // todos 中有多少 documents
db.todos.estimatedDocumentCount();

db.todos.find(); // 檢視某一 Collections 內所有的 documents
db.todos.find({ title: 'Create new Node course' }); // 檢視特定 document
db.todos.find({ _id: ObjectId('5c0beffdeb866557d13c0ef8') }); // 檢視特定 document

db.todos.find().pretty(); // 以格式化的方式列出 document
db.todos.find().limit(2); // 指列出前兩筆 document
db.todos.find().skip(2); // 忽略前兩筆資料
db.todos.find().sort({ title: 1 }); // 排序資料,1 是 ascending,-1 是 descending
db.todos.find().toArray();
db.todos.find().forEach();
Basic Query
Query Embedded Documents (Nested Object)
可以在 key 的地方使用 "x.y.z",就可以搜尋 embedded documents(nested objects)
db.todos.find({ 'status.description': 'on-time' });
db.movies.find({ 'rating.average': { $gte: 6.7 } });
Query Elements in an Array
如果要找的是 array 中的元素:
// Query 尋找陣列中的資料
// 假設 hobbies 是 array,我們想要找 hobbies 中包含 'sports' 的 document
// hobbies: ['sports', 'video game']
db.todos.find({ hobbies: 'sports' });
上面的 query 會找到在陣列中「包含」有該元素的資料,如果你想要找到是在該陣列中「只有那個元素」,則要使用 hobbies: ["sports"]。
如果 array 中的元素是 array of object,例如:
#    history: [
#      { disease: 'headache', treatment: 'aspirin' },
#      { disease: 'fever', treatment: 'ibuprofen' }
#    ]
如果我們希望找到 history 中有 disease 是 'headache' 的元素,可以使用:
db.patientData.find({ 'history.disease': 'headache' });
當如果你希望找到的是 history 中有完全相同的物件,則是使用:
// 可以用類似的方式來 query
db.patientData.find({ history: { disease: 'headache', treatment: 'aspirin' } });
Array Query Operator
$elemMatch
假設想要找出在 hobbies array 中,有 { title: 'Sports' },且 { frequency: value } 的 value 大於等於 3 的元素。
如果我們使用 $and 並不能得到我們想要的結果:
db.users.find({
// 這個 query 會找到 hobbies 陣列中有 title 為 Sports 且 frequency 大於等於 3 �的 documents
// 但不表示這個條件會在同一個 element 中同時被滿足,舉例來說,以下的文件就會被找到
// { hobbies: [{ title: 'Sports', frequency: 2}, { title: 'Yoga', frequency: 3 }] }
$and: [{ 'hobbies.title': 'Sports' }, { 'hobbies.frequency': { $gte: 3 } }],
});
正確的做法是要用 $elemMatch:
// 這樣才能正確找出 hobbies 陣列中,同時 title 是 Sports frequency 大於等於 3 的 documents
db.users.find({
  hobbies: { $elemMatch: { title: 'Sports', frequency: { $gte: 3 } } },
});
Query Operator
Comparison Operators
keywords: $eq, $gt, $gte, $lt, $lte, $ne, $in, $nin
// $eq: equal(預設沒帶 operator 的話就是這個)
// $gt: greater than
// $gte: greater than or equal to
// $lt: less than
// $lte: less than or equal to
// $ne: not equal
db.todos.find({ priority: { $gt: 2 } });
db.movies.find({ runtime: { $ne: 60 } });
db.movies.find({ runtime: { $in: [] } });

// $in 和 $nin operator
db.todos.find({ status: { $in: ['A', 'D'] } }); // status 的值是「'A' 或 'D'」都符合
db.movies.find({ runtime: { $in: [30, 42] } }); // runtime 的值是「30 或 42」都符合
db.movies.find({ runtime: { $nin: [30, 42] } }); // runtime 的值不是「30 或 42」都符合
Logical Operators
keywords: $or, $nor, $and
// $or operator
db.todos.find({
  $or: [{ title: 'Create new Node course' }, { title: 'Learn NodeJS' }],
});

db.movies.find({
  $or: [{ 'rating.average': { $lt: 5 } }, { 'rating.average': { $gt: 9.3 } }],
});

// $nor operator:表示不是 xxx 也不是 xxx
db.movies.find({
  $nor: [{ 'rating.average': { $lt: 5 } }, { 'rating.average': { $gt: 9.3 } }],
});

// $and operator,預設不指定就是 $and
db.movies.find({
  $and: [{ 'rating.average': { $gt: 9 } }, { genres: 'Drama' }],
});
// 等同於
db.movies.find({ 'rating.average': { $gt: 9 }, genres: 'Drama' });
之所以會需要 $and operator,是因為在 JavaScript 中,物件中不能有重複的 key。舉例來說,如果我們想要找出 genres 這個 array 中同時有 Horror 和 Drama 這兩個 elements 的:
// ❌ JavaScript 並不能這樣寫,因為當物件中有相同的 key,後面的會改掉前面的
db.movies.find({ genres: 'Horror', genres: 'Drama' });

// 所以上面的寫法實際上等同於
db.movies.find({ genres: 'Drama' });

// 如果要達到原本的目的,就要用 $and operator
db.movies.find({ $and: [{ genres: 'Horror' }, { genres: 'Drama' }] });
但如果是在 Golang 的 mongo driver 中,不用 $and 即可��可以達到原本的目的:
filter := bson.D{{"genres", "Drama"}, {"genres", "Horror"}}
Element Operators
keywords: $type, $exist
// 找出所有 age 是 null 的資料
db.users.find({ age: { $type: 'null' } });

// 找出所有 age 欄位存在的資料(欄位值是 null 也算存在)
db.users.find({ age: { $exists: true } });
Projection:SELECT fields
針對物件
// Projection(類似 SQL 的 SELECT,只選出有需要用到的欄位,確保效能)

db.todos.find({}, { title: true }); // 會顯示 _id 和 title
db.todos.find({}, { _id: false, title: true }); // 只會顯示 title
db.todos.find({}, { title: false }); // 除了 title 其他都會顯示
db.todos.find({}, { title: true, tag: false }); // 錯誤的語法
針對 Array
// 找出 color 陣列中包含 "black" 或 "white" 的 product
// 在輸出的結果中,只要顯示 color 陣列中第一個符合查詢的元素
db.products.find({ color: { $in: ['black', 'white'] } }, { 'color.$': true });

// 使用 slice 可以指定只顯示陣列中的前幾個元素
// 找出所有 price > 299 的 documents color 陣列中的前兩個元素
db.products.find({ price: { $gt: 299 } }, { color: { $slice: 2 } });
Cursor
當我們使用 find() 時,MongoDB 實際上會回給我們一個 cursor,這是基於效能考量,因為我們並不一定需要所有 find 到的東西,如果一次全部拉出��來,都放到記憶體中,會造成很多資源的浪費。
在 Mongo Shell 中,預設會以 batch 的方式,一次顯示 20 筆資料。如果有需要的話,可以透過 DBQuery.shellBatchSize 修改。
// 在 mongosh 中,如果把 find() 回傳的 cursor 保存起來的話
// 它就不會自動 iterate,而要手動 iterate
var cursor = db.users.find();

cursor.hasNext();
cursor.next();
printjson(cursor);

myCursor.objsLeftInBatch();
sort
// 1: ASC
// -1: DESC
db.products.find().sort({ 'spec.ram': -1 });

// 先用 RAM 排序,再用 price 排序
db.products.find().sort({ 'spec.ram': -1, price: 1 });
skip and limit
db.products.find().skip(2).limit(3);
UPDATE
/**
 * Update
 * db.collection.updateOne({}, {}, {upsert: false})
 * db.collection.updateMany({}, {}, {upsert: false})
 * 第一個參數的物件稱作 update filter,類似 find,找出符合條件的「documents」
 * 第二個參數的物件稱作 update action,透過 $set 可以更新內容
 * 第三個參數的物件稱作 options,透過 upsert 可以新增不存在的資料,預設是 false
 */

db.users.updateMany(
  { 'hobbies.title': 'Sports' },
  { $set: { isSporty: true } },
  { upsert: true }
);
Upsert 的意思就是,如果「找不到」就「建立新的」。
Field Update Operator
$set
db.todos.updateOne(
  { _id: ObjectId('5c0beffdeb866557d13c0ef8') },

  // $set 會添加新的、或覆蓋原有欄位
  { $set: { tag: 'course', title: 'Learn Node JS' } },
);
$inc:increment
db.users.updateOne(
  { name: 'Manuel' },
  {
    // 把 age 這個欄位的 value +2
    // 如果要 decrement 就用負數,例如 -2
    $inc: { age: 2 },

    // 可以同時搭配 $set 使用
    $set: { isSporty: true },
  },
);
$min, $max
db.users.updateOne(
  { name: 'Manuel' },
  {
    // 如果欄位 age 的值大於 30,則將 age 欄位的值設定為 30
    // 如果欄位 age 的值小於等於 30,則不更新
    $min: {
      age: 30,
    },
  },
);
$mul
db.users.updateOne(
  { name: 'Manuel' },
  {
    // 將欄位 age 的值 * 1.1
    $mul: {
      age: 1.1,
    },
  },
);
$unset:把欄位移除
如果想要移除某個欄位,需要使用 $unset operator:
// 如果 age 的欄位是 null,則移除這個欄位
db.users.updateMany({ age: { $type: 'null' } }, { $unset: { age: '' } });
$rename:修改欄位名稱
db.users.updateMany(
  {},
  // 把所有名為 age 的欄位名稱都改成 totalAge
  { $rename: { age: 'totalAge' } },
);
Array Update Operator
array.$:更新陣列中的 firstMatch
用 $ 來指稱 match 到的「第一個」(first match)陣列元素中的位置(index/position)。
舉例來說,我們想要找出 hobbies 陣列中,title 為 Sports,且 frequency 大於等於 3 的 documents。它的 query 會像這樣:
db.users.find({
  hobbies: { $elemMatch: { title: 'Sports', frequency: { $gte: 3 } } },
});
針對被找出來的陣列元素,我們想要「加上一個新的 isHealth 的欄位」,這時候可以這樣寫:
db.users.updateMany(
  {
    hobbies: { $elemMatch: { title: 'Sports', frequency: { $gte: 3 } } },
  },
  {
    // 在符合條件的 hobbies 陣列元素中,添加一個 isHealth 欄位,並設定為 true
    $set: { 'hobbies.$.isHealth': true },
  },
);

db.users.updateMany(
  {
    hobbies: { $elemMatch: { title: 'Sports', frequency: { $gte: 3 } } },
  },
  {
    // 以新的物件,把符合條件的陣列元素取代掉
    $set: { 'hobbies.$': { title: 'Running', frequency: 4 } },
  },
);
$[]:更新陣列中的所有元素
// 找出所有 age 存在的 documents
// 接著把這些 documents 中 hobbies 陣列裡,元素中的 frequency 都加 1
db.users.updateMany({ age: { $exists: true } }, { $inc: { 'hobbies.$[].frequency': 1 } });
$[identifier]:更新陣列中符合條件的元素
db.users.updateMany(
  // STEP 1. 找出所有符合 age < 40 的 documents
  {
    age: { $lt: 40 },
  },
  // STEP 3. 把符合 arrayFilters 的元素中的 frequency 都乘以 10
  {
    $mul: {
      // element 變數名稱可以自己取,表示的是符合 filter 的元素
      'hobbies.$[element].frequency': 10,
    },
  },
  // STEP 2. 找出 hobbies 陣列中,frequency 大於 5 的元素
  {
    // 定義要如何 filter hobbies 這個 array
    arrayFilters: [{ 'element.frequency': { $gt: 5 } }],
  },
);
$push, $each, $sort, $addToSet:添加陣列元素
// 找出 name 為 Max 的 document
// 針對這些 documents,把 hobbies 陣列中多加入一個元素
db.users.updateOne({ name: 'Max' }, { $push: { hobbies: { title: 'TRX', frequency: 3 } } });
使用 $push 可以把一個元素加到陣列中,但如果是希望一次添加多個元素,則可以搭配 $each 使用:
db.users.updateOne(
  { name: 'Max' },
  {
    $push: {
      hobbies: {
        // 把這些元素都推進 hobbies 陣列中
        $each: [
          { title: 'Rails', frequency: 5 },
          { title: 'Ruby', frequency: 3 },
        ],
      },
    },
  },
);
在更新陣列時,如果希望也能重新排序該陣列,可以搭配使用 $sort:
db.users.updateOne(
  { name: 'Anna' },
  {
    $push: {
      hobbies: {
        $each: [
          { title: 'Rails', frequency: 5 },
          { title: 'Ruby', frequency: 3 },
        ],
        // 更新 hobbies array 後,再依照 frequency 降冪排序
        $sort: { frequency: -1 },
      },
    },
  },
);
$addToSet 和 $push 的作用很類似,唯一的差別是,使用 $addToSet 是,如果該元素已經存在陣列中,則不會再添加進入;但如果是 $push 的話,可以重複添加已經存在的元素:
// 如果 hobbies 中已經存在 'RxJs' 這個元素,則不會再重複添加到陣列中
db.users.updateOne({ name: 'Chris' }, { $addToSet: { hobbies: 'RxJs' } });
$pull, $pop:移除陣列中的元素
使用 $pull 過濾出符合條件的陣列元素並移除:
// 找出 name 為 Anna 的 document
// 在這個 document 中,移除 hobbies 陣列中,title 為 Rails 的元素
db.users.updateMany({ name: 'Anna' }, { $pull: { hobbies: { title: 'Rails' } } });

// 移除所有 documents 中,hobbies 陣列裡,title 為 Ruby 的元素
db.users.updateMany({}, { $pull: { hobbies: { title: 'Ruby' } } });
使用 $pop 移除陣列中第一個或最後一個元素:
// 找出 name 為 Max 的 document
// 1:把 hobbies 陣列中的最後一個元素移除
// -1:把 hobbies 陣列中的第一個元素移除
db.users.updateOne({ name: 'Max' }, { $pop: { hobbies: 1 } });
DELETE
##
# Destroy
# db.collection.deleteOne()
# db.collection.deleteMany()
##
db.todos.deleteOne({ tags: 'course' })
db.todos.deleteMany({ tags: 'course' })    # 刪除 tags 為 'course' 的 documents
db.todos.deleteMany({})           # 刪除 todos 中所有的 documents
db指我們所在的資料庫post是 collection ,會在insertdocument 之後被建立{title: 'Hello Mongo'}是所見建立的 document- 過去使用的
insert(),update()寫法目前處於 deprecated 狀態,建議不要使用。
- MongoDB CRUD Operations @ MongoDB Manual
- Insert Documents @ MongoDB CRUD Operations
- Query Documents @ MongoDB CRUD Operations
- Update Documents @ MongoDB CRUD Operations
- Delete Documents @ MongoDB CRUD Operations
- Views @ Introduction to MongoDB > Database and Collections
其他指令
建立有資料型別驗證(Document Validation)的 Collection
可用的 bsonType 可以參考這裡的官方文件。
關於 schema validation 可以這裡的官方文件。
預設的情況下,MongoDB 不會對 Document 做任何資料型別的驗證,但如果有需要,可以在建立 Collection 的時候,利用 createCollection 就把 Collection 中 Document 中的欄位名稱和資料型別定義好:
db.createCollection('users', {
  // 定義 users 這個 collection 的 validation rules
  validator: {
    $jsonSchema: {
      bsonType: 'object',
      // 這個 object 中有哪些欄位是必填的
      required: ['email', 'age', 'address', 'habits'],

      // 定義每個欄位的型別
      properties: {
        email: {
          bsonType: 'string',
          description: 'must be a string and is required',
        },
        age: {
          bsonType: 'int',
          description: 'must be a integer and is required',
        },
        // embedded / nested document
        address: {
          bsonType: 'object',
          required: ['country', 'addressLine'],
          properties: {
            country: {
              bsonType: 'objectId',
              description: 'must be objectId and is required',
            },
            addressLine: {
              bsonType: 'string',
              description: 'must be string and is required',
            },
          },
        },
        // array
        habits: {
          bsonType: 'array',
          description: 'must be an array and is required',
          // 定義 array 裡的 items 的型別
          items: {
            bsonType: 'string',
            description: 'must be a string and is required',
          },
        },
      },
    },
  },
});
當有不符合 validation rules 的 document 要存進 mongoDB 時,就會噴錯。
匯入資料(載入 seed 檔)
如果想要把某個 JSON 檔匯入到 Database 的某個 Collection 中,可以使用 mongoimport:
# --jsonArray,如果 import 的檔案中包含多個 documents,則要加上這個 option
# --drop,如果 collection 已經存在,先移除舊、建立新的後再匯入
$ mongoimport example.json -d [databaseName] -c [collectionName] --jsonArray --drop
索引相關
db.todos.getIndexes(); // 取得 todos 這個 document 的索引
db.todos.createIndex({ title: 1 }); // 建立索引,1 表示越來越大,2 表示越來越小
db.todos.dropIndex('title_1'); // 刪除索引
Relations
在 MongoDB 中,可以使用 embedded / nested documents 或 reference 的方式來將不同的 collections 建立關聯,至於要選擇哪個方式,可以思考的角度包括:
| 需求 | embedded / nested documents | references |
|---|---|---|
| 資料分析 | X(使用 embedded 的話,後續不好將所有 embedded 的 documents 拉出來做資料分析) | O(比較好做後續的資料分析,例如,想要看某一個產品的銷量) |
| 經常會需要同時用到的資料 | O(使用 embedded 的話,關聯的資料會直接拉出,不需要再另外 query,但相對來說,資料的傳輸量會比較大) | X(需要另外 query,但如果不需要另一個表的資料,則可以節省流量) |
| 需要同時更新參照到的資料 | X(每個 embedded 中的 documents 都是獨立的,沒辦法一次全部更新) | O(因為使用 reference,所以改 reference 的資料來源就可以一併更改所有使用到的地方) |
| 需要建立 snapshot | O(和上一列的情況相反,如果我希望儲存的資料後續不會因為 reference 的內容改動而被修改,而是希望保留一開始寫入的值,例如商品快照) | X |
| 避免資料重複 | X(因為 embedded 中的資料都是彼此獨立的,所以容易出現重複的資料,例如不同 Order 中的 Product 都是一樣的,就會重複同樣的內容好幾次) | O(減少重複的資料,而是全部都 reference 到同一個資料來源) |
| 資料量很大 | X(因為 documents 本身有 16MB 的限制,且最多只能 100 層,所以如果資料量很大時,全部塞在同一個 nested document 中並不是很好的做法) | O(只存 reference,所以不太會碰到 document 的容量上限) |
One To One Relations
在 MongoDB 中,如果是一對一的關係,通常可以用 Embedded/Nested Documents 的方式完成就好。
舉例來說,每個 User 都會有一個 Address,可以直接把 Address 以 Embedded Documents 的方式保存起來:
db.users.insertOne({
  name: 'Aaron',
  age: 35,
  address: { country: 'Taiwan', city: 'Taipei' },
});
但有些時候可能有資料分析的需求,例如,希望知道居住在不同城市的會員人數,這時候就可以用類似關聯式資料庫的方式,把 user_id 保存在 Address 這個 collection 中(Address belongs to User):
db.users.insertOne({ name: 'Aaron', age: 35 });
// {
//   acknowledged: true,
//   insertedId: ObjectId('666dc2e480de2f9394703a21')
// }

db.addresses.insertOne({
  country: 'Taiwan',
  city: 'Taipei',
  user_id: ObjectId('666dc2e480de2f9394703a21'),
});
當要 Query 某個 User 的 Address 時,就可以使用:
const userId = db.users.findOne({ name: 'Aaron' })._id;
db.addresses.findOne({ user_id: userId });
One to Many Relationship
和 One to One Relationship 類似,如果要做 One to Many Relationships 的話,一樣可以使用 embedded documents 或 reference 的方式,選擇那種端看應用程式的需求。
舉例來說,如果是類似 Facebook 中��一個 Post 底下會有很多不同 comments 的情況,如果我們希望每次拿到 Post 的時候,連帶也把底下的 comments 一併拿出來,同時,如果我們有沒有單獨需要分析 comments 的需求的話,這時候就可以使用 embedded documents。
然而,如果你不希望在拿 Post 的時候,就一併把所有的 comments 也同時取出,而是當這則貼文被點擊時才去 fetch 對應的 comments;又或者,你發現使用 embedded documents 有可能有機會超過 document 最多 16MB 的限制,這時候則應該考慮使用 reference 的做法,也就是只存用來 reference 用的 ObjectId。
Many to Many Relationship
在 MongoDB 中 Many to Many 的關聯一樣可以透過 embedded documents 或 reference 來達到。
如果資料是需要連動修改的,這種就會適合用 reference,例如 Author 和 Book 的關係。一個 Author 可以有出版很多書,一本書也可以同時擁有多個作者。一般來說,作者的資訊一旦更新,我們會希望更新到所有有參照到這個作者的地方,這種就適合用 reference。
另一個例子是一個 Orders 中有很多 Products,一個 Products 也可以屬於很多 Orders。如果使用 Embedded 的話,即使 Product 更新後,Order 裡的 Product 並不會被更新到,它比較像是建立了一個商品快照(snapshot)的概念,所以如果 Product 名稱有修改,Order 中的 Product 名稱並不會被更新。
除此之外,使用 Embedded 較容易出現重複的資料,即使不同 Order 中,買的是相同的產品,還是會重複複製好幾份一樣的資料,例如:
[
  {
    _id: ObjectId('6671a57466cca4d69fd8627e'),
    orderNumber: '111',
    products: [
      {
        title: 'Learn MongoDB',
        price: 100,
        quantity: 3,
      },
    ],
  },
  {
    _id: ObjectId('6671a54666cca4d69fd8627d'),
    orderNumber: '222',
    products: [
      {
        title: 'Learn MongoDB',
        price: 100,
        quantity: 1,
      },
    ],
  },
];
但如果使用 reference 則會是:
[
  {
    _id: ObjectId('6671a57466cca4d69fd8627e'),
    orderNumber: '111',
    products: [
      {
        productId: ObjectId('6671a5b266cca4d69fd8627f'),
        quantity: 3,
      },
    ],
  },
  {
    _id: ObjectId('6671a54666cca4d69fd8627d'),
    orderNumber: '222',
    products: [
      {
        productId: ObjectId('6671a5b266cca4d69fd8627f'),
        quantity: 1,
      },
    ],
  },
];
Aggregation Framework
Aggregation Reference
$lookup:把不同的 collection join 起來
// 目標是透過 book.user_id 拿到 user 的資料放進去
// 從 books 出發
db.books.aggregate([
  {
    $lookup: {
      from: 'users', // 要 join 的 collection
      localField: 'user_id', // input document 對應的欄位
      foreignField: '_id', // 對應到 from collection 的欄位
      as: 'user_info', // 輸出陣列的欄位名稱
    },
  },
  // 把 user_info 陣列展開
  { $unwind: '$user_info' },
  {
    // 建立想要添加的欄位
    $addFields: {
      user_name: '$user_info.name',
      user_age: '$user_info.age',
    },
  },
  {
    // 移除用不到的欄位
    $project: {
      user_info: 0,
    },
  },
]);
$group
count
如果沒有要分組可以用:
_id: null
計算 documents 數量可以用:
total_count: { $sum: 1 }total_count: { $count: {} }
// 計算 documents 的數量
db.sales.aggregate([
  {
    $group: {
      // 不進行分組
      _id: null,
      // 建立一個新的 total_count 欄位,value 是 documents 數量
      total_count: { $count: {} }, // 也可以寫這樣 total_count: { $sum: 1 }
    },
  },
  { $project: { _id: 0 } }
]);
如果要取的數量,MongoDB 提供一個 $count 的 aggregation stage 可以直接使用,上面的語法可以直接簡化成:
db.sales.aggregate([
  {
    // 建立一個 total_count 的欄位
    $count: "total_count"
  }
])
group by + count
db.sales.aggregate([
  {
    $group: {
      // 根據 $item 這個欄位進行分組
      _id: '$item',
      // 建立一個新的 count 欄位,value 是計算每一組的 documents 數量
      total_count: { $count: {} }, // 也可以寫這樣 count: { $sum: 1 }
    },
  },
]);
group by + calculation(aggregation)
db.sales.aggregate([
  {
    $group: {
      // 根據 $item 這個欄位進行分組
      _id: '$item',
      // 建立一個新的 totalSaleAmount 欄位,
      // value 是 sum($price * $quantity)
      totalSaleAmount: {
        $sum: { $multiply: ['$price', '$quantity'] },
      },
    },
  },
]);
Handle Date
db.sales.aggregate([
  {
    // query 對應的時間區間
    $match: {
      "date": {
        $gte: new ISODate('2014-01-01'),
        $lt: new ISODate('2015-01-01'),
      },
    },
  },
  {
    $group: {
      // Group By:用時間分組
      _id: {
        $dateToString: { format: '%Y-%m-%d', date: '$date' }
      },

      // 計算 aggregate 後的資料
      totalSaleAmount: { $sum: { $multiply: ['$price', '$quantity'] } },
      averageQuantity: { $avg: '$quantity' },
      count: { $sum: 1 },
    },
  },
  {
    $sort: { totalSaleAmount: -1 },
  },
]);
$match:篩選資料
db.sales.aggregate([
  {
    $match: {
      created_at: {
        $gte: ISODate("2025-02-18T14:00:00Z"),
        $lt: ISODate("2025-02-18T15:00:00Z")
      },
      status: 'SUCCESS',
    }
  }
])
$count:資料筆數
db.sales.aggregate([
  {
    // 建立一個 total_count 的欄位
    $count: "total_count"
  }
])
移除特定欄位
# 移除 sales 這個 collection 中的 field_foo 這個欄位
db.sales.aggregate([
  {
    $unset: ["field_foo"]
  },
  {
    $merge: {
      into: "sales",
      whenMatched: "replace",
      whenNotMatched: "fail"
    }
  }
])
Transactions
// https://www.mongodb.com/docs/manual/core/transactions-in-applications/#mongosh-example

// Start a session
session = db.getMongo().startSession();

userCollection = session.getDatabase('playground').users;
postCollection = session.getDatabase('playground').posts;

// Start a transaction
session.startTransaction();

// Operation inside the transaction
try {
  userCollection.deleteOne({ _id: ObjectId('669299597a1003afb1b65bf6') });
  postCollection.deleteMany({
    author_id: ObjectId('669299597a1003afb1b65bf6'),
  });
} catch (err) {
  // Abort transaction on error
  session.abortTransaction();
  throw error;
}

// Commit the transaction
session.commitTransaction();

// End a session
session.endSession();
Indexes
建立 Index 能夠加快資料檢索的速度,讀取的效能會提升;但相對的,當資料在寫入時,因為會需要更新 index,所以寫入的效能會變差。
檢視效能
// 使用 explain() 可以檢視這個 query 的資訊
db.contacts.explain().find(/* ... */);

// 搭配 `executionStats` 可以檢視效能指標
// executionTimeMillis:花了多久時間
// totalDocsExamined:總共掃描了多少文件
// nReturned:回傳多少筆數的資料
db.contacts.explain('executionStats').find(/* ... */);

db.contacts.explain('allPlansExecution').find(/* ... */);
使用 db.<collection>.explain().<xxx>() 可以檢視這個 query 的:
queryPlannerwinningPlan:最終使用那個 Plan 來做搜尋IXSCAN:表示使用 index 搜尋COLLSCAN:表示需要完整掃描這個 collection
rejectedPlans
executionStatsexecutionTimeMillis:這個 query 執行了多久totalKeysExamined:使用了幾個有建立過索引(index)的 keytotalDocsExamined:總共檢查了多少 documentsnReturned::最終回傳了多少 documents
透過 executionStats 可以判斷效能好不好:
- 當
totalKeysExamined、totalDocsExamined和nReturned的值越接近,表示效能越好 totalDocsExamined越小越好,表示幾乎不要回去看原本的 documents
// 同樣的 Query,還沒建立 index 前
{
   nReturned: 1,
    executionTimeMillis: 11,
    totalKeysExamined: 0,
    totalDocsExamined: 5000,  // 需要檢查所有 documents
}
// 同樣的 Query,建立 index 後
{
    nReturned: 1,
    executionTimeMillis: 3,
    totalKeysExamined: 1,
    totalDocsExamined: 1,
}
covered query 指的是,光靠 index 就可以取得 query 所需的所有資料,而不需要回頭檢視 document,這時候 totalDocsExamined 會是 0。
操作索引
db.collection.createIndex() @ MongoDB Manual / Reference / mongosh / Collection Methods
// 檢視現有索引
db.collection.getIndexes();

// 建立索引
db.collection.createIndex(
  {
    /* index key */
    '<fieldName>': 1, // 1 for ascending, -1 for descending

    /* text index */
    '<fieldName>': 'text',
  },
  {
    // create a name for the index
    name: 'indexName',

    // Unique index
    unique: true,

    // TTL index
    expireAfterSeconds: 5,

    // 只有特定欄位的特定值要建立 index
    partialFilterExpression: {
      email: { $exist: true },
      gender: 'male',
    },

    // 預設的情況下,createIndex 會在 foreground 執行
    // 在 foreground 執行的好處是速度快,但它會 block collection 的存取。
    // 如果是 production 環境要建立 index,我們不會想要 db 被 lock 住,導致使用者無法操作
    // 因此,如果是 production 的話,最好是以 background 的方式執行
    background: true,
  },
);

// 移除索引
db.collection.dropIndex('<indexName>');
db.collection.dropIndex({
  /* index key */
});
Compound Indexes
建立 compound indexes 時,物件中的順序是會有影響:
- 如果 age 放在前面,index 會是 "dob.age_1_gender_1" 組成,可以想像成先用 age 排序後,再用 gender 排序的概念
- 這時候如果我們用
age做 filter,一樣可以提升檢索速度;但如果用gender做 filter,則不會有幫助
// 物件中的順序會有影響
db.collection.createIndex({ 'dob.age': 1, gender: 1 });
Partial Filter Expression:希望 unique 但值有可能是 null
如果把某個欄位設成 unique,但這個欄位值有可能是 null 時,預設來說,是沒辦法同時有多個該欄位時 null 的 documents 存在(違反 unique),所以如果要達到這個目的,可以搭配 partialFilterExpression 使用:
db.users.createIndex(
  { email: 1 },
  { unique: true, partialFilterExpression: { email: { $exists: true } } },
);
TTL Indexes:時間到自動刪除 document
有些資料如果我們不希望一直保存在 database 中,只是想要做一個暫存的操作,這時候可以使用 TTL(Time-To-Live ) indexes。TTL (Time-To-Live ) Indexes 只能建立在含有 date type 資訊的欄位上:
db.events.insertOne({
  type: 'click',
  createdAt: new Date(),
});

db.events.createIndex(
  {
    createdAt: 1,
  },
  {
    expireAfterSeconds: 5,
  },
);
Multi-key Indexes:陣列元素搜尋
當建立索引的欄位是「陣列」時,稱作 multi-key indexes。Mongo 會把所有 array 中的 elements 都加到索引中,這表示 multi-key indexes 會需要話更多的儲存空間,因此,當索引的對象時陣列時,需要特別留意是不是真的有這個需要。
Multi-key indexes 也可以用在 array of embedded documents,例如:
{
  devices: [{ brand: 'apple' }, { brand: 'samsung' }, { brand: 'xiaomi' }];
}
但要留意,如果索引是建在 devices,那麼 query {"devices.brand": "apple"} 時是不會有幫助的,而是要搜尋 { devices: { brand: 'apple' } } 才會有幫助。如果你希望一開始的 query 有幫助,則應該針對陣列中的 document 的特定欄位做索引:
db.products.createIndex({ devices: 1 });
db.products.find({ devices: { brand: 'apple' } });

db.products.createIndex({ 'devices.brand': 1 });
db.products.find({ 'devices.brand': 'apple' });
簡單來說,應該根據你 Query 會用到的語法來建立索引,如此才能確保這個 Index 是有幫助的。
Text Index:字串關鍵字搜尋
Text Indexes 是在 MongoDB 中專門針對字串建立 index 的方法,它的做法是把字串不相關的字或空白移除後,將剩下的單字做索引。可以想像,這也是一個會消耗較多儲存空間的 index,因此,每個 collection 只能有一個 text index:
// 建立 Text Index
db.contacts.createIndex({ <fieldName>: 'text' });

// 使用 Text Index
db.contacts.find({ $text: { $search: 'Islamabad' } });
精確比對
預設的情況下,Text Search 會有模糊比對,如果希望搜尋的結果是完全符合關鍵字,需要把關鍵字用雙引號刮起來:
db.contacts.find({ $text: { $search: '"Islamabad, Karachi"' } });
移除特定字詞
在欲搜尋的字串中使用 - 可以排除特定關鍵字,例如:
// 會搜尋 "new"、"street",但不能有 "oxfordshire"
db.contacts
  .find({ $text: { $search: 'new street -oxfordshire' } }, { score: { $meta: 'textScore' } })
  .sort({ score: -1 })
  .limit(2);
textScore
在使用 Text Search 的時候,Mongo 會為每個找到的字串提供一個 textScore,分數越高表示相似度越高。
我們可以把這個 textScore 取出來排序,就可以找到關聯性最高的字串:
db.contacts
  .find(
    { $text: { $search: 'Islamabad' } },
    // 使用 projects 建立一個 relevanceScore 欄位,值則是來自 "textScore"
    { relevanceScore: { $meta: 'textScore' } },
  )
  .sort({ relevanceScore: -1 });
Combined Text Index
由於每個 Collection 只能有一個 Text Index,如果想要針對多個欄位建立 Text Indexes,需要一次建立:
// 同時針對多個欄位建立 Text Index
db.contacts.createIndex({
  'location.street': 'text',
  'location.city': 'text',
  'location.state': 'text',
});
Numeric Data
- Model Monetary Data
- Data Types @ Docs Home / MongoDB Shell / Reference
// Int (int32)
db.users.insertOne({ age: NumberInt('29') });

// Long (int64)
db.users.insertOne({ assets: NumberLong('30000000000') });

// Double: decimal64, default number type in mongo shell
db.users.insertOne({ assets: 10 });

// NumberDecimal (Decimal128): decimal128, high precision double
db.users.insertOne({ assets: NumberDecimal('10.11') });
Number Types
int(int32)- 只能存整數,不能存小數
-2,147,483,648~2,147,483,647
long(int64)- 只能存整數,不能存小數
-9,223,372,036,854,775,808~9,223,372,036,854,775,807
double(64bit)- 能存小數(decimal),但小數的值是近似值,小數點會有精度的問題
decimal- High Precision Doubles (decimal 128)
- 能存小數,同時有更高的精度(34 decimal digits)
在 Mongo Shell 中,現在會根據要保存的數值大小,自動調整儲存的資料格式,例如,一般的整數會存成 int,太大整數或小數則會自動存成 double。但如果要存成 long 或 decimal 則要自己用對應的 constructor 建立。
檢查 Data Type
可以使用 $aggregate 的方式,來檢查某個值的 data type:
// 顯示 `price` 這個欄位的 data type 為何
db.sales.aggregate([
  {
    $project: {
      dataType: { $type: '$price' },
    },
  },
]);
也可以使用 $type 來 query 出特定型別的資料:
db.sales.find({
  price: {
    $type: 'int', // Int32
    $type: 'long', // Long (int64)
    $type: 'double', // Double (decimal64)
    $type: 'decimal', // Decimal128
  },
});
參考
- Getting Started @ MongoDB Manual > Introduction to MongoDB
- MongoDB Manual @ mongoDB
- The Mongo Shell