[DevOps] GitHub Actions 筆記
keywords: deploy, publish, release, github, CI, CD
Workflow syntax for GitHub Actions @ GitHub
References
可以用的環境變數
例如,如果想要拿到 git tag 或 branch,可以使用 github.ref_name(參考:How to get just the tag name?)
- Default environment variables @ Github
- github context @ Github
Notes
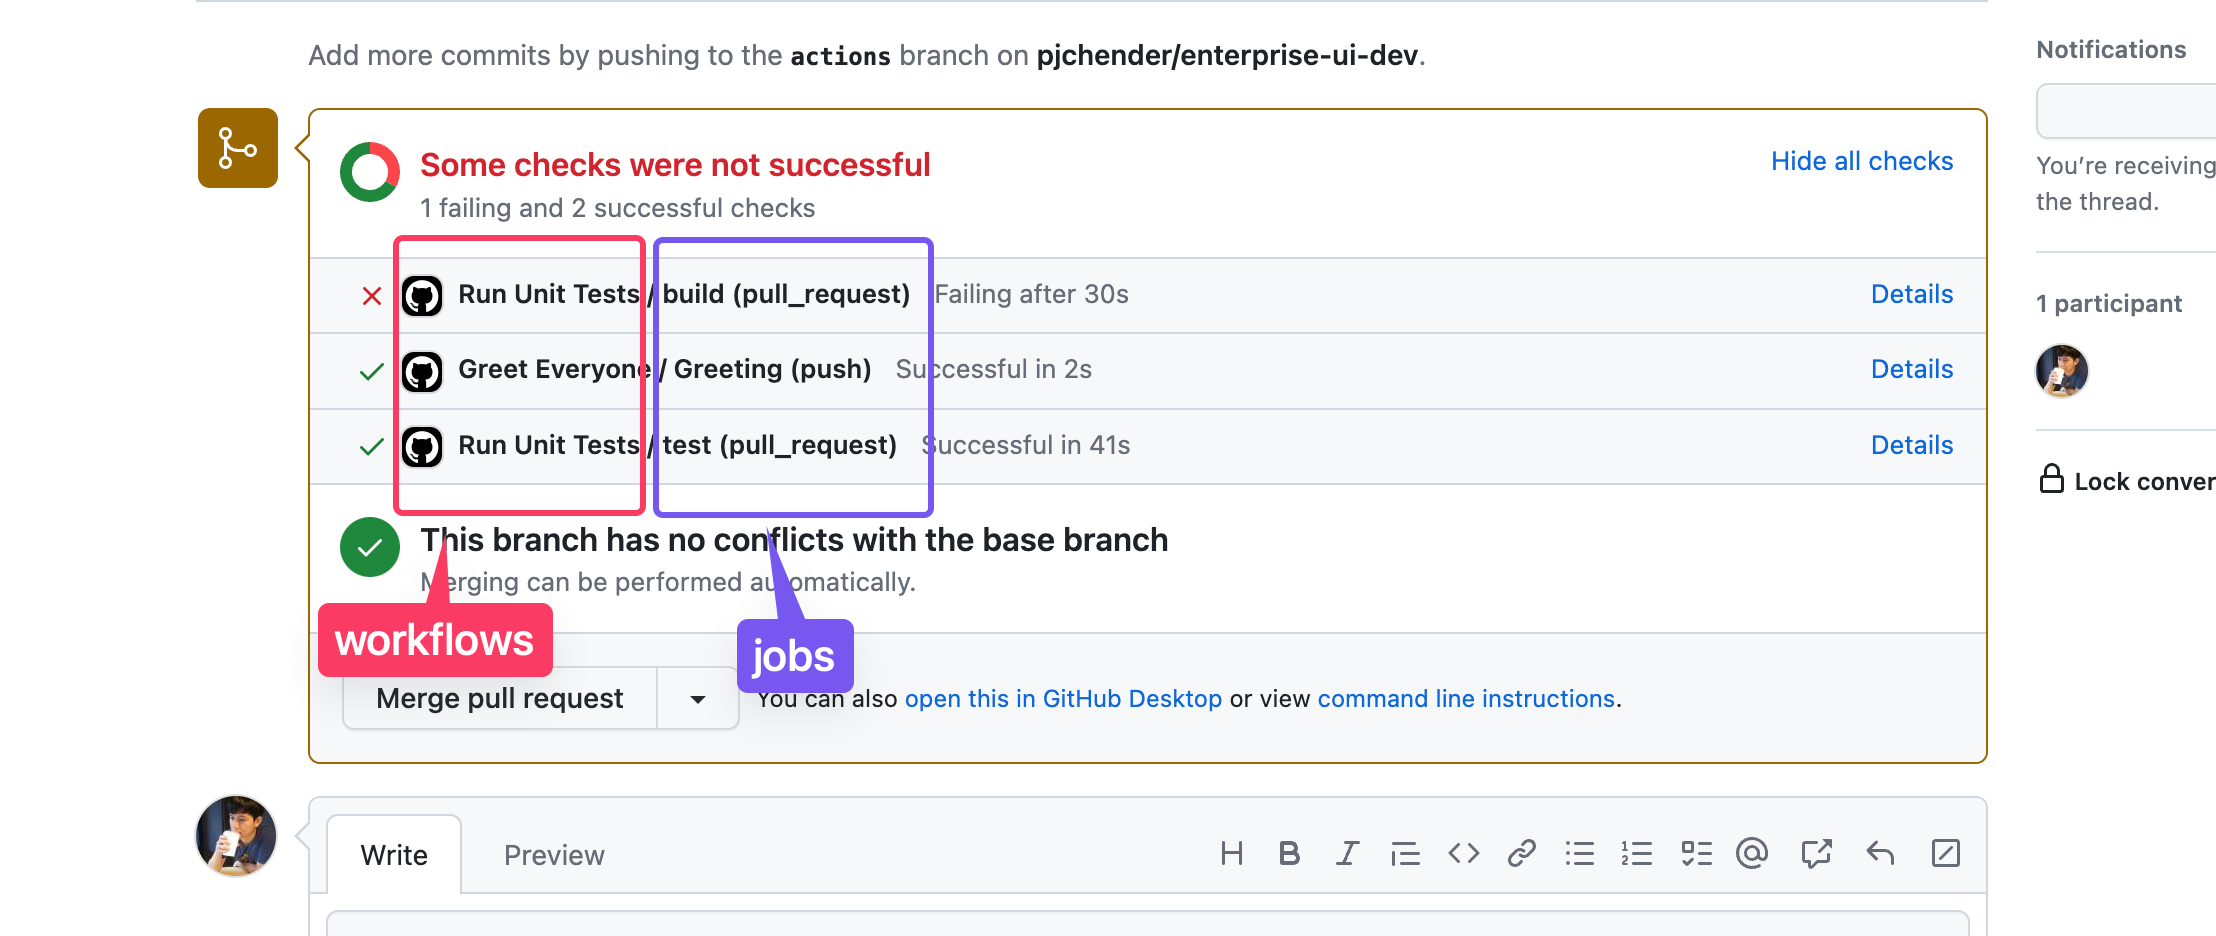
- 建立或修改 Github Actions 的時候,該 PR 就已經會用最新的 workflows 執行。
- workflow 是放在
.github/workflows/資料夾內的 YAML 檔 - 一個 Workflow 裡可以定義多個
jobs,每個 jobs 會平行(parallel)執行 - Job 裡面可以定義多個
steps,每個 steps 會依序(sequential)執行

GitHub Actions
About GitHub Actions @ Github
Github Actions 讓你可以在存放程式碼的地方自動化程式碼部署的工作流程(workflow),同時整合協作中的 pull requests 和 issues。你可以撰寫「個別的任務(individual task)」,也就是 Actions,並將這些 Actions 統整在一起變成「工作流程(workflow)」,工作流程就是在 repository 上進行設定後,可以透過自動化的方式打包(build)、測試、發佈、部署專案程式碼。
透過 GitHub Actions 將可以針對 repository 執行 end-to-end 的 CI(continuous integration)和 CD(continuous deployment)。
Workflows(工作流程)
Configuring a workflow @ Github
工作流程(Workflows)是針對 repository 進行設定,以此進行自動化的打包(build)、測試、發佈、部署專案程式碼。工作流程中至少需要包含一個工作項目(job),而工作項目中會包含一系列的步驟(step)來執行各別任務(tasks),這些個別的步驟(step)可以是執行指令或是 actions。
你需要透過 YAML 語法來設定工作流程,一個 repository 可以有一個以上的工作流程,你需要在專案根目錄中建立 .github/workflows 的資料夾,在這個資料夾中建立 .yaml 的檔案來儲存這些 workflows,一旦你成功觸發工作流程,將可以看到打包時的紀錄(build logs)、測試結果(tests results)、打包結果(artifacts)和執行工作流程時每一步驟的狀態(statuses)。
觸發 workflow
你可以設定在什麼情況下要觸發工作流程(workflow):
- Repository 上的事件,例如有人發送 commit、發佈 issue 或建立 pull request
- 定期的排程
- Github 外的事件,但透過
repository_dispatch來觸發 - 手動執行(
workflow_dispatch)
你也可以設定只有當某些分支、tag、路徑被觸發時才執行工作流程。
矩陣建置(build matrix)
透過設定矩陣建置(build matrix)可以在不同的作業系統、平台和語系環境下同時進行測試。
Checkout Action
checkout action 是一個標準化的 action,如果你的工作流程中有下列 actions 的話,則需要先執行 checkout action:
- 你的工作流程需要先複製出一份專案程式碼,例如針對專案進行打包、測試,或者使用 CI 時。
- 在你的工作流程中,至少有一個 action 是定義在同一個 repository 內(而非引用自外部公開的 repository),參考 Referencing actions in your workflow。
要使用標準的 checkout action 只需要在步驟中加入:
- uses: actions/checkout@v4
checkout @ Github Actions
Workflow 設定檔範例
Run Unit Tests example
# .github/workflows/continuous-integration-workflow.yml

# The name of the workflow which you can see when the action runs
name: Run unit tests

# This workflow is triggered on pushes to the repository.
on:
  push:
    branches: [main]
  pull_request:
    branches: [main]

# Jobs will run in parallel
jobs:
  run-unit-tests:
    # This job runs on Linux
    runs-on: ubuntu-latest

    # Steps run synchronously (one after the other)
    steps:
      # Retrieve the codebase on the ubuntu machine.
      # if the codebase isn't required, this step can be skipped.
      - uses: actions/checkout@v4
      - name: Setup Node
        uses: actions/setup-node@v4
        with:
          node-version: 16
          cache: 'npm'
      - run: npm ci
      - name: Run unit tests
        run: npm test
Greet Example
# .github/workflows/continuous-integration-workflow.yml

name: Greet Everyone
# This workflow is triggered on pushes to the repository.
on: [push]

jobs:
  build:
    # Job name is Greeting
    name: Greeting
    # This job runs on Linux
    runs-on: ubuntu-latest
    steps:
      # This step uses GitHub's hello-world-javascript-action: https://github.com/actions/hello-world-javascript-action
      - name: Hello world
        uses: actions/hello-world-javascript-action@v1
        with:
          who-to-greet: 'Mona the Octocat'
        id: hello
      # This step prints an output (time) from the previous step's action.
      - name: Echo the greeting's time
        run: echo 'The time was ${{ steps.hello.outputs.time }}.'
設定環境變數
- Environments @ Github Docs
- Workflow syntax @ Github Docs
在 GitHub Action 的 workflow 中使用環境變數(environment variable)的方式可以參考:
- 建立環境名稱(environment name):在 Github Repository 的 Settings 頁籤可以找到
Environments的選項,可以在這裡新增環境名稱 - 接著可以在此環境名稱中新增環境變數(environment variable)
- 最後,要記得在 workflow 的設定檔中指定使用的環境名稱(environment name):
# .github/workflows/release.yml
# ...
jobs:
  release:
    name: Release
    environment: release # 指定套用的「環境名稱」
Cache
Dependency cache 和 Artifacts 的差別
- cache:在不同 jobs 或 workflows 執行時可以被重複使用的檔案,例如 npm 的 dependencies
- artifacts:重複使用 jobs 或 workflows 執行後產生的檔案,例如 build 好的檔案
Cache Action 的使用
- 當
key相同的時候,稱作cache hit,GitHub Action 就會把 cache 放回定義好的path資料夾中 - 當
key不相同時,稱作cache miss,如果 job 成功執行,會自動建立新的 cache
name: Caching with npm
on: push
jobs:
  build:
    runs-on: ubuntu-latest
    steps:
      - uses: actions/checkout@v4

      - name: Cache node modules
        id: cache-npm
        uses: actions/cache@v4
        env:
          cache-name: cache-node-modules
        with:
          # npm cache files are stored in `~/.npm` on Linux/macOS
          path: ~/.npm
          #
          key: npm-${{ hashFiles('package-lock.json') }}

      - if: ${{ steps.cache-npm.outputs.cache-hit != 'true' }}
        name: List the state of node modules
        continue-on-error: true
        run: npm list
直接使用 setup-node actions
實際上,使用 actions/setup-node@v4 就能做到類似的事。預設情況下,actions/setup-node 不會啟用 cache,可以透過定義 cache 來啟用。它底層一樣是使用 actions/cache:
steps:
  - uses: actions/checkout@v4
  - uses: actions/setup-node@v4
    with:
      node-version: 16
      cache: 'npm'
  - run: npm ci
  - run: npm test
在 Actions 中即可看到被保存的 cache:

Artifacts
執行完 Actions 後,如果希望產生的檔案可以下載或給其他 API 使用的話,可以使用 actions/upload-artifact@v4 這個 Actions:
# ...
jobs:
  coverage:
    runs-on: ubuntu-latest
    steps:
      - uses: actions/checkout@v4
      - uses: ./.github/actions/setup-node
      - run: npm test -- --coverage
      - name: Archive coverage results
        uses: actions/upload-artifact@v4
        with:
          name: coverage-report
          path: coverage
如此,在 Action Summary 的頁面,就可以看到一個可以被下載的檔案,這就是執行 test coverage 後產生的檔案:
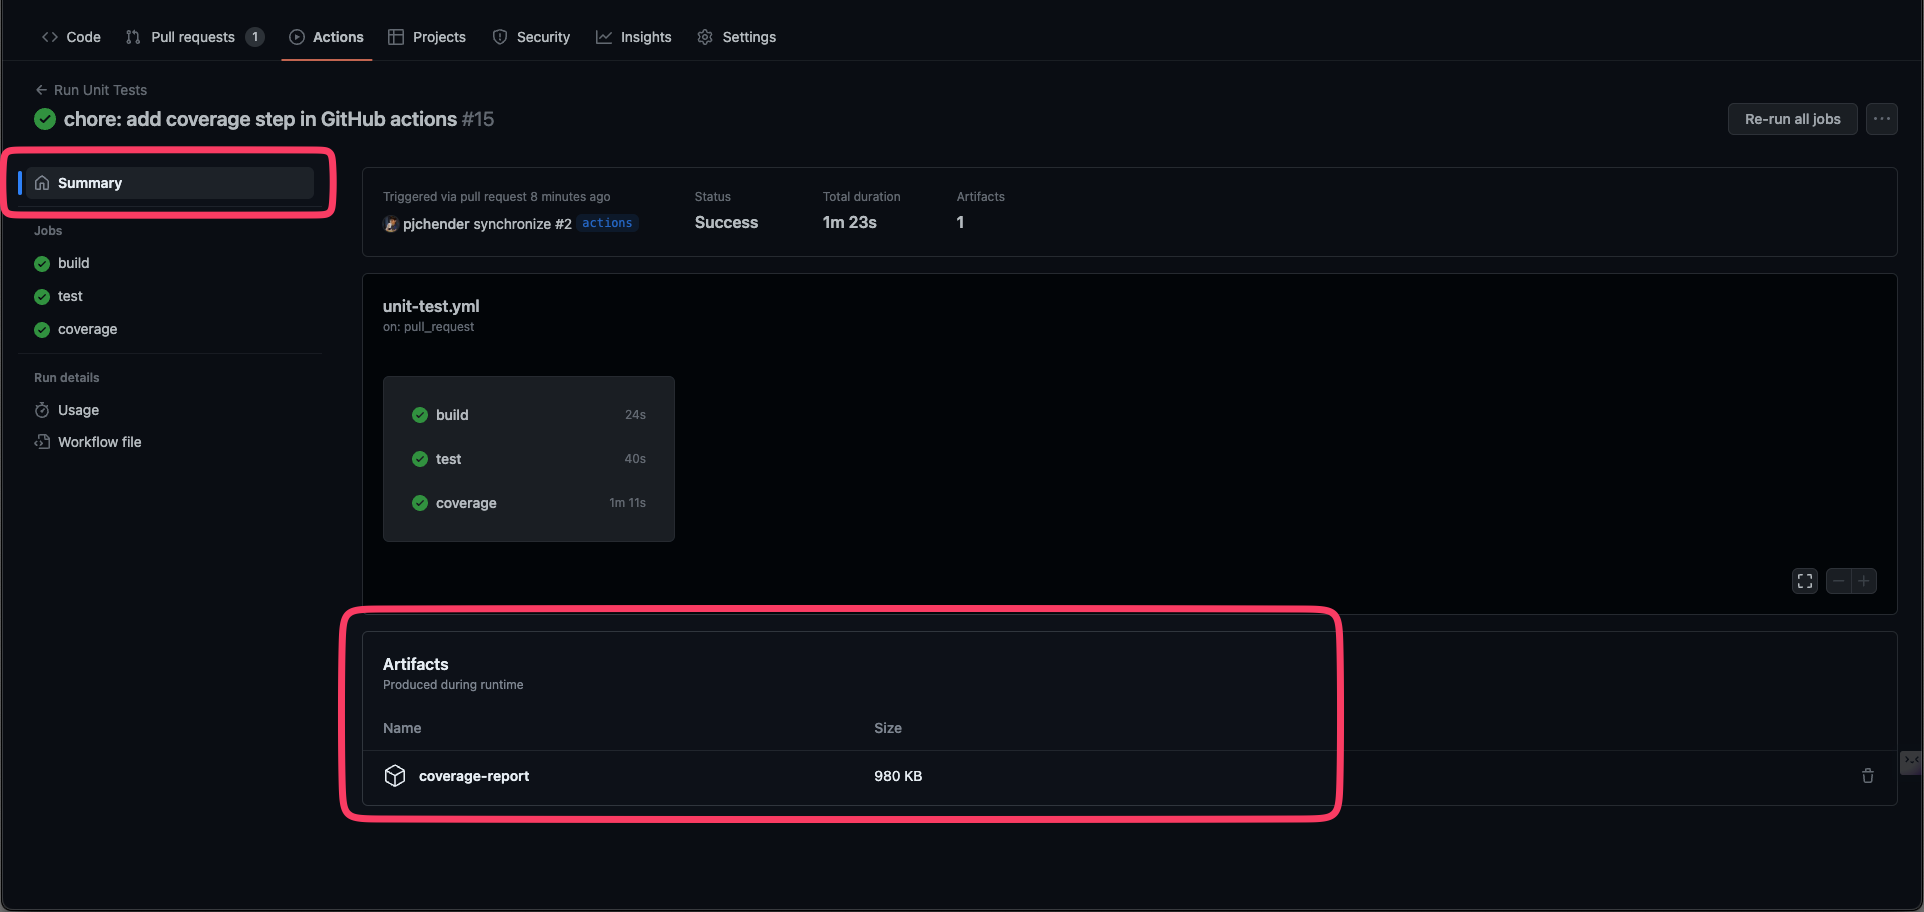
同樣的,你也可以在 npm run build 之後產生 artifacts 檔案(如果需要的話)。
Reusable Github Actions
Creating a composite action @ Github Actions
如果有些 Actions 會經常需要重複執行,可以考慮把它們包成一個 action:
# .github/actions/setup-node/action.yml
name: 'Setup Node and Install Dependencies'
description: 'Install dependencies'

runs:
  using: 'composite'
  steps:
    - name: Setup Node
      uses: actions/setup-node@v4
      with:
        node-version: 18
        cache: 'npm'
    - run: npm ci
      shell: bash
接著可以在原本的 workflow 中直接使用這個自己定義的 action:
- 記得要先使用
actions/checkout才能使用自己定義的 action(因為這個 action,是在自己的 codebase 中)
name: Run Unit Tests

# This workflow is triggered on pushes to the repository.
# on: [push]
on:
  push:
    branches: [main]
  pull_request:
    branches: [main]
jobs:
  build:
    runs-on: ubuntu-latest
    steps:
      - uses: actions/checkout@v4
      - uses: ./.github/actions/setup-node
      - run: npm run build
  test:
    runs-on: ubuntu-latest
    steps:
      - uses: actions/checkout@v4
      - uses: ./.github/actions/setup-node
      - run: npm test
  coverage:
    runs-on: ubuntu-latest
    steps:
      - uses: actions/checkout@v4
      - uses: ./.github/actions/setup-node
      - run: npm test -- --coverage
      - name: Archive coverage results
        uses: actions/upload-artifact@v4
        with:
          name: coverage-report
          path: coverage
建立自己的 Action(Custom Action)
除了照著官方文件的說明外,官方有提供 typescript-action 和 javascript-action 這兩個 template repository。
打包
建立自己的 Action 時,比較需要留意的是在把 actions 推上 Github 時,需要把 node_modules 中的 package 也放上去,其中包含兩種方式:
node_modules一起推上 GitHub- 或者使用 @vercel/ncc 將專案打包後,要把
dist一起推上 GitHub
測試
- 要測試自己寫的 Actions 時,記得一樣要建立 workflow,然後在
use的地方引用這個 action - 比較簡單的作法是參考 Example using a private action,在自己的 workflow 中使用根目錄的 action 檔
name: Workflow Name

on: [push]

jobs:
  hello_world_job:
    runs-on: ubuntu-latest
    name: A job to say hello
    steps:
      # 如果要使用專案中的 action,記得要先 checkout
      - name: Checkout
        uses: actions/checkout@v4
      - name: My Custom Action
        uses: ./ # 直接使用根目錄的 action.yml
        with:
     GITHUB_TOKEN: ${{ secrets.GITHUB_TOKEN }}
     configuration_path: .github/some-config.json
Tips
手動 trigger Github Actions 的方式
:::參考資料
Manually running a workflow @ GitHub
:::
使用 workflow_dispatch 可以讓使用者在 Github 的 UI(或透過 Github CLI)手動 trigger 特定的 workflow。
on:
  workflow_dispatch:
同樣的 gh 指令在 local 和 workflow 上得到不同的結果
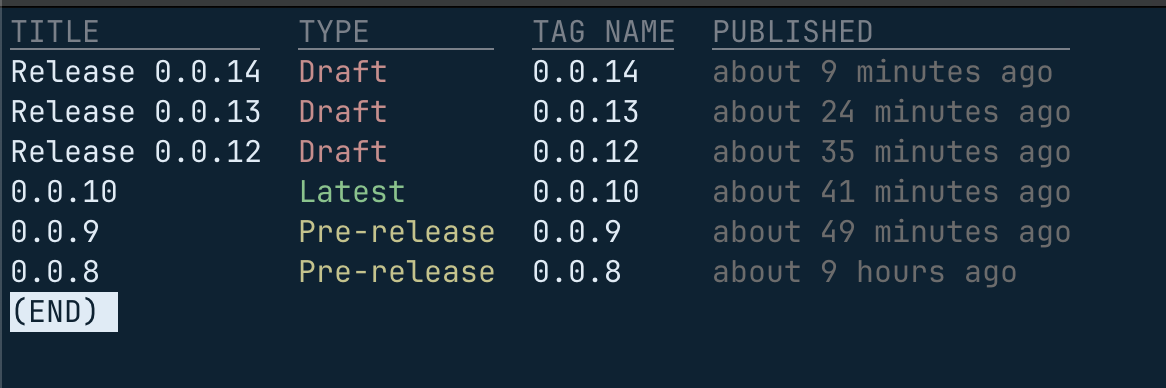
舉例來說,同樣是執行 gh release list 的指令,但在 local 執行時可以看到包含 draft(unpublished)的 release:
在 GitHub Action 的 workflow 中使用:
jobs:
  log-env:
    runs-on: ubuntu-latest
    steps:
      - uses: actions/checkout@v4
      - name: show all release list
        run: |
          gh release list
        env:
          GH_TOKEN: ${{ secrets.GITHUB_TOKEN }}
卻只能看到已經 publish 的 release:
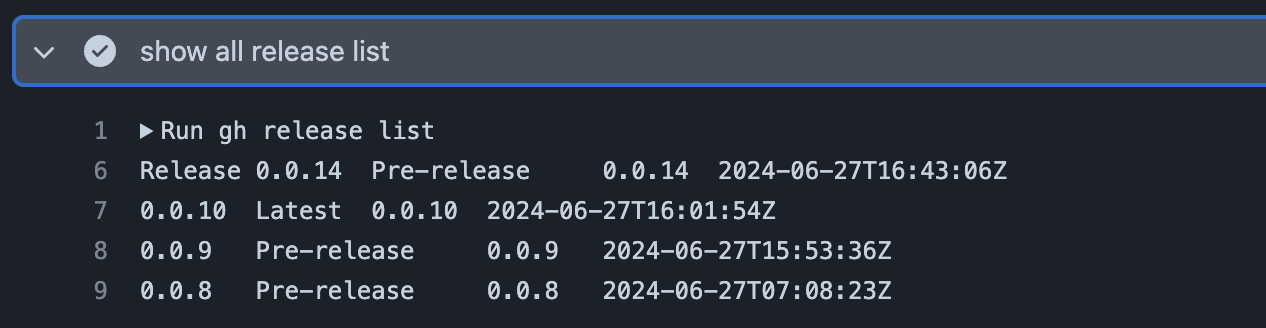
後來發現這是因為 GITHUB_TOKEN 預設權限不足的問題,只要修改 GITHUB_TOKEN 的權限後(參考「Configuring the default GITHUB_TOKEN permissions」),就能夠顯示出所有的 release。
修改 GITHUB_TOKEN 權限的方法如下:
針對個別 Workflow 修改 GITHUB_TOKEN 的權限
比較常見的做法是在 GitHub workflow 的 YAML 檔中,透過 permissions 這個關鍵字來給予權限(參考:「Modifying the permissions for the GITHUB_TOKEN」:
name: Github Action Playground

on:
  workflow_dispatch:

# set on workflow level
permissions: write-all

jobs:
  log-env:
    runs-on: ubuntu-latest
    # set on job level
    permissions:
      contents: write
    steps:
      - uses: actions/checkout@v4
      - name: show all release list
        run: |
          gh release list
        env:
          GH_TOKEN: ${{ secrets.GITHUB_TOKEN }}
permissions 的其他參數可以參考「permissions」。
針對 Repository 修改 GITHUB_TOKEN 預設權限
另一個做法是直接改 GITHUB_TOKEN 預設所擁有的權限,如此就不用在 Workflow 中各自設定(參考:Managing GitHub Actions permissions for your repository)。
在 GitHub repository 的 Settings 中,可以找到 Actions > General:
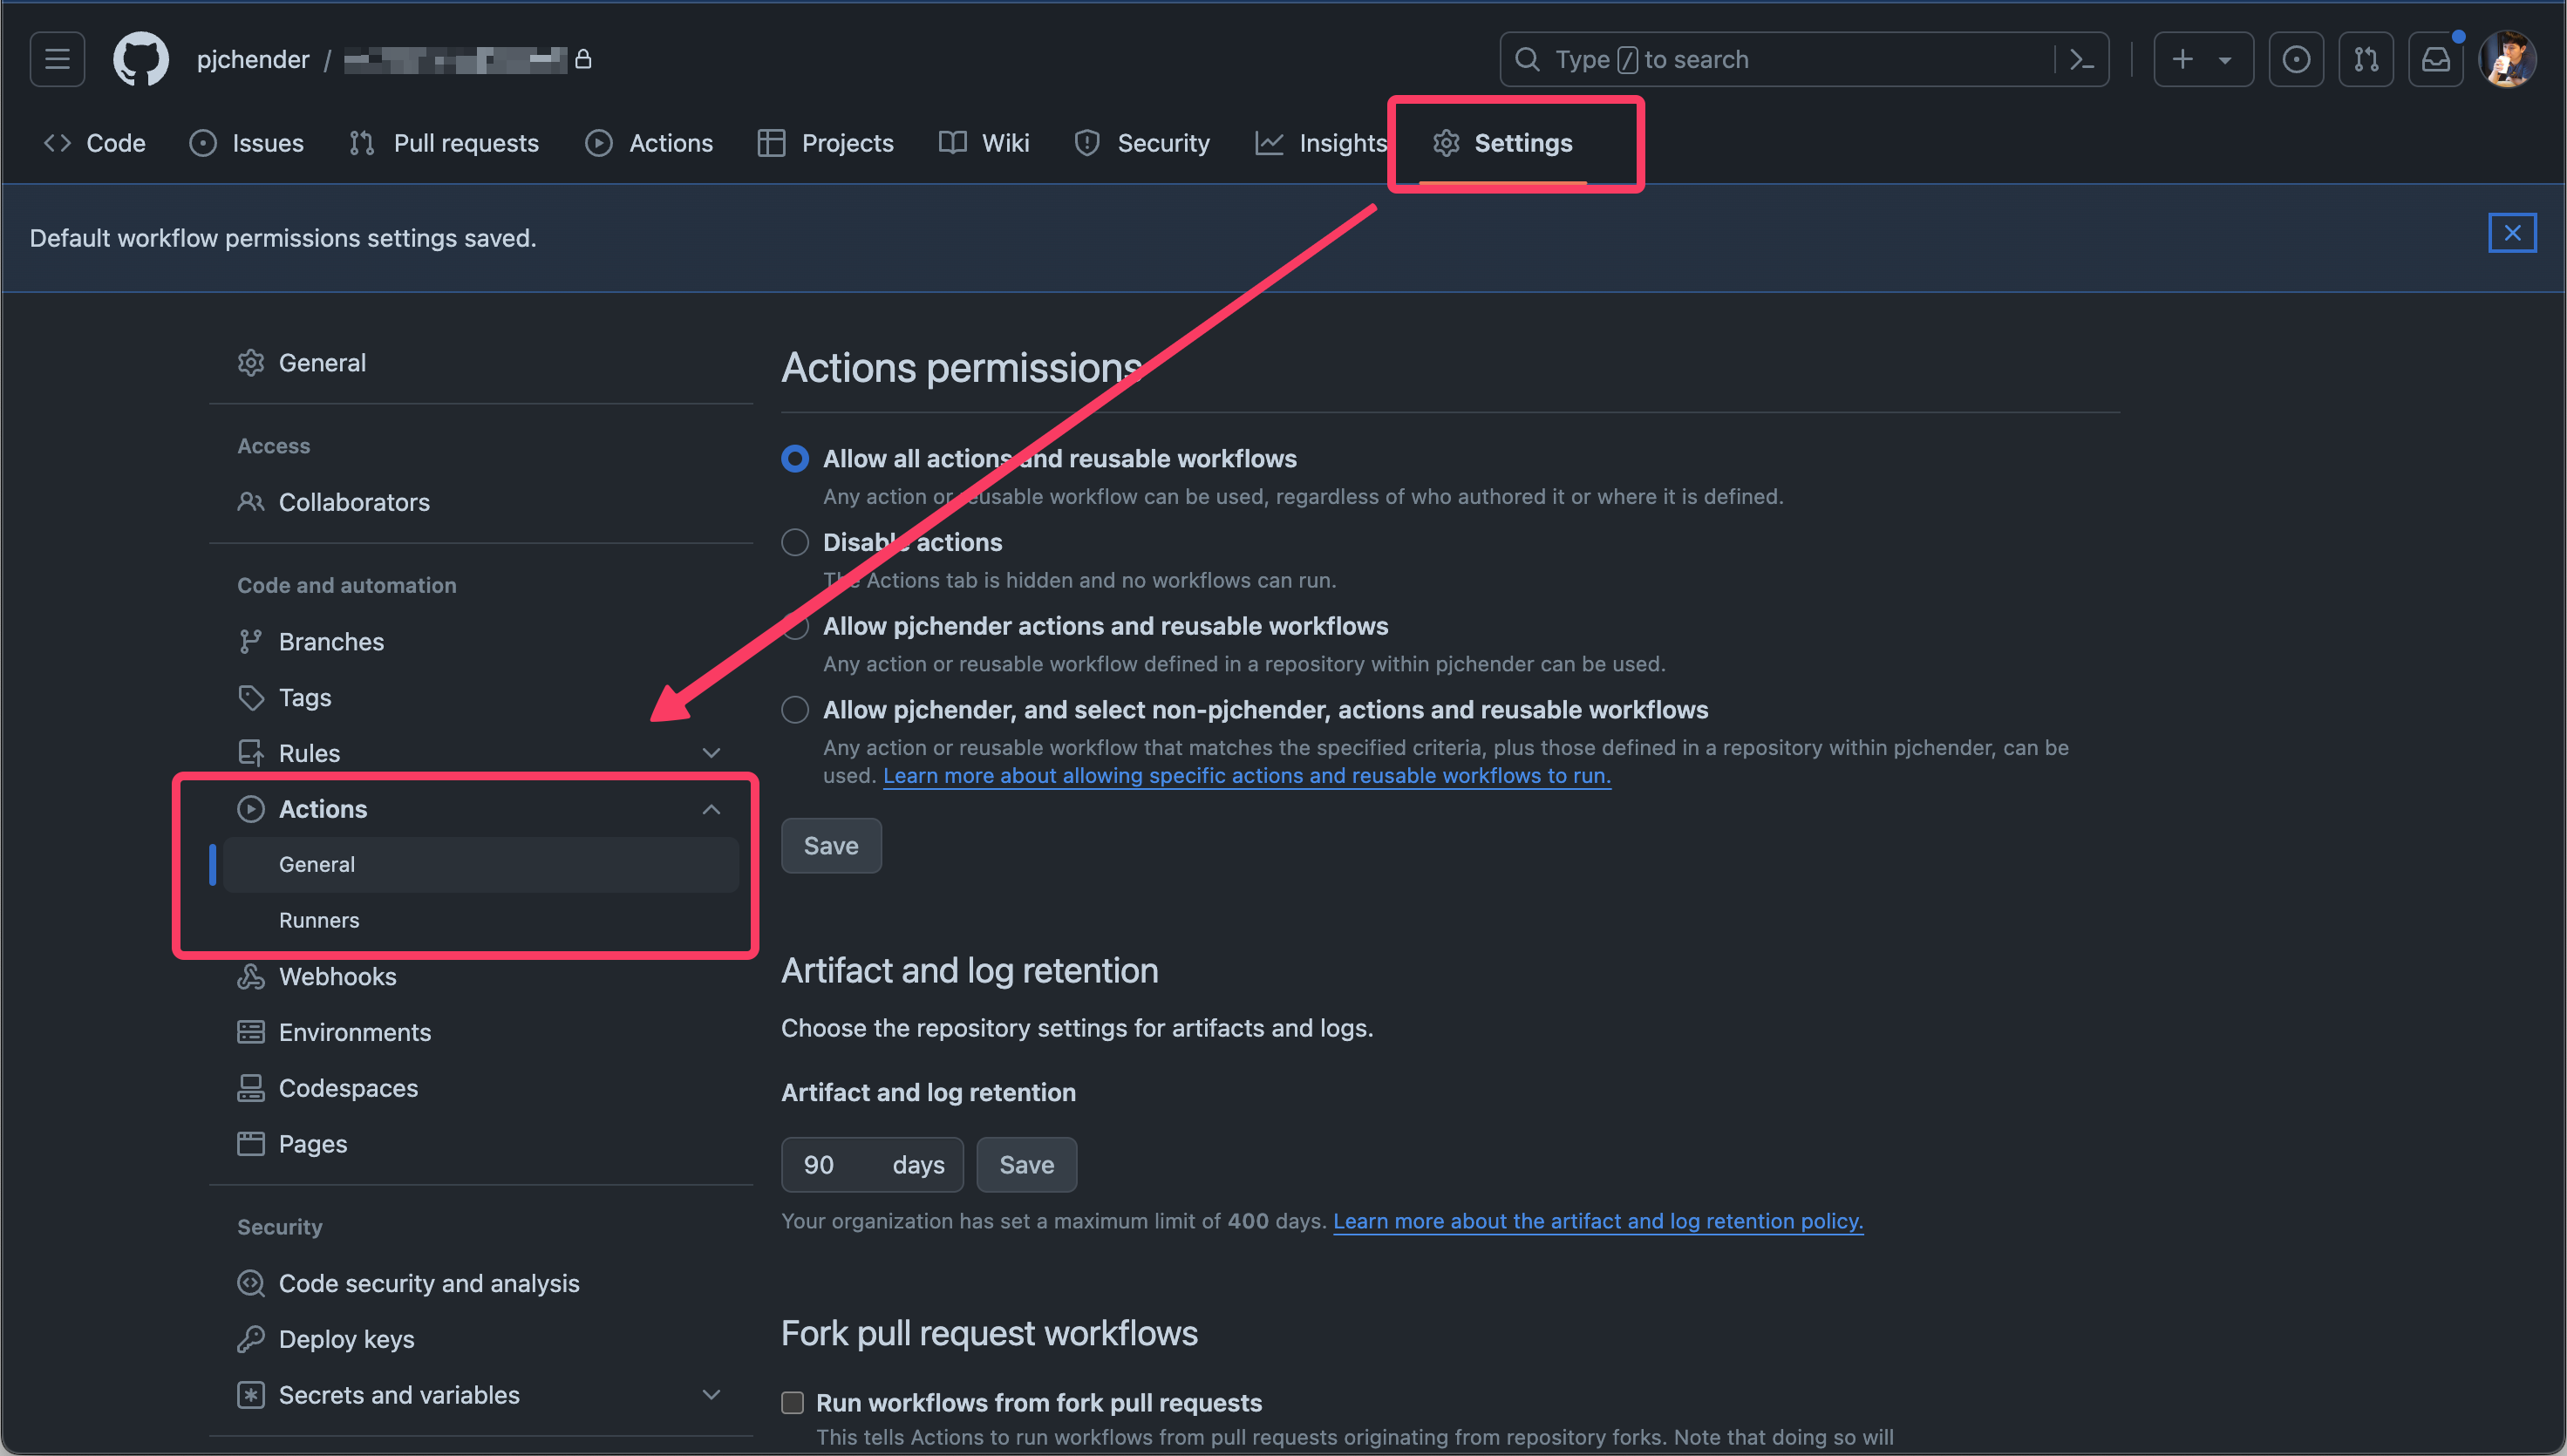
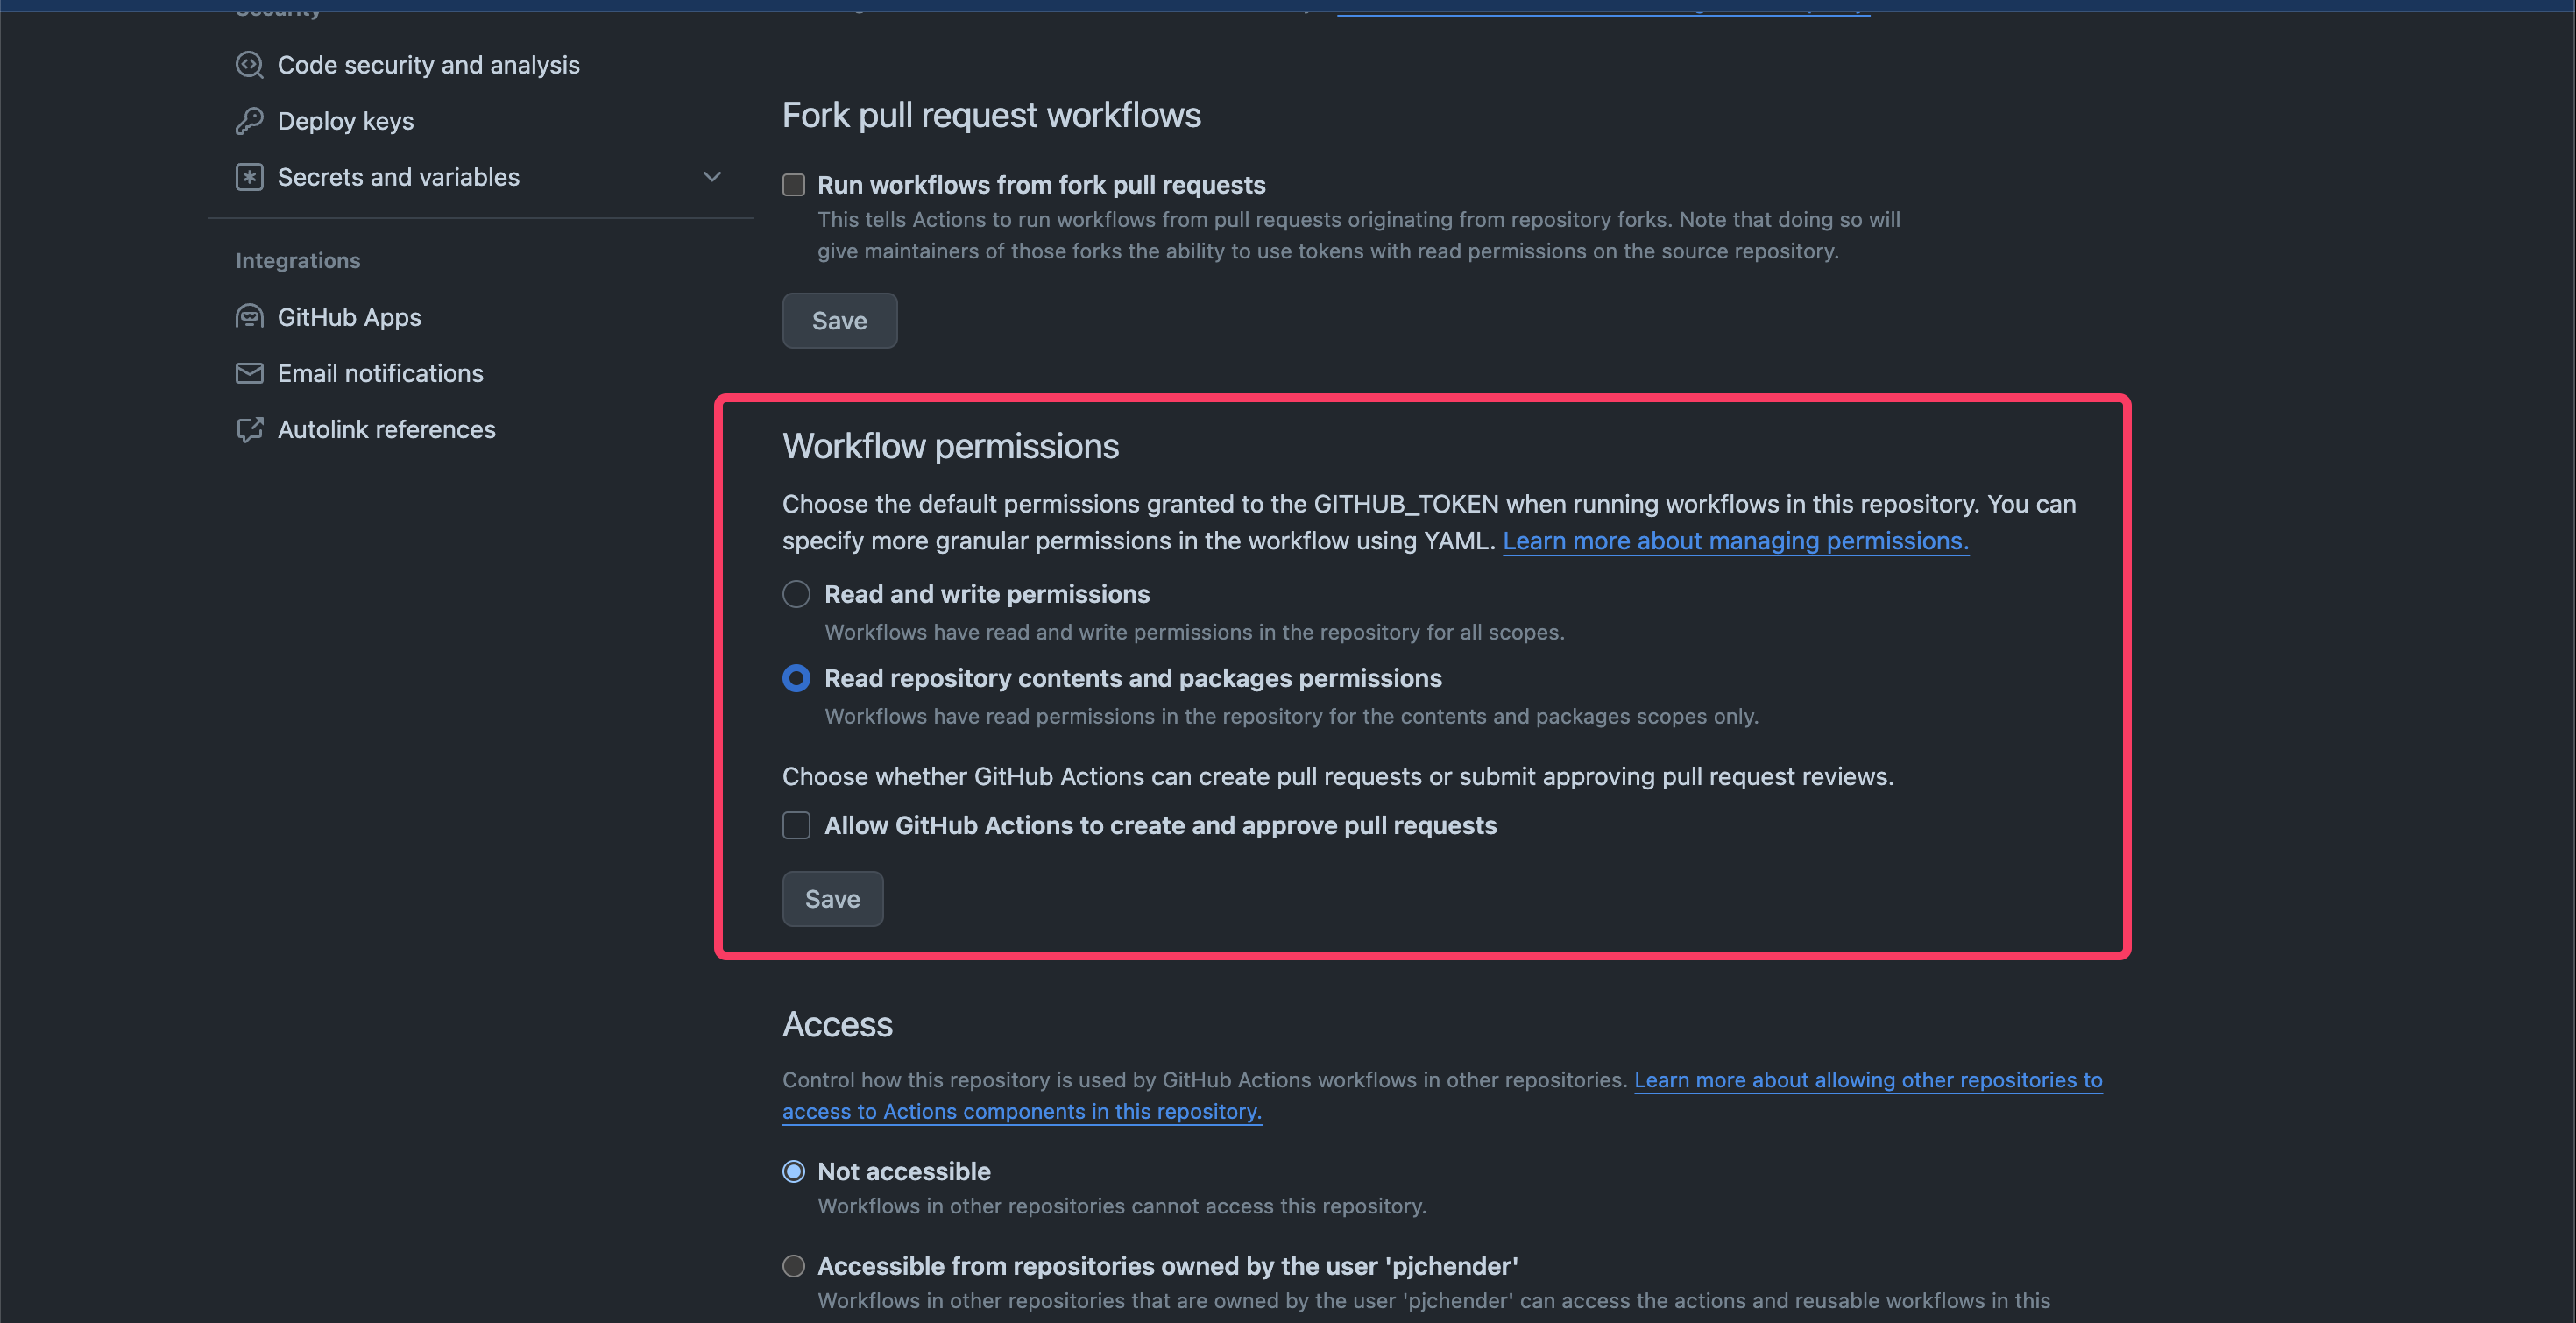
這裡面有一個「Workflow permissions」的設定,把它從「Read repository contents and packages permissions」改成「Read and write permissions」:
參考資料
- Getting Started with Github Actions @ FEM
- Creating a JavaScript action @ GitHub