[Note] Kubernetes Architecture
TL;DR
- Cluster -> Node -> Pods -> Containers
什麼是 Nodes / Minions(節點)
Nodes 是 Kubernetes 叢集(Cluster)中的機器,它可以是實體或虛擬的。 這些節點是 Kubernetes 啟動容器的地方。
如果運行應用程式的節點發生故障,應用程式就會停止運作。 為了避免這種情況,通常會有多個 Nodes 來組成叢集(Cluster)。
多個節點的優點包含:
- 高可用性: 如果一個節點故障,應用程式仍然可以從其他節點訪問。
- 負載平衡: 多個節點可以分擔工作負載,提高應用程式的效能和穩定性。
除了工作節點之外,Kubernetes 叢集還有一個 Master 節點,負責管理和協調叢集中的所有節點。 Master 節點會監控節點的健康狀況,並在節點故障時將工作負載轉移到其他工作節點。
Nodes 是 Kubernetes 叢集的基礎單元,是運行容器的地方。通過使用多個節點,Kubernetes 可以提供高可用性和負載平衡,確保應用程式的穩定性和效能。
什麼是 Cluster?
Cluster 是一組節點(Nodes)的集合,這些節點可以是實體機器或虛擬機器。 在 Kubernetes 的環境中,Cluster 中的節點分為 Master 節點和 Worker 節點。
- Worker 節��點 是實際執行應用程式容器的地方。
- Master 節點 負責管理和協調 Cluster 中的所有節點。
建立 Cluster 的主要目的是為了提高應用程式的高可用性和負載平衡能力。
- 高可用性: 當一個節點發生故障時,應用程式仍然可以從 Cluster 中的其他節點繼續運行。
- 負載平衡: Cluster 可以將工作負載分佈到多個節點,避免單一節點負載過重,提高應用程式的效能和穩定性。
舉例來說,如果您的應用程式需要處理大流量,您可以將應用程式部署到一個由多個節點組成的 Cluster 中。當其中一個節點發生故障時,Cluster 可以自動將流量轉移到其他健康的節點,確保應用程式可以繼續運行。此外,Cluster 也可以根據流量負載自動調整節點數量,確保應用程式可以始終保持最佳性能。
Master Node 中的元件
Master 節點負責管理和協調 Cluster 中的所有節點。
Master 節點上運行的組件包括:
- API Server: 作為 Kubernetes 的前端,處理所有與 Cluster 互動的請求。
- etcd: 一個分散式可靠的鍵值儲存庫,用於儲存管理 Cluster 的所有數據。
- Scheduler: 負責將工作負載(容器)分配到不同的節點。
- Controllers: 監控節點、容器和端點的健康狀況,並在發生故障時採取行動。
kubectl CLI(Kube Control)
kubectl 是一個命令列工具,用於部署和管理 Kubernetes Cluster 上的應用程式。 您可以使用 kubectl 執行以下操作:
- 獲取 Cluster 資訊
- 獲取 Cluster 中節點的狀態
- 部署應用程式
- 管理應用程式
以下是一些常用的 kubectl 命令:
kubectl run <application>:用於在 Cluster 中部署應用程式。kubectl cluster info:用於查看 Cluster 的資訊。kubectl get nodes:用於列出 Cluster 中的所有節點。
$ kubectl config get-contexts
$ kubectl config current-contexts # 顯示目前使用 context
$ kubectl config use-context <context-name> # 切換到某個 context

$ kubectl config get-clusters
Cluster 是一組節點的集合,用於提高應用程式的高可用性和負載平衡能力。 Kubernetes Cluster 由 Master 節點和 Worker 節點組成,Master 節點負責管理和協調 Cluster,而 Worker 節點則負責運行應用程式容器。 您可以使用 kubectl 工具來部署和管理 Kubernetes Cluster 上的應用程式。
Context 包含 cluster、user authentication、namespace 有關的資訊。
Pods
Kubernetes 並不直接將容器(container)部署到工作節點(Worker Nodes),而是使用 Pod 來封裝容器。
- Pods 是 k8s 中最小能用來部署的單位,會將 container 封裝在 pod 內
- Pod 通常和 container 有一對一的關係,但不是絕對
當要 scale up 時,可以:
- 在第一個 Node 中建立出相同應用程式的 Pod instance
- 如果還是不夠,也可以考慮在同一個 cluster 中,建立多個 Node,在不同 Node 中建立新的、相同應用程式的 Pod instance
雖然上面提到,Pod 和 Container 通常是一對一的關係,但這並不表示一個 Pod 中只能有一個 container。某些很少數的情況下,可能會需要兩個 container 在同一個 Pod 中,其中一個是 App container,另一個則是 Helper container。
在同一個 Pod 中的 containers 會:
- 共享相同的 network namespace,所以可以透過 localhost 互相溝通
- 共享相同的儲存空間
- 同生共死
使用 kubectl 直接建立 Pod
# 透過建立 Pod 來部署 Docker container
# kubectl run <pod-name> --image=<image-name>
$ kubectl run nginx --image=nginx

# 檢視 cluster 中的所有 pods
$ kubectl get pods
使用 YAML 來建立 Pods
# 建立出 myapp-pod 這個 pod
$ kubectl create -f pod-definition.yml

# 也可以用 apply
$ kubectl apply -f pod-definition.yml
# pod-definition.yml
apiVersion: v1
kind: Pod
metadata:
  name: grade-submission-api
  labels:
    app.kubernetes.io/name: grade-submission
    app.kubernetes.io/component: backend
    app.kubernetes.io/instance: grade-submission-api

spec:
  containers:
    - name: grade-submission-api
      image: rslim087/kubernetes-course-grade-submission-api:stateless
      resources:
        requests:
          memory: "128Mi"
          cpu: "200m"
        limits:
          # memory 的 limit 一定要設定,否則可能會吃掉整台機器的資源
          memory: "128Mi"
          # CPU 因為 kernel scheduler 會自動根據可用的資源來做分配,所以可以不需要設定,除非是怕佔用太多其他人的 cpu 資源
          cpu: "500m"
      ports:
        - containerPort: 3000
    - name: grade-submission-api-health-checker
      image: rslim087/kubernetes-course-grade-submission-api-health-checker
      resources:
        requests:
          memory: "128Mi"
          cpu: "200m"
        limits:
          memory: "128Mi"
關於 limits 的設定:
-
memory的 limit 一定要設定,否則可能會吃掉整台機器的資源,導致 OOM Killer -
cpu因為 kernel scheduler 會自動根據可用的資源來做分配,所以可以不設定,但如果為了防止單一容器因為使用過多計算資源而影響到其他容器(即所謂的「noisy neighbor」問題)。即使 CPU 是可以被壓縮的,但合理的資源限制還是有助於確保整個集群資源分配的公平性與穩定性。
| Kind | Version | 說明 |
|---|---|---|
| POD | v1 | k8s 中的最小佈署單位。 |
| Service | v1 | 提供讓外部存取 Pods 的方式,例如提供靜態的 endpoint(IP 和 DNS name),才不會 Pods 終止或重啟後 IP 就不見。 |
| ReplicaSet | apps/v1 | |
| Deployment | apps/v1 | 管理 Pods,並確保他們執�行起來是一致。 |
| ConfigMap & Secret | v1 | 用來保存設定檔或敏感資料 |
Replication Controllers and ReplicaSets
Replication Controllers
Replication Controllers 的作用:
- HA:透過 replication controllers 可以幫助我們在 k8s clusters 中運行多個 pod instances,從而提供 High Availability,確保指定數量的 Pods 始終在運行。
- Load Balancing & Scaling:透過 replication controllers 當流量大的時候,可以建立出多個 Pods 來平衡負載
apiVersion: v1
kind: ReplicationController
metadata:
  name: myapp-rc
  labels:
    app: myapp
    type: front-end

spec:
  template:
    metadata:
      name: myapp-pod
      labels:
        app: myapp
        type: front-end
    spec:
      containers:
        - name: nginx-container
          image: nginx
  replicas: 3
ReplicationController 的 spec 底下會有 template 和 replicas:
template:當 Pod 數量不足時,用了產生新的 Podreplicas:要有幾個 Pods 運行
$ kubectl create -f rc-definition.yml
$ kubectl get replicationcontroller
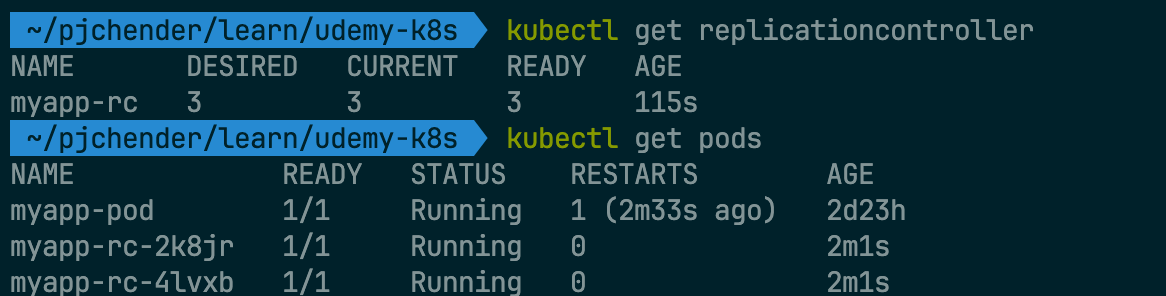
myapp-rc-xxx表示是透過 Replication Controller 建立的
ReplicaSets
- k8s 中的 ReplicaSet 能給確保指定數量的 Pods 在運行。
- ReplicaSets 和 Replication Controller 的其中一個差別是,
selector在 ReplicaSets 中是必填,但在 Replication Controller 中這是選填
# ReplicaSet Definition
apiVersion: apps/v1
kind: ReplicaSet
metadata:
  name: myapp-replicaset
  labels:
    app: myapp
    type: front-end
spec:
  template:
    metadata:
      labels:
        app: myapp
        type: front-end
    spec:
      containers:
        - name: nginx-container
          image: nginx
  replicas: 3
  selector:
    matchLabels:
      type: front-end
selector的用意是讓 Replica Set 清楚知道要監控的 Pods 是誰,以確保有正確數量的 Pods 存在
$ kubectl create -f replicaset-definition.yml

$ kubectl get replicaset
$ kubectl get pods

$ kubectl describe replicaset myapp-replicaset

# kubectl delete replicaset <replicaset-name>
$ kubectl delete replicaset myapp-replicaset
如果我們用 kubectl delete pod xxx-replicaset-xxx 來刪除某個由 Replica Set 所建立出來的 Pod 時,Replica Set 會自動再幫我們長一個新的 Pod 出來(除非是直接 delete 掉整個 Replica Set);相似地,如果我們已經具有足夠數量的 Pods 時,但又手動建了一個相同的 Pod 出來,這時候這個新建出來的 Pod 會自動被 Terminate 掉。
Scale Up
方法一:修改 yaml 檔中的 replica 後執行
$ kubectl replace -f replicaset-definition.yml
方法二:修改 memory 中的設定
$ kubectl edit replicaset myapp-replicaset
方法三:使用 scale 搭配檔案名稱
需要留意,使用 scale 指令並不會更新原本 YAML 檔中 replicas 指定的數量
$ kubectl scale --replicas=6 -f replicaset-definition.yml
方法四:使用 scale 搭配 kind 和 name
需要留意,使用 scale 指令並不會更新原本 YAML 檔中 replicas 指定的數量
# kubectl scale --replicas=n <kind> <name>
$ kubectl scale --replicas=6 replicaset myapp-replicaset
$ kubectl scale --replicas=5 replicationcontroller myapp-rc
Deployment
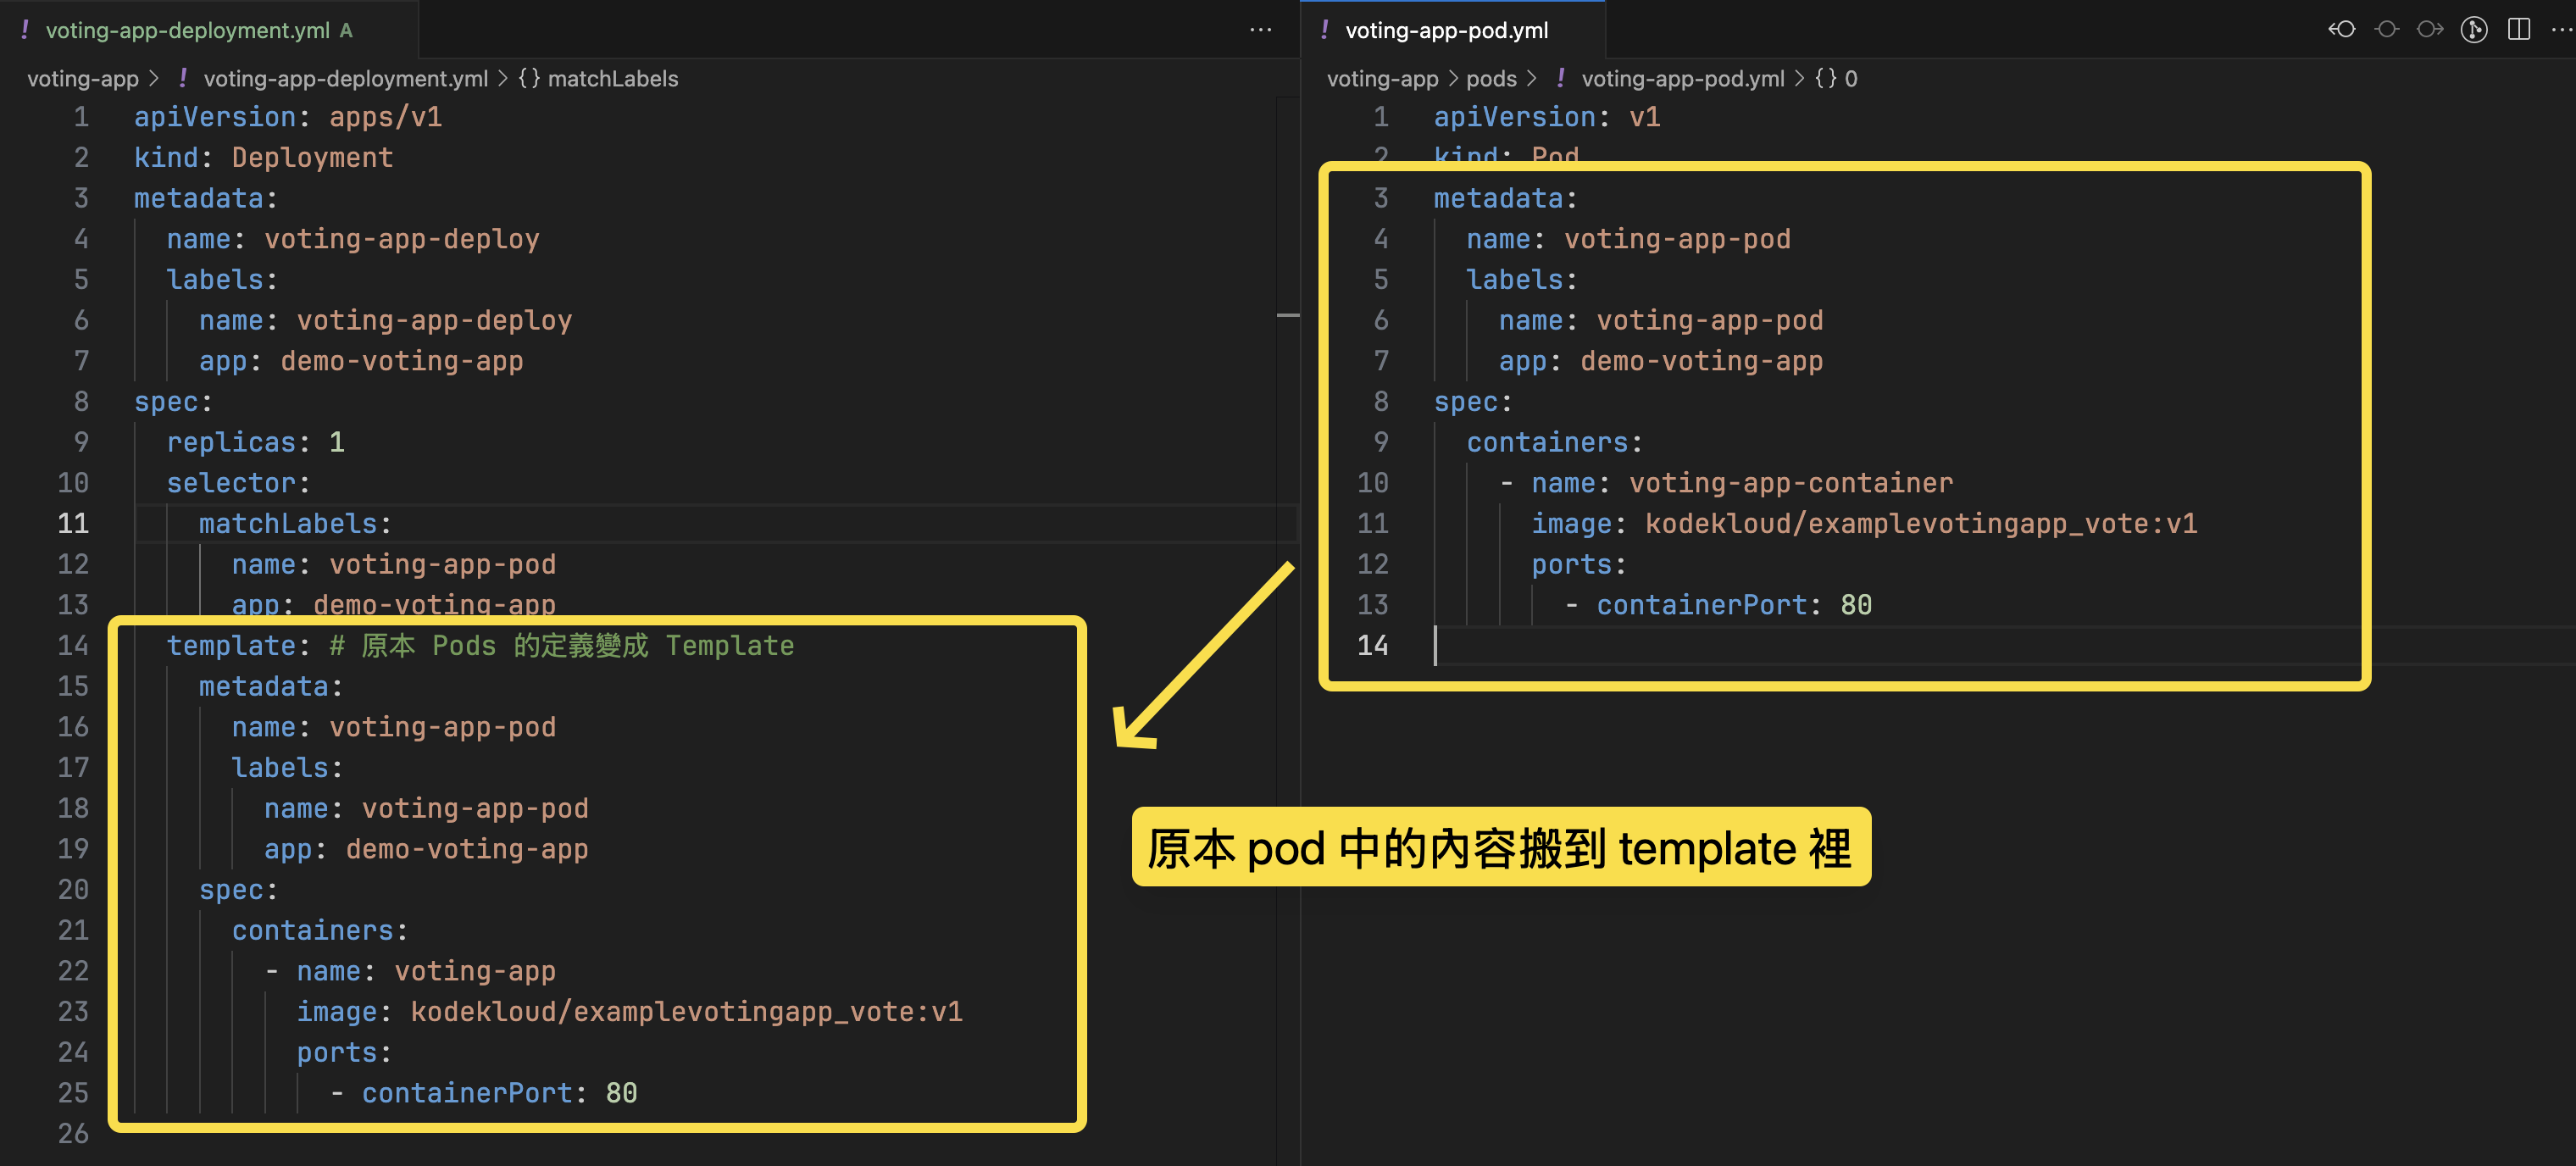
Deployment 是比 ReplicaSets 更 High Level 的層級,也就是說,Deployment 中包含 ReplicaSet,而 ReplicaSets 中則包含多個 Pods。
當建立 Deployment 時,Deployment Controller 會建立 ReplicaSet,接著 ReplicaSet 中的 Pods 也會一併建立。
比起直接用 Pod 來建立 Pod,Deployment 中透過 replicas 設定來維持指定數量的 Pod,因此 k8s 會確保始終維持這個數量的 Pod 運行(即使只有一個)。另外,Deployment 也提供了 rolling updates、rollback 、autoscale 的功能。
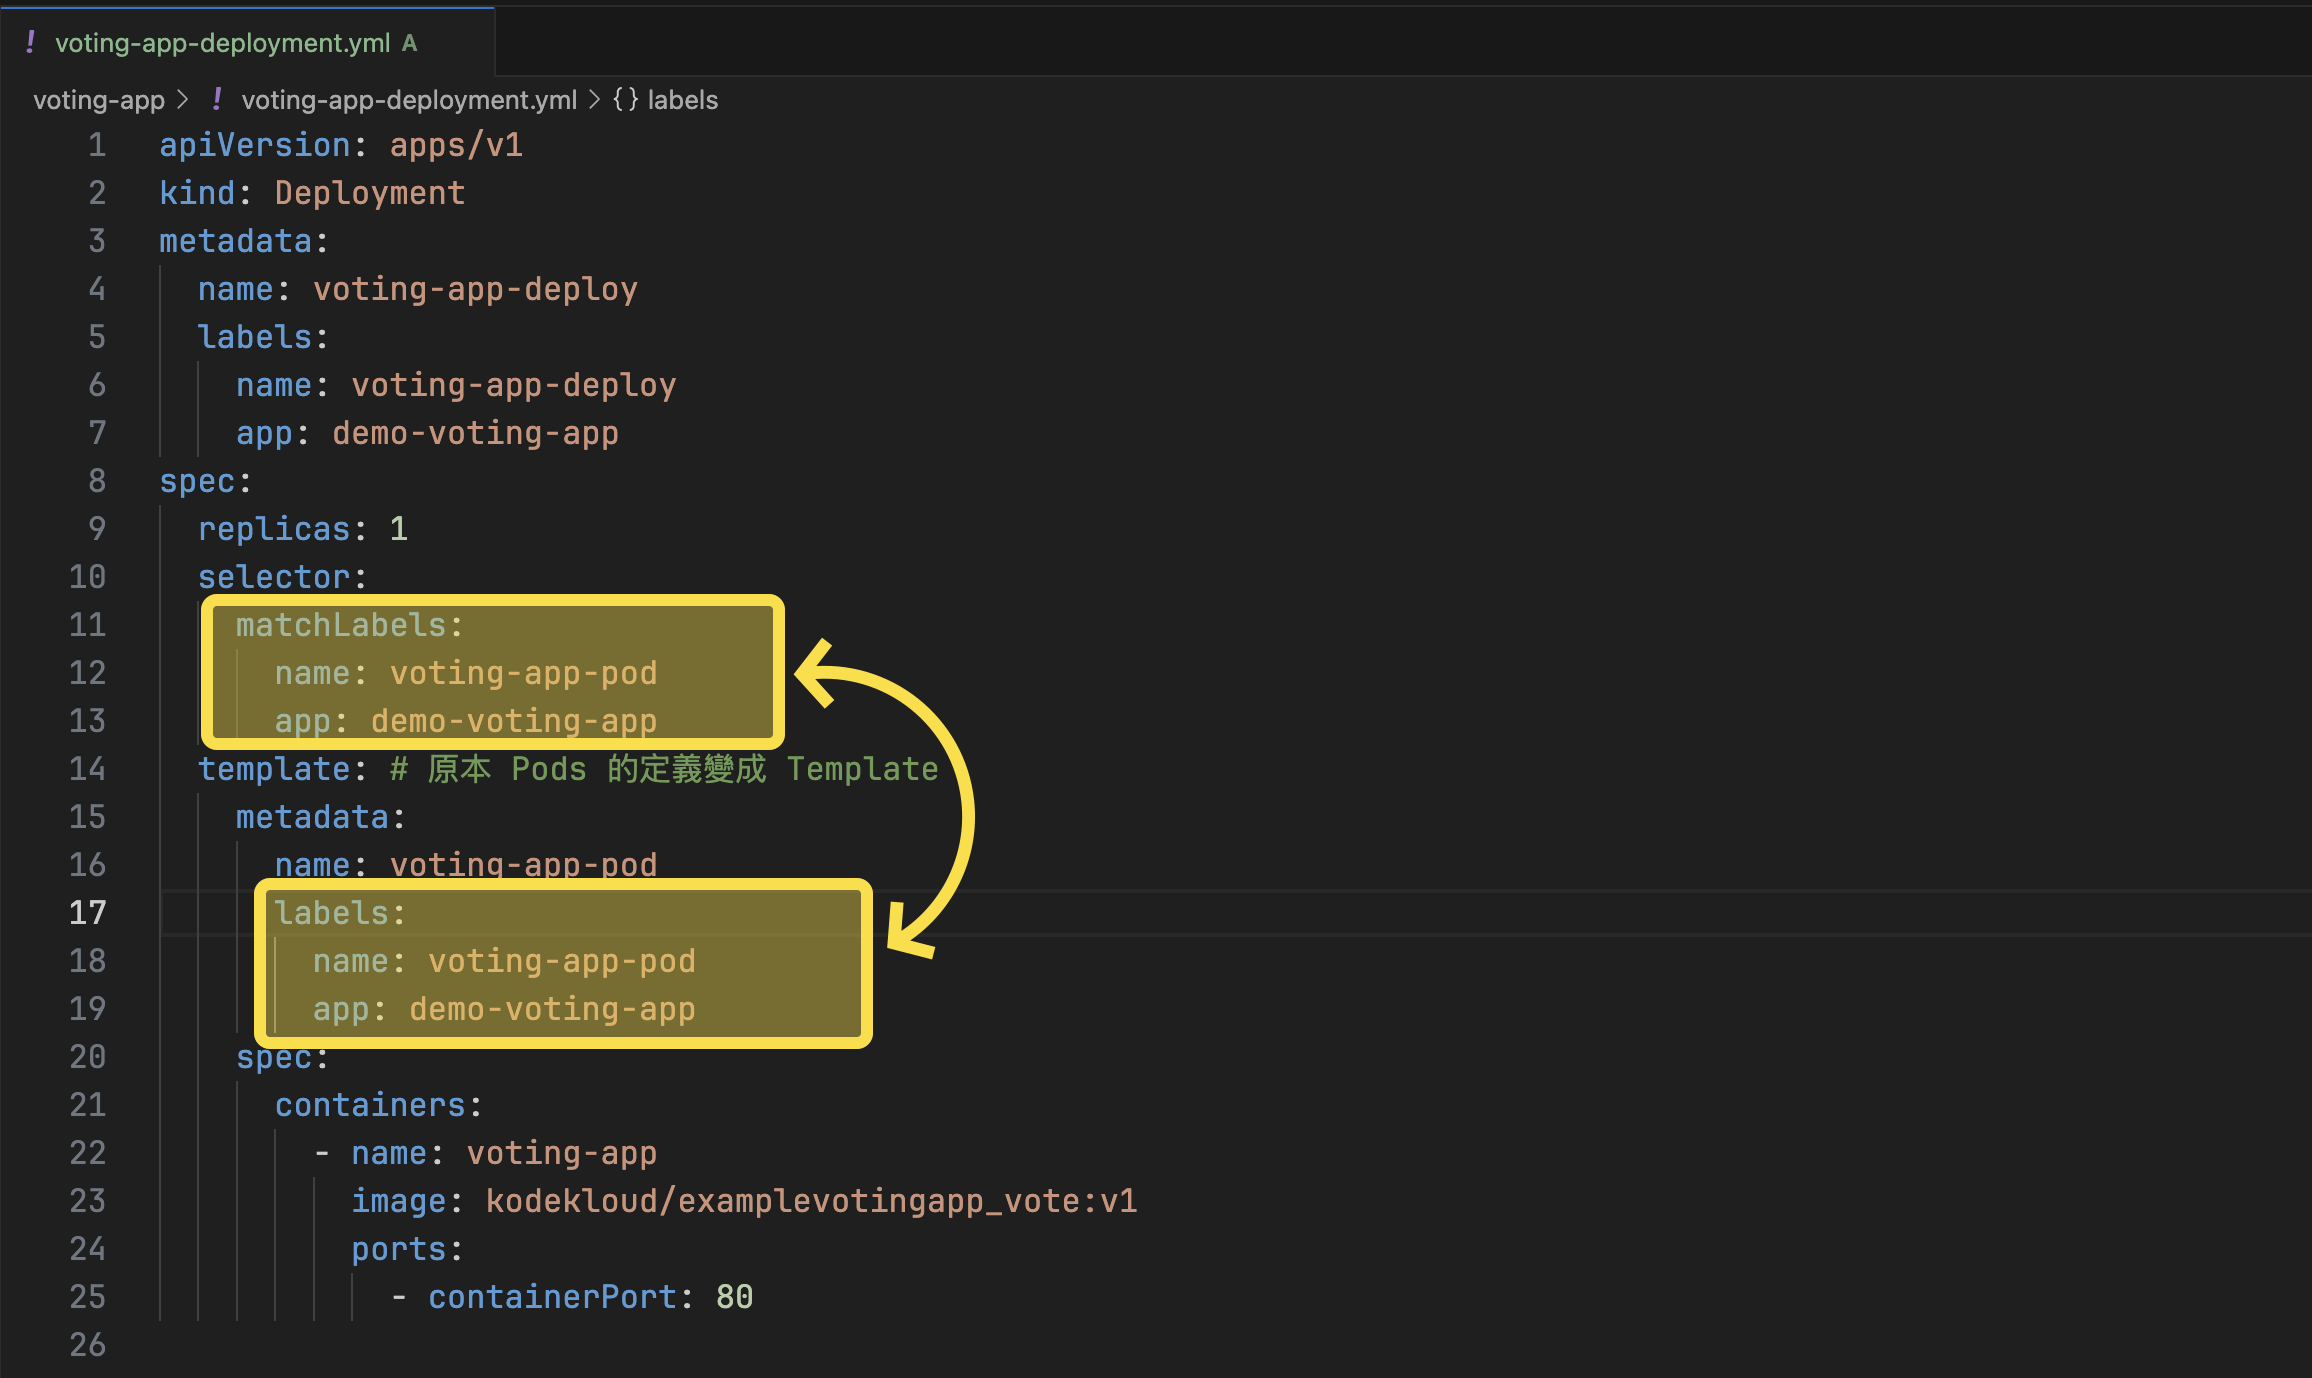
定義 Deployment 的方式和 ReplicaSet 相同,主要的差別只需要把 kind 改成 Deployment 即可。
# 建立 Deployment
$ kubectl create -f deployment-definition.yml --record

$ kubectl get deployments

# 更新 deployment(觸發 rollout 並更新 deployment version)
$ kubectl apply -f deployment-definition.yml

# 檢視 deployment 資訊
$ kubectl describe deployment myapp-deployment

$ kubectl delete deployment --all -n <namespace>

$ kubectl delete deployment myapp-deployment
$ kubectl edit deployment myapp-deployment
YAML Definition
apiVersion: apps/v1
kind: Deployment
metadata:
  name: grade-submission-api
  namespace: grade-submission
spec:
  selector:
    matchLabels:
      app.kubernetes.io/instance: grade-submission-api

  # 確保在 selector 的條件下,滿足足夠數量的 Pod,否則就用 template 建出新的 pod
  replicas: 2

  template:
    metadata:
      labels:
        app.kubernetes.io/name: grade-submission
        app.kubernetes.io/component: backend
        app.kubernetes.io/instance: grade-submission-api
    spec:
      containers:
        - name: grade-submission-api
          image: rslim087/kubernetes-course-grade-submission-api:stateless
          resources:
            requests:
              memory: "128Mi"
              cpu: "200m"
            limits:
              memory: "128Mi"
          ports:
            - containerPort: 3000
Rolling Update and Rollback
Rolling Update
第一次建立 Deployment 時,他會觸發 rollout,一個 rollout 會建立新的 deployment revision,稱作 revision one。未來,當有新的版本時,會觸發新的 rollout,然後會再建立一個新的 deployment revision,稱作 revision two。
# 查看 rollout 的狀態
$ kubectl rollout status deployment/myapp-deployment

# 查看 rollout 的歷史
$ kubectl rollout history deployment/myapp-deployment
在 k8s 中預設會使用 RollingUpdate 的策略來更版,這個策略會依序替換更新正在運行的實例,以確保沒有 downtime。具體來說,k8s 會再建立一個 replicaset,然後把新版的 Pods 建在裡面,同時,把舊的 replicaset 中的 Pods 陸續停掉。
另一種 Recreate 策略則是把所有運行的實例先砍掉後才建出新的,這種則會有 downtime。
更新的方式包含:
# 方法一:修改完 deployment 設定檔後執行
$ kubectl apply -f deployment-definition.yml

# 方法二:使用 set image(但這種做法會是的設定檔和實際執行的結果不一致)
# kubectl set image deployment/<deployment-name> <container-name>=<container-image>
$ kubectl set image deployment/myapp-deployment nginx-container=nginx:1.9.1
Rollback
如果因為某些原因發現新版本是有問題的,k8s 提供 Rollback 的機制:
$ kubectl rollout undo deployment/myapp-deployment
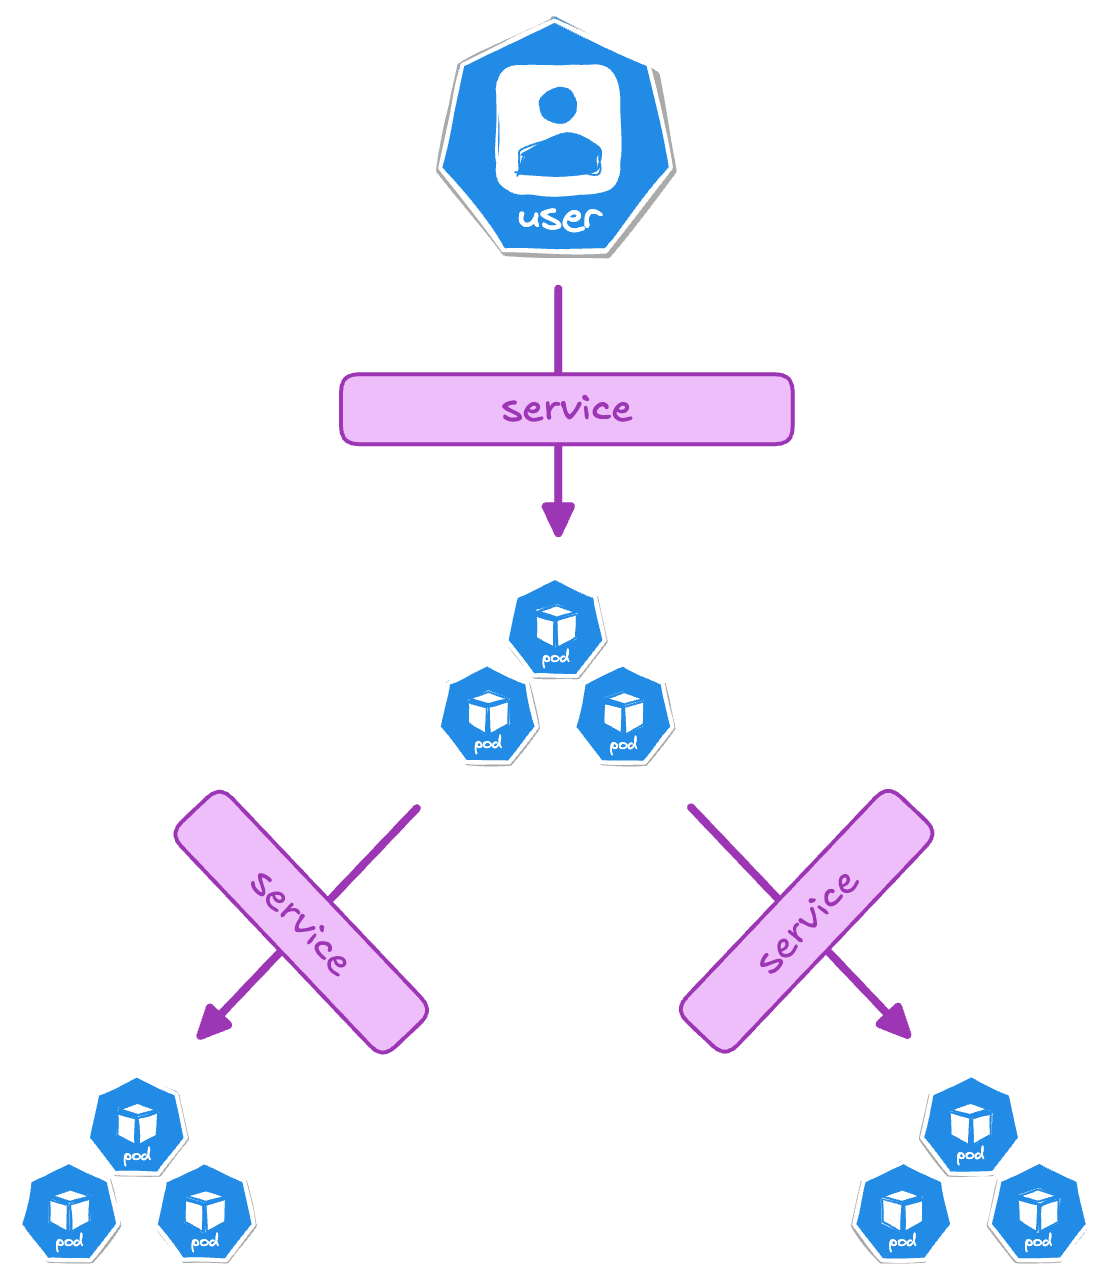
Service
在 k8s 中,IP 位址會被指派給 Pod;每一個在 k8s 中的 Pod 都有一個自己的內部 IP 位址(在 Docker 中,則總是會指派一個 IP 位址給 Docker Container)。
透過 k8s 的 Service,可以讓「外部使用者」或「其他內部服務」間進行通訊:
-
ClusterIP:Pod 與 Pod 間內部溝通使用,
Type不指定的話預設就是ClusterIP -
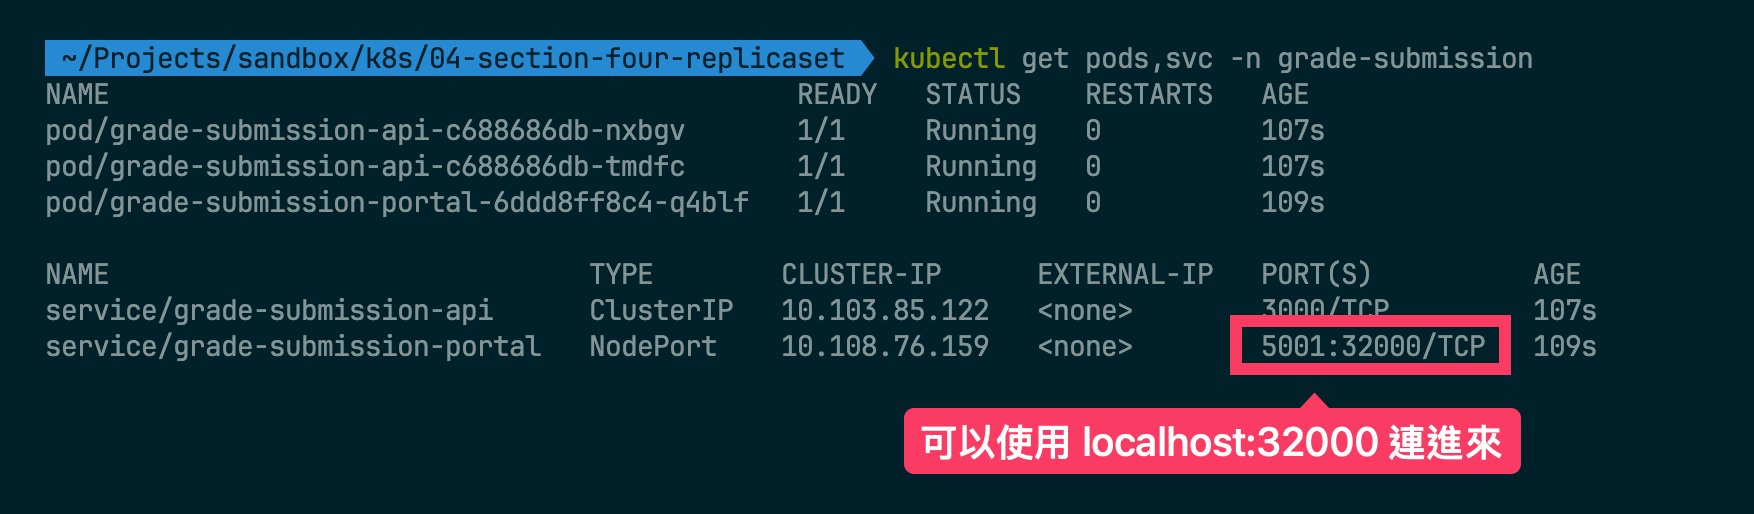
NodePort:讓外部的服務(例如,localhost)可以存取到 k8s 的網絡。這個 service,只適合用在測試環境。一般來說,production 並不會使用 NodePort,而是會用 LoadBalancer 或 Ingress 等其他方式。
- Cluster 中的每個 Node 都會多暴露這個 port,即使該 Node 中並沒有任何 App 依賴這個 Port,增加了安全性的風險
-
LoadBalancer:產生外部 IP,適合用在正式環境讓外部存取
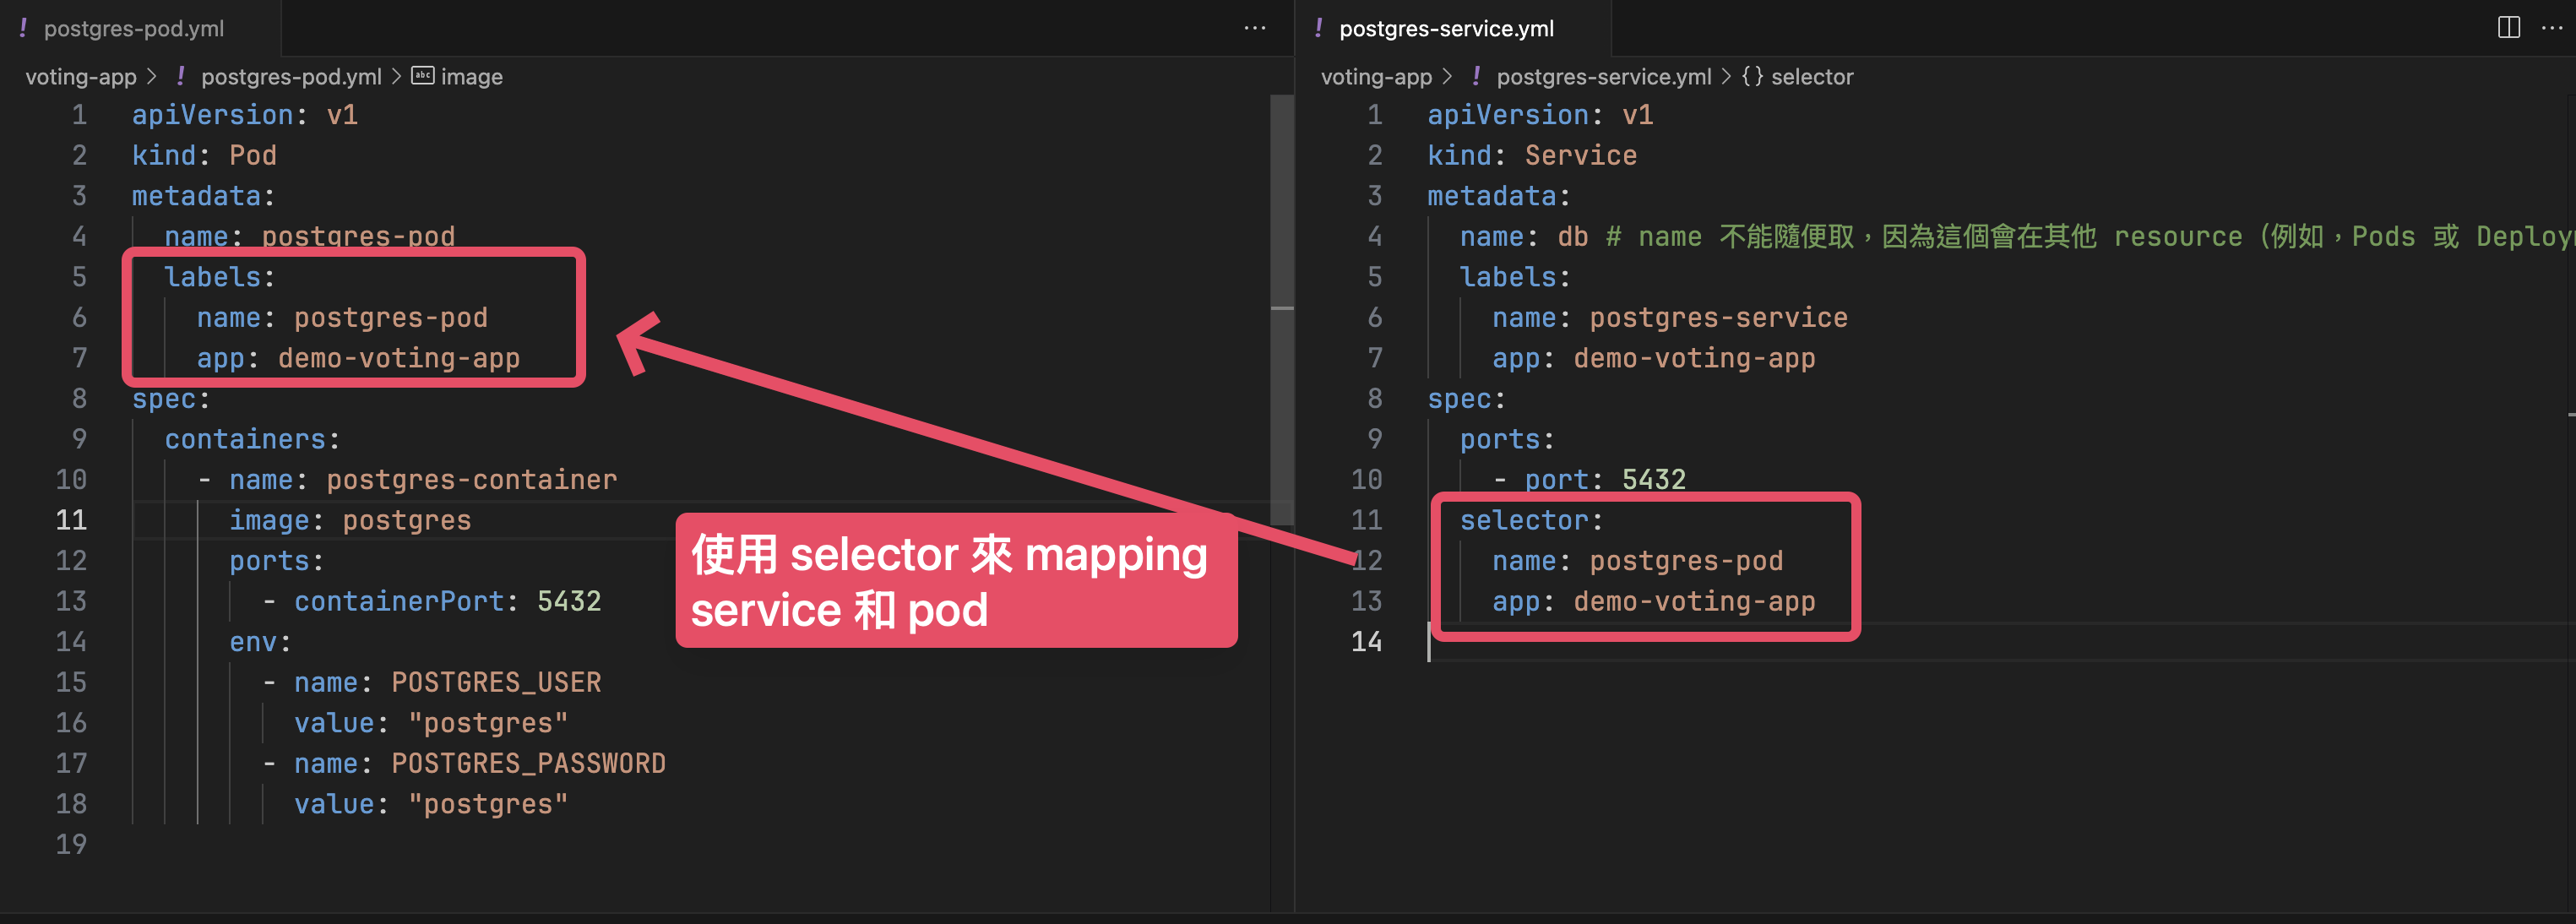
Selector
使用 Label Selector 來 Mapping 這個 service 是要對應到哪些 Pods
NodePort(適用於測試環境)
NodePort service 會監聽 node 上的 port,然後把對應的 request 轉發到 pod 上對應的 port。
以 Service 的角度來看,共可以分成這些 port:
- Port:在 service 上的 port(
紫色),對應到的就是pod中指定的containerPort - TargetPort:在 Pod 上的 port(
藍色) - NodePort:暴露給外部通訊(
綠色),只能介於 30000 - 32767 之間。
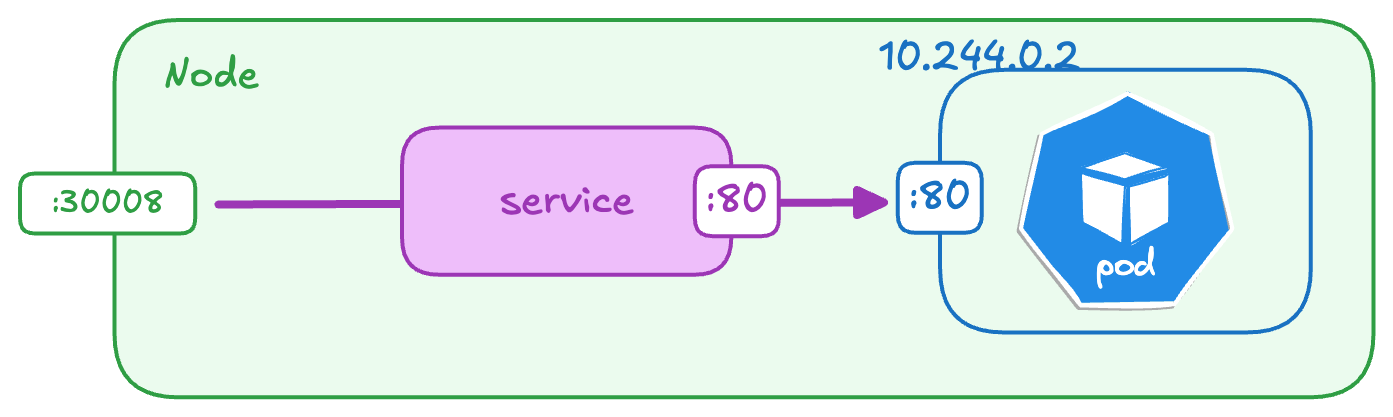
# Service Definition
apiVersion: v1
kind: Service
metadata:
  name: myapp-service

spec:
  # NodePort Service 會將所有從 Node 上指定 Port 進來的請求,
  # 都 proxy 到符合 label selector 的 pods 的 port 上。
  # 例如,這裡會將 localhost:30008 進來的請求,proxy 到 label 為
  # “app.kubernetes.io/instance: grade-submission-portal” 的 Pods 的 5001 port
  type: NodePort
  selector: # 必填,指定要對應的 Pods
   app.kubernetes.io/instance: grade-submission-portal
  ports:
    - port: 80 # 必填
      targetPort: 80 # 選填,預設和 port 相同
      nodePort: 30008 # 選填,範圍介於 30000-32767
$ kubectl create -f service-definition.yml
$ kubectl get services
在 k8s 中,不論是一個 Node 中只有一個 Pod、一個 Node 中有多個 Pods、或是多個 Nodes 中有多個 Pods,k8s 都會自動建立對應的 Service,不需要開發者額外再進行設定。
ClusterIP
ClusterIP 適合用在 Cluster 中 Pod 與 Pod 間的溝通。
預設如果在 spec 中沒有指定 type 的話,就會是 ClusterIP:
apiVersion: v1
kind: Service
metadata:
  # name 不能隨便取,因為這個會在其他 resource(例如,Pods 或 Deployments)中參照
  # 例如,其他 pod 如果要連到這個 pod 時要用 "db:5432"
  name: db
  labels:
  app.kubernetes.io/name: grade-submission
  app.kubernetes.io/component: backend
    app.kubernetes.io/instance: grade-submission-db

spec:
  # 在 Cluster 內,如果有請求送到 db:5432
  # 就會 proxy 到 label 為 "app.kubernetes.io/instance: grade-submission-db" 的 pod 的 5432 port
  type: ClusterIP
  selector:
    app.kubernetes.io/component: backend
  app.kubernetes.io/instance: grade-submission-db
  ports:
    - port: 5432
    - targetPort: 5432
要連到某個 ClusterIP,可以使用 Port Forward,例如,
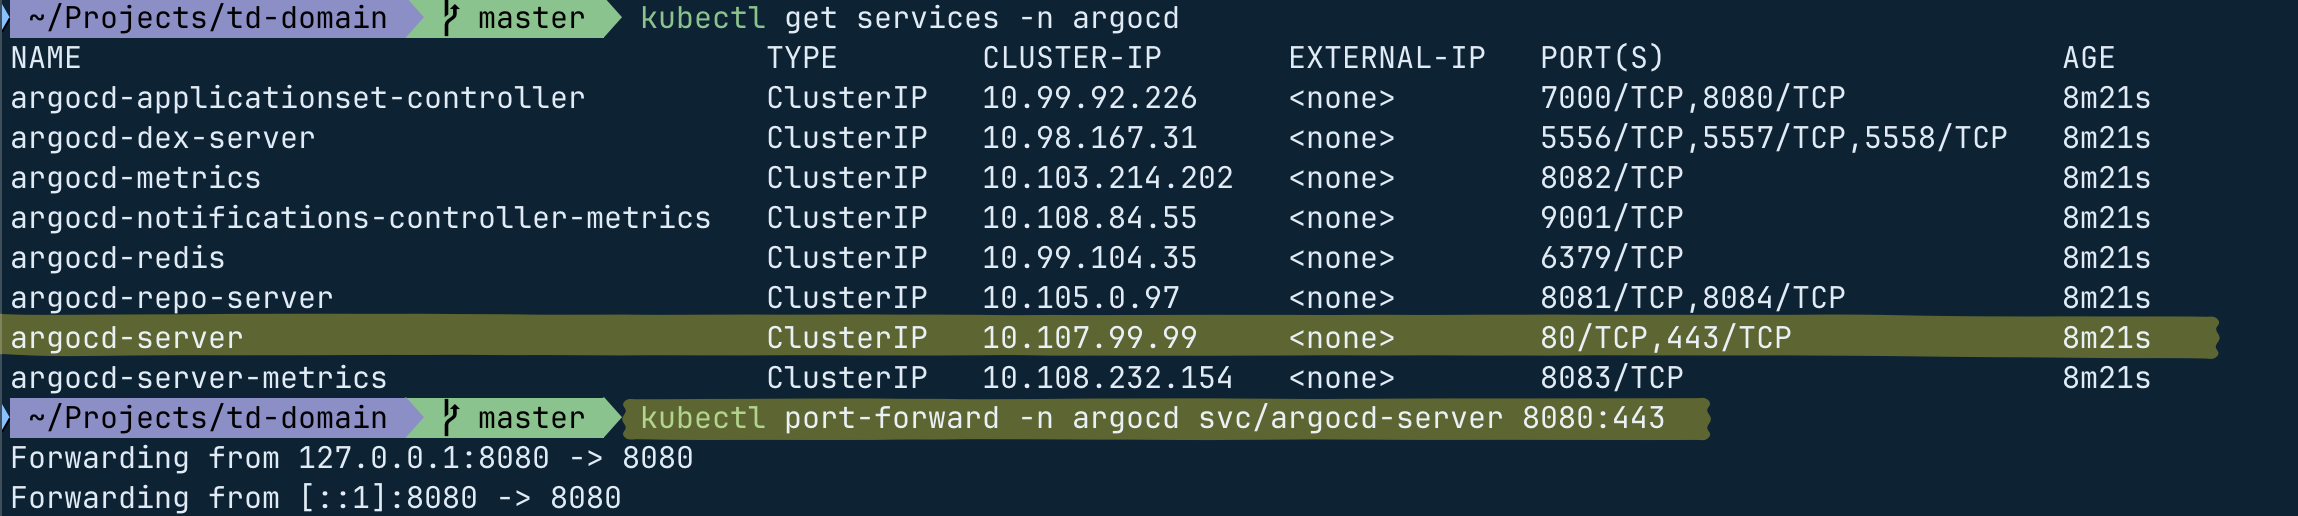
# 將 argocd-server 這個 service 的 443 port forward 到本地的 8080 port
# kubectl port-forward --namespace=<namespace> <service-name> <local-port>:<clusterIP-port>
$ kubectl port-forward -n argocd service/argocd-server 8080:443
Namespaces and ResourceQuota
預設的情況下,我們會在 default 這個 namespace 底下進行操作。除了 default 之外,預設還會有 kube-node-lease、kube-public 和 kube-system 這些 namespaces。
建立 Namespace
使用 YAML 建立
# namespace-definition.yml
# 建立名為 dev 的 namespace
apiVersion: v1
kind: Namespace
metadata:
  name: dev
$ kubectl create -f namespace-definition.yml
使用指令建立
# 建立名為 dev 的 namespace
$ kubectl create namespace dev
指定 Namespace
要指定檢視的 namespace,可以使用 --namespace=<namespace> 或 -n <namespace>:
# 取得所有 namespaces 中的 pods
$ kubectl get pods --all-namespaces

# 檢視在 kube-system 這個 namespace 中的 pods
$ kubectl get pods --namespace=kube-system

# 在 dev 這個 namespace 中建立 pod(或者直接指定在 YAML 檔中)
$ kubectl create -f pod-definition.yml --namespace=dev
YAML
在 metadata.namespace 中也可以指定該 Pod 要在那個 namespace 中被建立
apiVersion: v1
kind: Pod
metadata:
  name: redis-pod
  namespace: dev
  labels:
    name: redis-pod
    app: demo-voting-app
spec:
  containers:
    - name: redis-container
      image: redis
      ports:
        - containerPort: 6379
切換 Namespace
如果不想要每次都要指定 namespace,可以透過以下指令切換當前操作中的 namespace:
# 將當前操作的 namespace 改成使用 "dev"
$ kubectl config set-context $(kubectl config current-context) --namespace=dev
連到不同 namespace 下的 service
如果是在同一個 namespace 下,可以直接使用 service name 就可以,但如果是在不同 namespace 下,則要指定特定 namespace 下的 service:
// 連到 "dev" 這個 namespace 底下的 "db-service" 這個 service
// cluster.local: default domain name of the Kubernetes cluster
// svc: subdomain for service
// dev: namespace name
// db-service: service name
mysql.connect("db-service.dev.svc.cluster.local")
ResourceQuota:限制 namespace 中可用的資源
如果想要限制 Namespace 中可以使用的資源,需要定義 ResourceQuota:
# resource-quota-definition.yml
apiVersion: v1
kind: ResourceQuota
metadata:
  name: compute-quota
  namespace: dev
spec:
  hard:
    pods: "10"
    requests.cpu: "4"
    requests.memory: 5Gi
    limits.cpu: "10"
    limits.memory: 10Gi
$ kubectl apply -f resource-quota-definition.yml
$ kubectl describe resourcequota compute-quota -n dev
ConfigMaps and Secrets
- ConfigMap:k8s 中的一個 Object,目的是用來保存不含敏感資料的設定檔,適合用在應用程式的設定、環境變數等等。
- Secret:和 ConfigMap 相似,但設計來保存敏感資料,包含密碼、token、SSH keys、API credentials,這些 Secrets 中的資料會以 base64 編碼,以增加最基本混淆。
apiVersion: v1
kind: ConfigMap
metadata:
  name: app-config
data:
  LOG_LEVEL: "info"                    # Logging level (info, debug, warn, error)
  APP_ENV: "production"                # Application environment
  API_BASE_URL: "https://api.example.com"  # External API base URL
  CACHE_TTL: "3600"                    # Cache Time-to-Live in seconds
apiVersion: v1
kind: Secret
metadata:
  name: db-credentials
type: Opaque
data:
  DB_HOST: bG9jYWxob3N0           # Base64 encoded "localhost"
  DB_PORT: NTQzMg==               # Base64 encoded "5432"
  DB_USER: YWRtaW4=               # Base64 encoded "admin"
  DB_PASSWORD: c2VjdXJlX3Bhc3M=   # Base64 encoded "secure_pass"
接著即可在建立 Pod 時使用對應的 ConfigMap 和 Secret:
apiVersion: v1
kind: Pod
metadata:
  name: app
spec:
  containers:
  - name: app-container
    image: my-app-image:latest
    env:
    # Inject ConfigMap values as environment variables
    - name: LOG_LEVEL
      valueFrom:
        configMapKeyRef:
          name: app-config
          key: LOG_LEVEL
    - name: APP_ENV
      valueFrom:
        configMapKeyRef:
          name: app-config
          key: APP_ENV

    # Inject Secret values as environment variables
    - name: DB_USER
      valueFrom:
        secretKeyRef:
          name: db-credentials
          key: DB_USER
    - name: DB_PASSWORD
      valueFrom:
        secretKeyRef:
          name: db-credentials
          key: DB_PASSWORD
$ kubectl get secrets
Stateful Set, Persistent Volumes & Persistent Volume Claims (PVC)
在 k8s 中,Application 可以分成兩類:Stateless 和 Stateful。這兩者的差別主要在於當 Pod 重啟後,是否需要保留原本的資料狀態:
- Stateless:Pod 在 restart 或 recreation 後資料就會消失
- 使用 Deployment 所建立出來的 Pod 就屬於這種,通常適合用在 App 類型
- Pod 間是可以�互相替換
- Stateful:Pod 在 restart 或 recreation 時可以保留先前的資料狀態
- 使用 StatefulSet 所建立出來的 Pod 就是 Stateful Pod,適合用在資料庫。
- 每個 Pod 有一個 unique ID,每個 Stateful Pod 都有自己對應的 PVC,所以有其獨自的儲存空間(Persistent Volume),確保資料不會互相干擾
一個 StatefulSet 可以建立並管理多個 Stateful Pod(例如,mongodb-0);每個 Stateful Pod 都會對應到自己的一個 PVC;PVC 會 bind 在適當的 PV;PV 會 mounted 在 Stateful Pod 中指定的資料夾。即使 Pod 被刪掉,PVC 還是存在,它可以再掛回原本的 Pod。
具體來說,假設有 MongoDB 使用的 Pod,由於 Pod 可能被銷毀、回收、重新建立,如果沒有將資料保存下來,每次 Pod 重建後資料就消失了。為了避免這個問題,我們可以使用 Persistent Volume Claims (PVC) 來定義需要多少的儲存空間和儲存特性。
k8s 會根據我們定義的 PVC,找到一個適合的 Node,並把實體的儲存空間(Persistent Volume, PV)掛在那個 Node 上。
由於 Pod 的名字是 unique 的,因�此即使該 Pod 被刪除,只要下次透過 StatefulSet 建立出相同名稱的 Pod 是,就會自動連結到原本定義的 PVC 和其對應的 Persistent Volume。
StatefulSet YAML Definition
apiVersion: apps/v1
kind: StatefulSet

metadata:
  name: mongodb
  namespace: grade-submission

spec:
  selector:
    matchLabels:
      app.kubernetes.io/instance: mongodb

  # 用來命名 Stateful Pod 的前綴 (Pod Name: <StatefulSetName>-<OrdinalIndex>)
  serviceName: mongodb # mongodb-0, mongodb-1

  # 確保在 selector 的條件下,滿足足夠數量的 Pod,否則就用 template 建出新的 pod
  replicas: 1
  template:
    metadata:
      labels:
        app.kubernetes.io/name: grade-submission
        app.kubernetes.io/component: database
        app.kubernetes.io/instance: mongodb
    spec:
      containers:
        - name: mongodb
          image: mongo:4.4
          ports:
            - containerPort: 27017

          # 將 Persistent Volume 掛載到容器內的 /data/db 路徑
          volumeMounts:
            - name: mongodb-persistent-storage
              mountPath: /data/db

  # 定義 Stateful Pod 的 Persistent Volume Claim
  volumeClaimTemplates:
    - metadata:
        name: mongodb-persistent-storage
      spec:
        accessModes: ["ReadWriteOnce"]
        resources:
          requests:
            storage: 1Gi
$ kubectl get statefulset -n grade-submission
$ kubectl get pvc -n grade-submission
從下圖中可以看到,stateful pods 有其 unique name(例如,mongodb-0),而 stateless pods 則會隨機產生一組名字。這是因為 stateless pods 隨時可以替換,但 stateful pods 則不行,stateful pods 都會連結到對應的 PVC,每個 PVC 會對應連結到自己的儲存空間。
因為 stateful pod 的名稱是固定的,所以即使 Pod 被刪掉,只要下次建立出來的 Name 是一樣的,就可以連結到原本 PVC。

Service for StatefulSet YAML Definition
只有 Stateful Set 還不夠,為了讓 App 能夠連結到 DB,需要為 DB 建立 Service:
apiVersion: v1
kind: Service
metadata:
  name: mongodb
  namespace: grade-submission
spec:
  selector:
    app.kubernetes.io/instance: mongodb
  ports:
  - port: 27017
    targetPort: 27017
檢視資料
有幾種方式可以檢視 DB 中的內容。
1. 連進 Pod 中檢視
# 連進 Pod 中
$ kubectl exec -n grade-submission -it mongodb-0 -- bash

# 使用 Mongo Shell 連進 MongoDB
$ mongo -u admin -p password
2. 使用 Port Forwarding
# 使用 port-forward 把 k8s 中某個 pod 的 port forward 到本機
$ kubectl port-forward -n grade-submission pod/mongodb-0 27017:27017

# 在本機電腦連進 k8s 上的 mongodb(或用 GUI Tool 也可以)
$ mongosh --host localhost -u admin -p password
Resiliency and Self Healing
Process Termination vs. Application Unresponsive
k8s 的 Restart Policy 只適用在 Process Termination 的情況,例如,OOM、Application Crash 等等。
如果 Application 仍然在運行中,但因為某些問題導致 server 沒辦法回應時,例如 deadlock,k8s 並不會自動偵測到這種錯誤並重新啟動,這時候需要額外設定 liveness probes 來主動檢查 Application 的健康狀態。
Restart Policy
在 k8s 中,預設的 RestartPolicy 是 Always,也就是說,不論 Process Terminate 的理由是什麼,k8s 都會試著重啟這個 Pod。
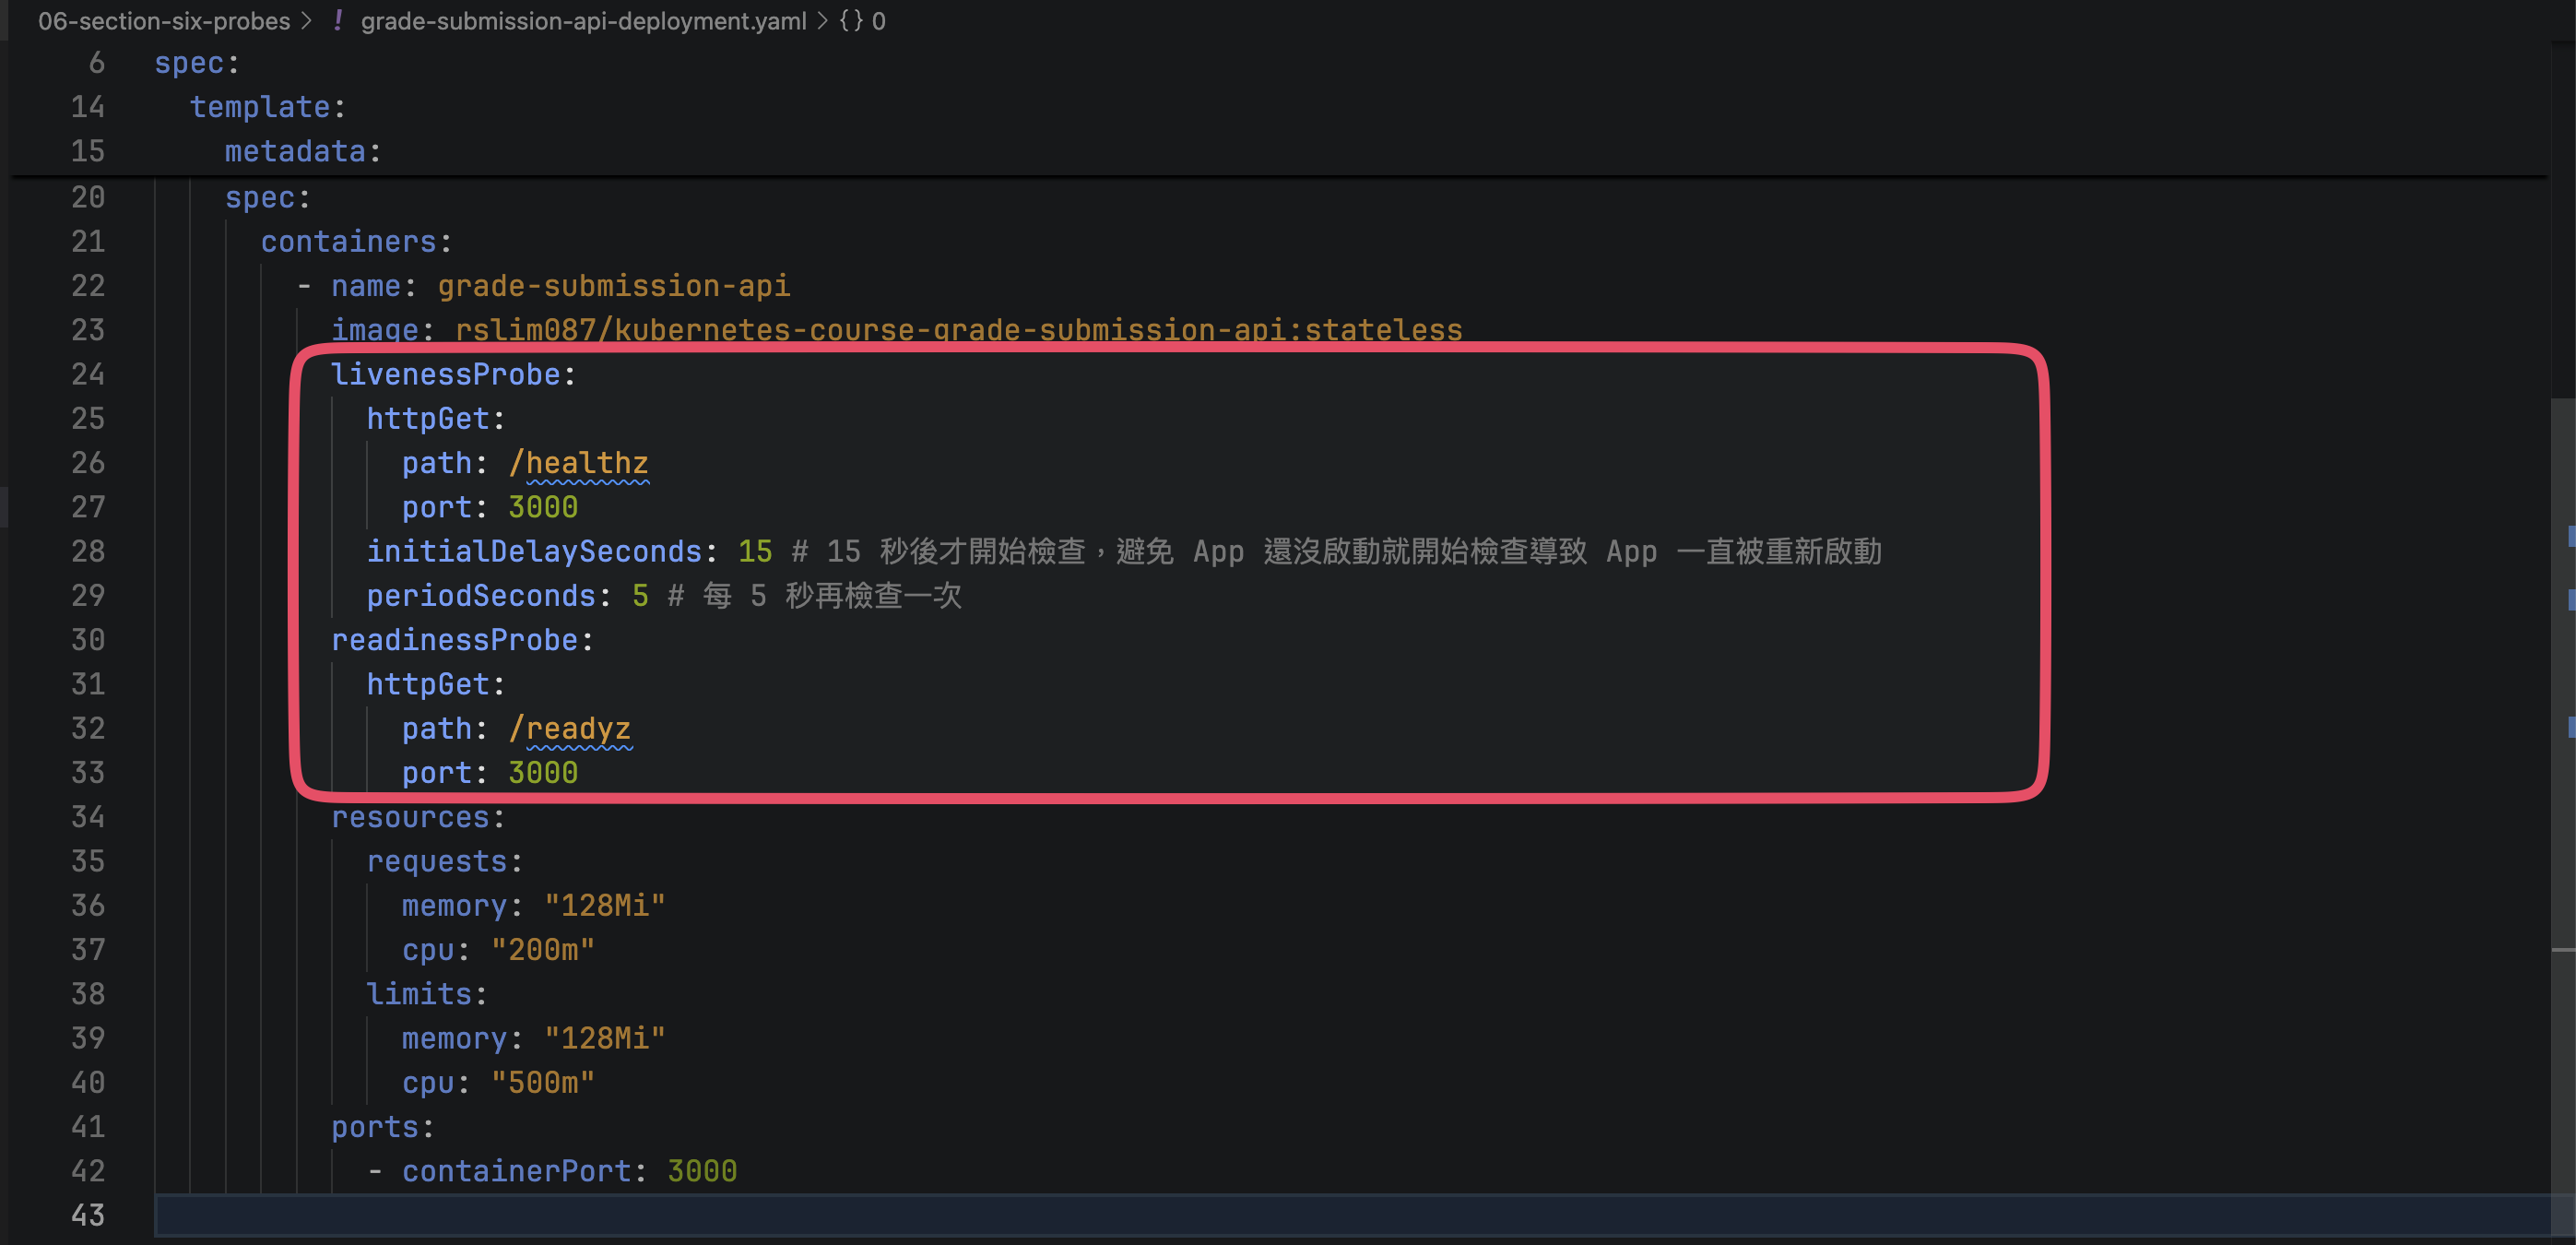
Liveness and Readiness Probes
- Liveness Probes:如果沒有收到 Status Code 200,表示 App 沒有正常運作,則會重新啟動 container,常用
GET /healthz。 - Readiness:如果沒有收到 Status Code 200,表示 App 還沒準備好(例如,尚未與 DB 建立連線),則 container 會處於 out of service 的狀態,以避免有流量被導入,常用
GET /readyz。
ContainerD
Docker 和 Kubernetes 的一些歷史
一開始,Kubernetes 是專為協調 Docker 而建立的,因此兩者緊密耦合,Kubernetes 當時只能與 Docker 搭配使用。 隨著 Kubernetes 作為容器協調器的普及,其他 container runtime(如 Rocket)也想加入,這讓 Kubernetes 的使用者需要它能與 Docker 以外的 container runtime 一起運作。
為此,Kubernetes 引入了一個新的介面,稱作 Container Runtime Interface(CRI),任何廠商只要遵守 OCI(Open Container Initiative)標準,就能在 Kubernetes 被運行。 OCI 標準定義了映像的建立方式(imagespec)和 runtimespec 的開發標準。
在定義了這個標準後,雖然 Rocket 等其他 container runtime 就能夠在 Kubernetes 上運行,但 Docker 起初並不是為了符合 CRI 標準而設計,Docker 在 CRI 出現之前就已存在,並且是當時最主流的容器工具。
起初為了繼續支援 Docker,Kubernetes 引入了稱為 Dockershim 的臨時解決方案,允許 Docker 即使不符合 CRI 標準仍可以在 kubernetes 上繼續運作。 然而,在 Kubernetes 1.24 版本中決定完全移除 Dockershim,以減少不必要的維護成本。
在 kubernetes 移除 dockershim 之後,因為 Docker 產生出來的 image 符合 CRI imagespec 的規範,因此只要搭配 ContainerD 使用,就可以繼續在 Kubernetes 上運行。ContainerD 是 Docker 的一部分,但現在是個獨立的專案。
具體來說,如果我們有安裝 Docker,可以用 docker run 來執行 container,但如果我們不需要 Docker 的其他功能,只是要運行某個 container,則可以使用 ContainerD 來達到。
Container Runtime 能像 docker 一樣讓 container 運行起來。
Reference
- Kubernetes for the Absolute Beginners - Hands-on @ Udemy
- Kubernetes Training: Learn K8s from Zero to Cloud @ Udemy、Github
- Kubernetes Made Easy: A Beginner’s Roadmap to Container Orchestration @ ByteByteGo