Table of Contents
[TOC]
Reference
- Sample Codes @ Google Colab
- LangGraph Essentials @ LangGraph Academy
Components
使用 LangGraph 通常會包含幾個步驟:
- Define State
- Define Node
- (optional) define conditional edges
- Build the Graph (Define Edge)
- StateGraph
- Add nodes
- Add edges (static and conditional edges)
- Compile and Display
- Invoke the Graph
- define initial state
- invoke with initial state
State: Data
-
會被餵進去 Graph 中,被 Graph 更新,最後回傳給使用者
-
可以使用 Pydantic Model、TypedDict、dataclass 來定義 State
-
在定義 State 的時候,可以同時定義 reducer function 來處理 state
class State(TypedDict):# operator.add 是 Langgraph 提供的 reducer function# 以這裡來說,是說明 State 被呼叫時,它會把新的資料 append 到 nlist 中,而不是覆蓋nlist: Annotated[List[str], operator.add]State(nlist=["A"]) # nlist=["A"]State(nlist=["B"]) # nlist=["A", "B"]
State Schema:何時用哪一種?
定義 graph schema 的方式有三種,文件主推 TypedDict,其它兩種有各自的觸發條件:
| 寫法 | 何時使用 | 注意事項 |
|---|---|---|
TypedDict(預設) | 一般情況都用這個 | 沒有預設值、沒有遞迴驗證 |
dataclass | 想要在 state 裡提供預設值時改用 | 仍是輕量結構,效能接近 TypedDict |
Pydantic BaseModel | 需要遞迴的資料驗證(nested model 也要被驗證)時用 | 效能比 TypedDict / dataclass 差;且 LangChain 高階的 create_agent factory 不支援 Pydantic state schema |
[!WARNING] 如果打算用
create_agent包出 agent,state schema 限制更嚴:自 langchain 1.0 起只接受 TypedDict(且要 extendAgentState),PydanticBaseModel和 dataclass 都不支援。
StateGraph
- graph 是無狀態的(stateless)
- 定義一個 graph 時,需要先把 graph 會用到的 state 定義好,這個 state 可以被 graph 中的所有 node 所共享
- 當 graph 被 invoke 的時候,state 會被初始化
builder = StateGraph(State)
# ...
graph = builder.compile()
# ...
graph.invoke()
Reducer
operator.add是 python 內建的 reducer function- 透過 Annotated Type 的 metadata 把 reducer function 帶入
class State(TypedDict):
    # operator.add 是 reducer function,用來說明當有多個 Node 對 State 進行處理的話
    # 要如何處理
    nlist: Annotated[list[str], operator.add]
Node: Functions
- 是一個 function,input 是 state,output 是更新後的 state
Edges: Control Flow
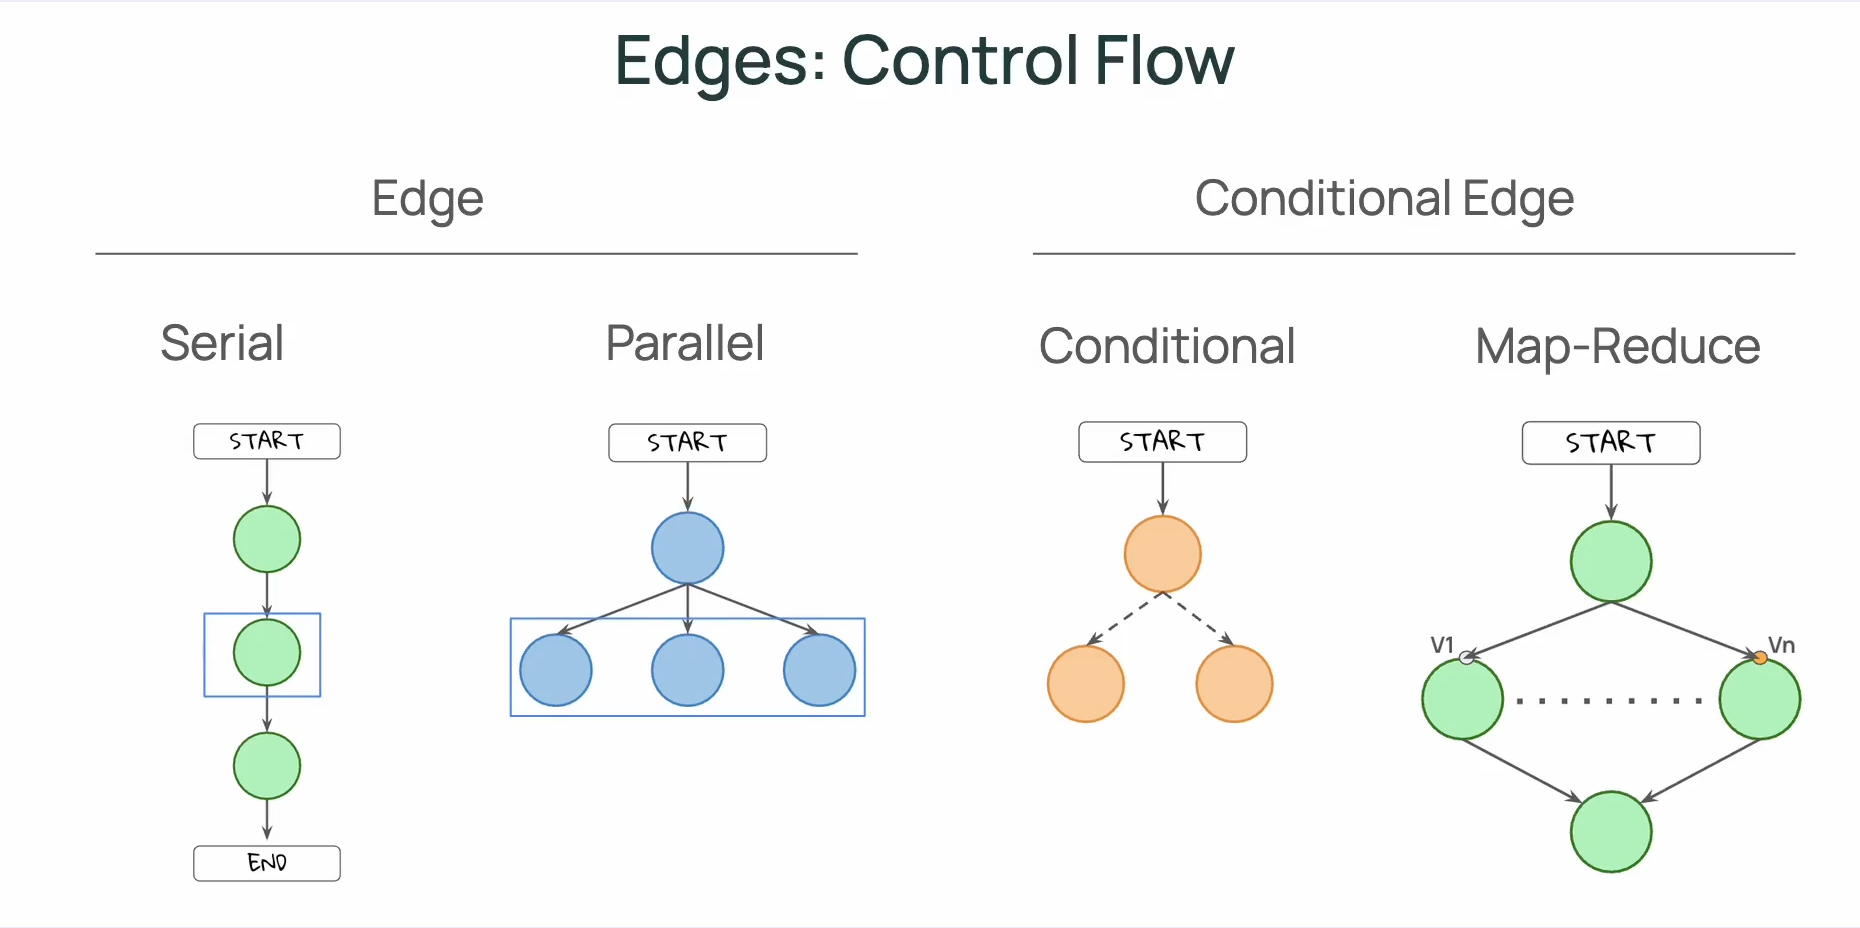
[!TIP] 一個重點是:Edge 可以控制 control flow,但不能控制 data(state)能被誰(哪個 node)存取;在 LangGraph 中 State 會被所有 Nodes 所共享。
[!TIP] 在圖中,我們會用「實線」來表現 Static Edges;用「虛線」來表示 Conditional Edges。
Static Edges
- Serial
- Parallel
Conditional Edges
- Conditional
- Map-Reduce
建立 Conditional Edges 的方式有兩個:
- 定義 conditional edge function 並使用
builder.add_conditional_edges() - 不額外定義 conditional edge,而是在 Node 中使用
Command方法
方法一:
# Define Conditional Edges
def conditional_edge(state: State) -> Literal["b", "c", END]:
  select = state["nlist"][-1]
  if select == "b":
    return "b"
  elif select == "c":
    return "c"
  elif select == "q":
    return END
  else:
    return END
# Build the graph
builder = StateGraph(State)

# Add nodes
builder.add_node("a", node_a)
builder.add_node("b", node_b)
builder.add_node("c", node_c)

# Add edges
builder.add_edge(START, "a")
builder.add_edge("b", END)
builder.add_edge("c", END)
builder.add_conditional_edges("a", conditional_edge)  # Add conditional edges

# Compile and display
graph = builder.compile()
display(Image(graph.get_graph().draw_mermaid_png()))
方法二:透過 Command 把邏輯放在 Node 中
def node_a(state: State) -> Command[Literal["b", "c", END]]:
  select = state["nlist"][-1]
  if select == "b":
    next_node = "b"
  elif select == "c":
    next_node = "c"
  elif select == "q":
    next_node = END
  else:
    next_node = END

  return Command (
      # update state
      update = State(nlist=[select]),
      # specify next node
      goto = next_node
  )

# 不需要再額外添加 conditional edges
# builder.add_conditional_edges("a", conditional_edge)  # Add conditional edges
Map-Reduce 與 Send
要在執��行期動態 fan-out 出多個平行任務(每個任務跑同一個 node、但帶不同 payload),就要在 routing function 中回傳 Send 的 list。Send(node, payload) 代表「呼叫某個 node,並指定它這次收到的 state」——這是少數會讓 node 看到的 state 不等於 OverallState 的場合。
from operator import add
from langgraph.types import Send

class OverallState(TypedDict):
    tasks: list[str]
    results: Annotated[list[str], add]   # 👈 reduce 階段靠它把各 worker 的輸出合併
    final_summary: str

def planner(state):
    return {"tasks": ["task1", "task2", "task3"]}

def worker(state):                        # 👈 注意:state 是 {"task": t},不是 OverallState
    result = do_work(state["task"])
    return {"results": [result]}          # 回傳 list,靠 add reducer 合併

def dispatch_tasks(state: OverallState):  # 👈 routing function,回傳 Send list
    return [Send("worker", {"task": t}) for t in state["tasks"]]

def final_summary(state):
    return {"final_summary": summarize(state["results"])}

builder.add_node("planner", planner)
builder.add_node("worker", worker)
builder.add_node("final_summary", final_summary)

builder.add_edge(START, "planner")
builder.add_conditional_edges("planner", dispatch_tasks)   # 👈 dispatch (map)
builder.add_edge("worker", "final_summary")                # 👈 所有 worker 收斂到這 (reduce)
builder.add_edge("final_summary", END)
幾個容易踩到的點:
- worker 收到的 state 不是 OverallState:而是你在
Send(..., payload)裡指定的那份 dict。所以worker簽章上應該對應 payload 的形狀(這個範例是{"task": str})。 - 收斂靠 reducer,不是靠程式碼自己 append:每個平行的 worker 各自回傳
{"results": [result]},由Annotated[list[str], add]在 reduce 階段把它們合併成完整 list。沒有 reducer 就會互相覆蓋。 - fan-in 用一條普通的
add_edge:所有 worker 都連到final_summary,LangGraph 會等所有 Send 出去的 worker 都跑完才推進。
[!TIP] > 為什麼
Send要放在 routing function 裡,而不是 node 裡? 把 dispatch 寫在 conditional edge function(routing function)中,可以把「這個 node 在做什麼業務邏輯」(planner 規劃任務)和「接下來要往哪走、要 fan-out 幾份」(dispatch_tasks 拆派工作)兩件事拆開。planner只負責生出tasks;要不要平行、平行幾份、payload 長什麼樣,由 routing function 決定。這樣 node 本身保持單純、好測試,也比較容易換掉 dispatch 策略而不動到 node。
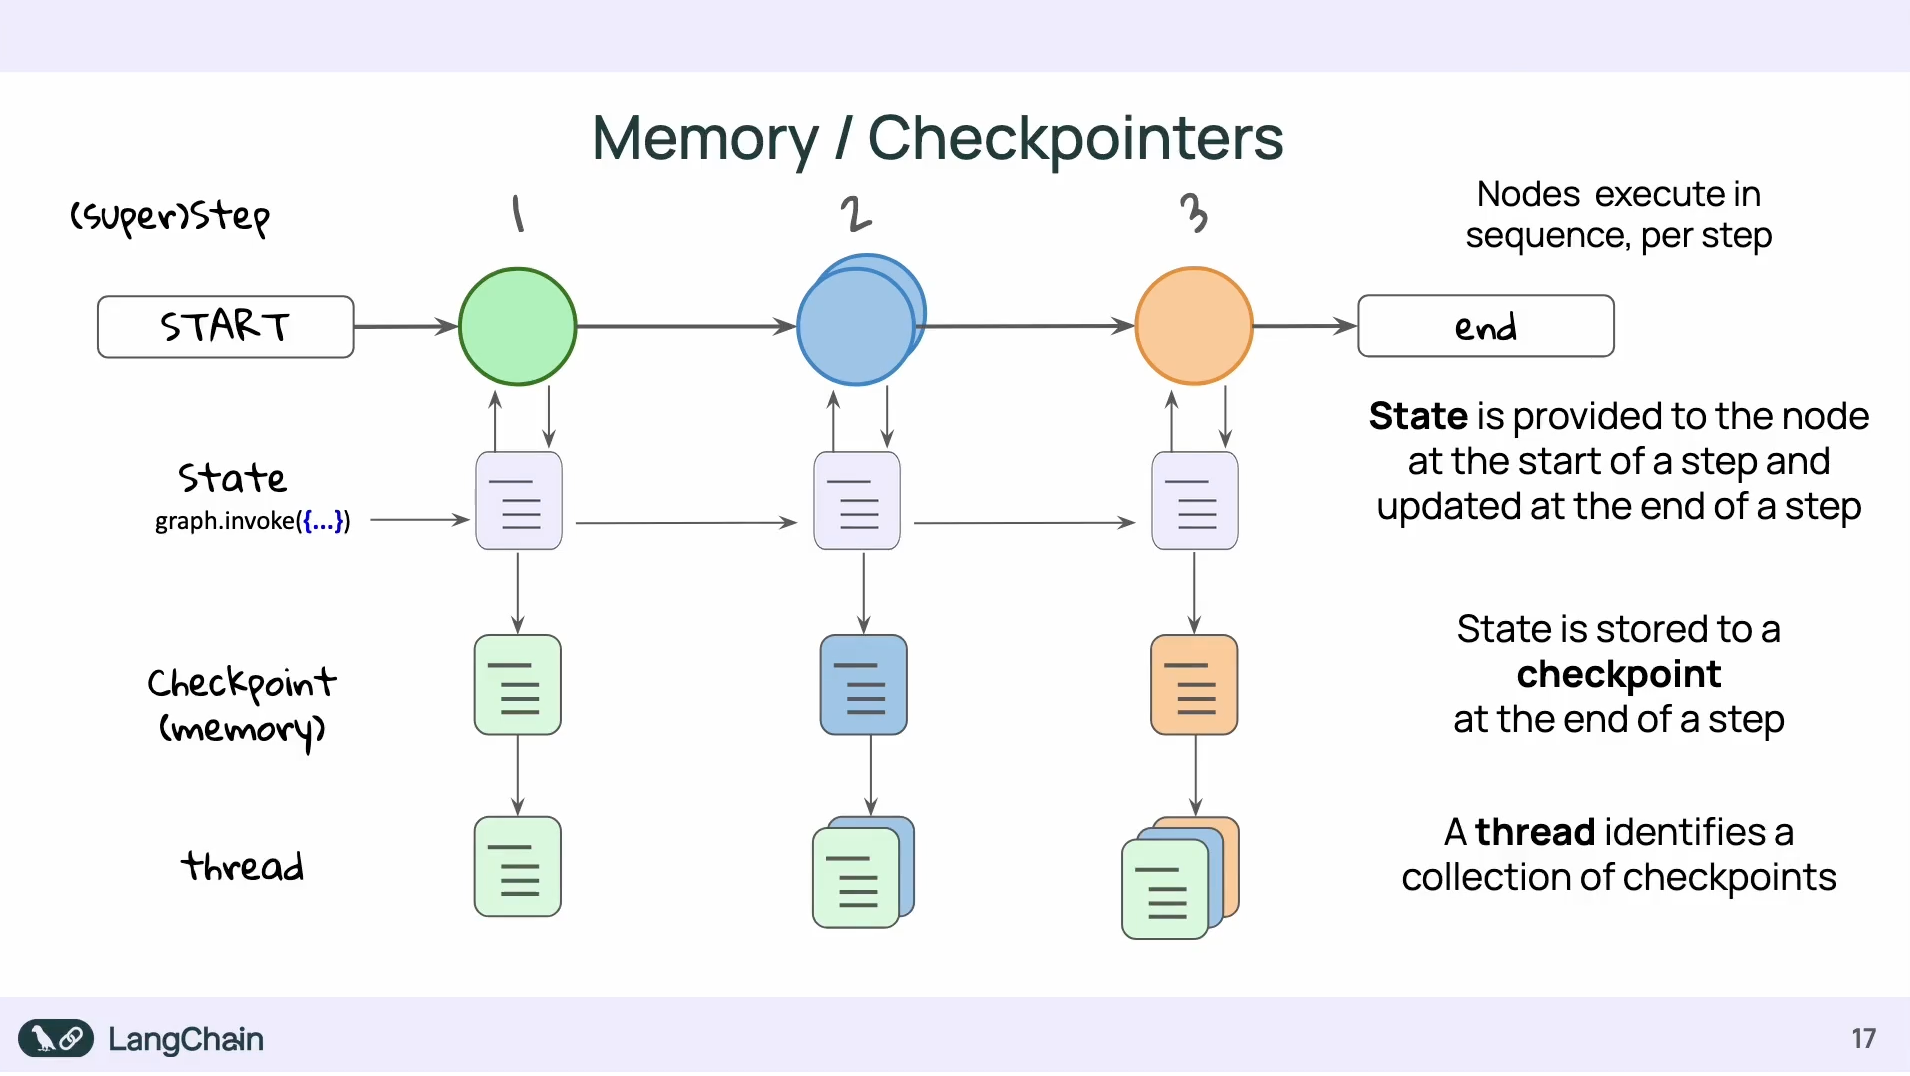
Super-step
在 LangGraph 中,一個 super-step 代表一個 "tick",是 graph 執行的最小時間單位,也是 checkpoint 記錄的基本單位。
- 一個 super-step 會被記錄成一次 checkpoint
- 平行執行的多個 node 會算在同一個 super-step 中,所以只會被記錄一次(而不是每個 node 各記錄一次)
- 序列(serial)執行的 node 則會分別屬於不同的 super-step,各自產生一次 checkpoint
序列:a → b → c            共 3 個 super-steps(3 次 checkpoint)

平行:     ┌─ b ─┐
       a ─┤     ├─ d      共 3 個 super-steps(b、c 平行算一次)
          └─ c ─┘
CheckingPoint/Memory
[!TIP] 本節以及接下來的 Context、Store,對應官方文件 Persistence,涵蓋 checkpointer、thread、Store 等持久化機制。
由於在 LangGraph 中,所有的 Node 都會共享 State,如果我們希望能在每一個 step 結束後,記錄當下的資料狀態(類似 snapshot),則可以使用 checkpoint。
透過 checkpointer 你可以把每一步驟結束時的資料狀態保存下來。
thread 則是把一系列的 checkpoint 整理起來,如此可以回朔出經過每個步驟後,資料改變了些什麼。
使用 Memory 的好處包含:
- 能夠錯誤的狀態中復原(recover gracefully from failure)
- 能夠 rollback 回特定的時間點(time travel)
- 即時 graph 沒有在運行,也能夠把資料保存下來(persistent state)
- �能夠在任何 step 時還原資料狀態(restore state at any step)
要能夠共享相同資料狀態的前提是他們有相同的 thread_id:
from langgraph.checkpoint.memory import InMemorySaver
# InMemorySaver 可在把 checkpoint 的資訊保存在記憶體中
# 另外還有 PostgresSaver 和 SqliteSaver
memory = InMemorySaver()
config = {"configurable": {"thread_id": "1"}}

graph = builder.compile(checkpointer=memory)

while True:
  user = input('b, c, or q to quit: ')
  input_state = State(nlist = [user])
  result = graph.invoke(input_state, config )
  print( result )
  if result['nlist'][-1] == "q":
      print("quit")
      break
從特定 checkpoint 重新執行(time travel)
前面 Memory 的好處列出「rollback 回特定的時間點(time travel)」——具體做法是把 graph.invoke() 的兩個參數搭配使用:
# 從特定歷史點接著跑
graph.invoke(None, {"configurable": {"thread_id": "1", "checkpoint_id": "abc123"}})

# 沒帶 checkpoint_id:從 thread 中最新(most recent)的 checkpoint 接著跑
graph.invoke(None, {"configurable": {"thread_id": "1"}})
LangGraph 會這樣解讀:
input=None:不要從外部加任何新資料進 state,直接用 checkpointer 載入的那一份checkpoint_id:指定要從哪個歷史點載入;不給就會載入 thread 中最新的那筆 checkpoint(checkpoint 之間透過parent_config串成一條 linked list,「最新」就是這條鍊的頂端)
組合起來的執行流程:
- checkpointer 依照
checkpoint_id載入該點的 state,以及該點記錄的「下一個要執行的節點」 - 因為
input=None,state 完全不被修改 - 從那個「下一個節點」開始往下跑——
checkpoint_id之前的節點不會重跑 - 每跑一個 super-step 就產生新的 checkpoint,不會覆蓋舊的——原本的歷史線還在,這次的執行只是在舊的時間點上岔出一條新支線
具體想像一下:
原本歷史:cp0 (start) ─→ cp1 (node_a 後) ─→ cp2 (node_b 後) ─→ cp3 (end)

graph.invoke(None, {checkpoint_id: cp1}) 的實際發生:
  ├── 載入 cp1 的 state(next = node_b)
  ├── node_a 不會重跑(cp0 → cp1 之間的執行被跳過)
  └── 從 cp1 接著跑 node_b → node_c... 產生新支線 cp2'、cp3'
換句話說,checkpoint_id 記錄的不只是「當下的資料快照」,還包含「該點原本要走的下一步」——這也是為什麼從同一個 checkpoint 重跑會剛好接續而不是從頭�來。
update_state 與 as_node
順著「checkpoint 也記錄了 next 節點」這個觀念,可以接著理解 as_node。先回到一個基本問題——LangGraph 怎麼決定下一步要跑哪個節點?
關鍵是:LangGraph 在決定走哪條 edge 時,依據的是「上一步是誰」,而不是當前的 state——所有 edge 規則都從特定節點出發,得先知道「誰剛跑完」才能對應到該節點的 edge。以這個 graph 為例:
START → node_a → node_b → node_c → END
edge 規則就是:
- 上一步是
START→ 下一步跑node_a - 上一步是
node_a→ 下一步跑node_b - 上一步是
node_b→ 下一步跑node_c
(即使是 conditional edge 也一樣,先確定「上一步是哪個節點」,才會去執行掛在它身上的判斷函式——state 是判斷函式內部會看的,不是 edge 路由本身的依據。)
所以 checkpoint 除了記錄 state 之外,也記錄「這次是誰跑完的」——那就決定了 next 是誰。
update_state 帶來的歧義:當你呼叫 graph.update_state(config, {"foo": "edited"}) 想手動改 state 時:
原本:cp(node_a 剛跑完)──► next = node_b
呼叫 update_state 後:cp'(?? 剛跑完)──► next = ???
這個更新該被視為「誰做的」?不同假設會走出完全不同的後續:
- 假裝
node_a做的 → next 還是node_b - 假裝
START做的 → next 變成node_a(等於從頭來過) - 假裝
node_b做的 → next 變成node_c(跳過 node_b 不跑)
as_node 就是用來明確指定這個更新要被當成哪個節點做的:
graph.update_state(config, {"foo": "edited"}, as_node="node_a")
不指定的話,LangGraph 會用「最後一個跑過的節點」當預設;但在 interrupt、time travel 等情境下,常常需要手動指定 as_node 才能得到想要的後續流程。
一個 human-in-the-loop 的具體場景:想像一個「AI 寫文章 → 人類審核 → AI 發布」的 graph:
START → write_article → human_review → publish → END
執行流程:
write_article跑完,產生草稿article = "..."human_review節點 interrupt,等待人類編輯- 人類覺得草稿太爛,把
article改成新內容 - 接著要 graph 繼續往下跑——預期執行
publish
如果只寫成:
graph.update_state(config, {"article": "人類改過的新內容"})
graph.invoke(None, config)
LangGraph 會困惑這次更新算誰做的:
- 算
START做的?那會從write_article從頭重跑 - 算
write_article做的?那會跳回human_review再 interrupt 一次 - 算
human_review做的?那才會跳到publish✅
這時 as_node="human_review" 就是在告訴 LangGraph「這次更新請當成 human_review 做的,下一步請跑 publish」:
特別要留意這裡的語意——as_node="human_review" 不是「從 human_review 開始跑」,而是「假裝 human_review 已經跑完了」。所以 human_review 本身不會被執行,LangGraph 直接從它的下一條 edge 走到 publish。
graph.update_state(
    config,
    {"article": "人類改過的新內容"},
    as_node="human_review",   # ← 把這次更新當成 human_review 做的
)

graph.invoke(None, config)
# → LangGraph 看到「上一步是 human_review」→ 跳過 human_review,直接跑 publish ✅
對照表:invoke() 的四種行為
把 graph.invoke(input, config) 兩個位置的可能值整理起來,可以看到 LangGraph 完整的執行語意:
input | config.checkpoint_id | 行為 |
|---|---|---|
| dict(新 input) | 沒帶 | 一般執行:把新 input 套到當前 state,從適當位置繼續 |
| dict(新 input) | 有帶(指定歷史點) | 從歷史點 fork:把新 input 套到那個 checkpoint 的 state 上 |
None | 沒帶 | 從最新 checkpoint 接續:常用於 update_state 後、interrupt 後恢復 |
None | 有帶(指定歷史點) | 純 replay:從歷史點接著跑,state 完全不動 |
四種組合對應四種使用情境——None + 帶 checkpoint_id 是純 replay;None + 不帶就是「接著現況跑」。
Context
到目前為止看到的 State 是節點之間流動、會被更新的資料;但在實際執行時,節點還會收到另外兩個輸入——Context(整個 run 不會變的環境,例如 user_id、tenant_id)以及 Config(LangGraph 框架自己會用的 metadata,例如 thread_id、checkpoint_id)。
三者的角色分工:
| State | Context | Config | |
|---|---|---|---|
| 存什麼 | 對話中會變動的資料(messages、計算結果) | 整個 run 不變的環境(user_id、tenant_id) | LangGraph 框架自己會用的 metadata(thread_id、checkpoint_id 等) |
| 誰修改 | 節點(透過 return) | 呼叫方一次性傳入 | 呼叫方一次性傳入 |
| 會被 checkpoint 嗎 | ✅ 會(可還原任意時間點的狀態) | ❌ 不會 | ❌ 不會 |
| 節點怎麼拿 | 第一個參數 state | runtime.context | 加一個 config: RunnableConfig 參數,或用 get_config() |
| 型別怎麼宣告 | StateGraph(MyState) | context_schema=MyContext | LangGraph 內建 |
[!TIP] Context 是 LangGraph 後來才加上的設計,專門用來放「圖執行時需要的應用層環境」。舊範例裡常會看到把
user_id塞進config["configurable"]["user_id"]的寫法——那是過去 Context 還不存在時的權宜做法,新版推薦改用 Context。
判斷時問自己:
- 「這是 LangGraph / LangChain 框架自己會用的嗎?」→ Config
- 「這是我的應用要用的環境變數嗎?」→ Context
- 「這是會在執行中變動、需要被 checkpointer 記錄的資料嗎?」→ State(記錄下來才能還原到任意時間點的狀態)
Store
相對於 checkpointer 是「單一 thread 內」的短期記憶(thread-scoped),Store 則是跨 thread、跨 session 的長期記憶(cross-thread memory),常用來保存和使用者有關的資料。
Store 的資料以 (namespace, key) 的方式組織,namespace 是一個 tuple,可以依用途分類,常見的使用方式像是:
(user_id, "profile")           # 基本資料:名字、職業、語言偏好
(user_id, "preferences")       # 偏好:喜歡簡短回答、喜歡用 TypeScript
(user_id, "memories")          # 互動中累積的記憶:上週提到的專案、家人名字
(user_id, "facts")             # 確認過的事實:曾在 Google 工作
基本使用方式:透過 store.put() 寫入資料、透過 store.search() 取出 namespace 下的資料。
import uuid

from langgraph.store.memory import InMemoryStore

store = InMemoryStore()

user_id = "1"
namespace_for_memory = (user_id, "memories")

memory_id = str(uuid.uuid4())
memory = {"food_preference": "I like pizza."}

store.put(namespace_for_memory, memory_id, memory)

memories = store.search(namespace_for_memory)
print(memories[-1].dict())
啟用語意搜尋(Embedded Store)
預設的 Store 只支援 key、namespace、filter 取資料;要支援以自然語言查詢的語意搜尋(store.search(..., query=...)),必須在建立 Store 時帶入 index 設定,指定 embedding 模型、向量維度,以及預設要把哪些欄位轉成向量:
import os
from langchain.embeddings import init_embeddings
from langgraph.store.memory import InMemoryStore

store = InMemoryStore(
    index={
        "embed": init_embeddings(
            "openai:text-embedding-3-small", api_key=os.getenv("OPENAI_API_KEY")
        ),
        "dims": 1536,
        "fields": ["$"],   # "$" 代表把整個 memory 物件本身也建一份索引
    }
)
寫入時可以用 index= 覆寫這筆資料實際要被建索引的欄位(不指定就吃 Store 上的預設):
store.put(namespace_for_memory, memory_id, memory, index=["food_preference"])
之後就能用自然語言查詢,並用 limit 限制回傳的筆數:
memories = store.search(
    namespace_for_memory, query="What does the user like to eat?", limit=3
)
資料存取策略
Store 提供四種存取方式,但不該每種都當預設手段——語意搜尋雖然強大,卻是最貴(每次都要做 embedding API 呼叫)也最不精確的選項,應該留到最後才用。
把存取策略想成一個金字塔,從下往上選,能用下面的就不要用上面的:
                  ┌────────┐
                  │ 語意搜尋 │  ← 最後手段(慢、貴、不精確)
                  └────────┘
                ┌────────────┐
                │ filter 搜尋 │  ← 知道某個欄位的值時用
                └────────────┘
              ┌────────────────┐
              │ namespace 列表  │  ← 寫入時就分類好,讀取直接撈整個 namespace
              └────────────────┘
            ┌─────────────────────┐
            │  key 直接取(get)  │  ← 最理想:確切知道要什麼
            └─────────────────────┘
對應到實際 API:
| 你知道什麼 | 用什麼 API | 效能 |
|---|---|---|
| 確切的 namespace + key | store.get(ns, key) | ⚡ 最快 |
| 整個 namespace 都要 | store.search(ns) | 🚀 快 |
| namespace + 某個欄位精確值 | store.search(ns, filter={...}) | 🚀 快 |
| 只知道意思、不知道細節 | store.search(ns, query="...") | 🐢 慢(要 embed) |
核心原則:能用 key 就不要用 filter,能用 filter 就不要用 query。用最簡單、最可控的工具,語意搜尋只在「真的不知道精確 key」時才出場。
Memory Schema 的紀律
當不得不用語意搜尋時,schema 設計會直接決定效率與精確度。關鍵的紀律是——把「語意內容」和「metadata」明確分開,並只對前者建立 embedding 索引:
# 好的 memory schema
{
    "content": "使用者說 onboarding 流程混亂",        # ← 語意
    "metadata": {                                  # ← 明確標示為非語意
        "timestamp": "2024-04-15T14:32:00Z",
        "source": "msg-8f3a2c1b",
        "tags": ["feedback", "onboarding"]
    }
}

# 寫入時只 embed content,timestamp、source 這類欄位留給 filter 取
store.put(ns, key, memory, index=["content"])
這樣做的好處:
- embedding 只針對真正帶語意的欄位,不會被 timestamp、id 這類雜訊稀釋
- metadata 欄位可以用
filter精確查詢,自然回到金字塔下層的便宜手段
心智模型:資料與索引各自演化
前面那條 schema 紀律背後有一個更大的工程議題——索引(index)跟資料(data)必須能各自演化。
寫入的原始資料是 source of truth,永遠不變;embedding 向量則是衍生產物,可以隨時根據新模型重建。如果把這兩者混在一起想,未來換 embedding 模型時的遷移就會很痛苦。
┌──────────────────────────────┐
│   Source of truth (永久)      │  ← memory 的原始 value(content、metadata)
└──────────────┬───────────────┘
               │ 每次重新 embed
               ▼
┌──────────────────────────────┐
│   Embedding index (可重建)    │  ← 向量
└──────────────────────────────┘
只要原始 value 還在,index 永遠能重建。所以 reindex 雖然麻煩,但不可怕——它只是在「重新計算衍生資料」,不會丟失任何資訊。這也是前面 schema 紀律的根本理由:原始 value 結構乾淨、語意欄位獨立,未來換模型時只要重跑 embedding,就完全不必動到 source of truth。
為未來遷移做準備
把上面這個心智模型落地成兩個具體做法。
1. 在 memory 裡記錄版本資訊
從第一筆資料開始就帶上版本欄位,未來會感謝自己:
{
    "content": "...",
    "_meta": {
        "schema_version": "v1",
        "embedding_model": "text-embedding-3-small",
        "embedding_dims": 1536,
        "created_at": "...",
    }
}
任何時候都能據此判斷「這筆資料是哪個版本產生的、需不需要遷移」。
2. 把 store 設定集中管理
# config/store.py
EMBEDDING_CONFIG = {
    "embed": init_embeddings("openai:text-embedding-3-small"),
    "dims": 1536,
    "fields": ["$"],
}

def get_store():
    return PostgresStore(index=EMBEDDING_CONFIG)
未來要換 embedding 模型時,只需要改這一個地方,搭配一支遷移腳本掃過舊資料重新 embed,就能完成切換。
Streaming
[!TIP] 本節對應官方文件 Streaming 和 Event streaming。如果只是要看 graph 跑到哪裡或把 token 丟到 UI,通常先用
graph.stream()/graph.astream()搭配stream_mode;如果要 tracing、observability、或更細的 lifecycle event,才看 event stream。
LangGraph 的 streaming 可以分成兩層:
- Graph output streaming:
graph.stream()/graph.astream(),用stream_mode決定要拿哪一種��資料。 - Event streaming:
graph.stream_events()或 Runnable 的astream_events(),拿更底層的 execution / lifecycle events。
常用 API 對照:
| API | 拿到什麼 | 適合用途 |
|---|---|---|
graph.stream(..., stream_mode="updates") | 每個 node 回傳的 state update;通常會包含 node 名稱和該 node 更新的欄位 | 看 agent 進度、node 結果 |
graph.stream(..., stream_mode="values") | 每個 step 結束後的完整 state | debug state 演變 |
graph.stream(..., stream_mode="messages") | LLM token / message chunk,加上 node、tags 等 metadata | 聊天 UI 逐字輸出 |
graph.stream(..., stream_mode="custom") | 透過 get_stream_writer() 或 runtime.stream_writer 送出的自訂事件 | 產品化進度訊息 |
graph.stream_events(...) | typed projections,例如 stream.messages、stream.values、stream.output | app code 同時消費 token、state、output |
graph.astream_events(...) | on_chat_model_stream、on_tool_start、on_chain_end 等 Runnable lifecycle event | tracing / observability / 細粒度控制 |
新版官方範例常會在 graph.stream(..., version="v2") 中使用 StreamPart 格式;這時每個 chunk 會有 type 和 data,要先用 chunk["type"] 判斷它是 updates、values、messages 還是 custom。
最常見的選法:
- 只��想知道每個 node 做完後改了什麼 →
stream_mode="updates" - 想看 state 每一步怎麼變 →
stream_mode="values" - 要做聊天 UI 逐字輸出 →
stream_mode="messages" - 要自己從 node/tool 丟進度訊息 →
stream_mode="custom"搭配get_stream_writer()或runtime.stream_writer - 要把 LLM、tool、chain 的 start/stream/end 都拿出來做 tracing →
astream_events()或stream_events()
stream_mode 也可以一次開多個,例如:
for chunk in graph.stream(
    inputs,
    stream_mode=["updates", "messages", "custom"],
):
    ...
這時處理端要先看每個 chunk 屬於哪一種 mode,再決定要更新進度、append token,還是顯示自訂訊息。
Runtime
當一個節點同時需要用到 state、context、store、config 時,難道要把每個東西都寫進參數列嗎?
# ❌ 這樣 signature 會無限膨脹
def my_node(state, context, store, config, checkpointer, ...):
    ...
LangGraph 的解法是——把所有「節點執行時可能用到的環境」打包成一個物件,叫做 Runtime。節點只要在 state 之外多收一個 runtime 參數,就能從同一個入口拿到所有東西:
async def my_node(state: MessagesState, runtime: Runtime[Context]):
    user_id = runtime.context.user_id    # 應用層環境(Context)
    store = runtime.store                # 跨 thread 記憶(Store)
    # 其他可用的:runtime.stream_writer、runtime.previous 等
    # (注意:Runtime 上沒有 .config,要拿 config 請另外加 config: RunnableConfig 參數)
Runtime 就是節點看世界的窗口——除了 state 之外,所有「節點需要從外界拿的東西」都從 runtime 上取。
runtime 還是 get_store()?
除了從 runtime 上取,LangGraph 也提供 get_store()、get_config()、get_stream_writer() 這幾個函式——它們透過 contextvar 注入,讓函式即使沒有收 runtime 參數也能拿到對應內容。
實務上的原則是——Node 內部一律走 runtime,只有 helper 或 tool 才用 get_*()。理由:
- 單一入口、風格一致:Node 簽章既然已經宣告
runtime: Runtime[Context],那store、context、config就都從runtime拿,依賴最清楚。混用runtime.context又混用get_store()會讓讀者懷疑「為什麼不一樣?」 - 可測試性:mock 一個
runtime物件就能餵給 Node;用get_store()則必須在有 contextvar 的環境下才跑得起來。 - Optional 的 narrow 成本很低:一行
assert runtime.store is not None就能搞定,而且這個 narrow 本身是有意義的——它顯式宣告「這個 Node 假設 store 已注入」。
# Node ── 走 runtime
async def call_model(state: AgentState, runtime: Runtime[Context]):
    assert runtime.store is not None
    user_id = runtime.context.user_id
    memories = await runtime.store.asearch((user_id, "memories"), ...)


# Helper ── 不在 node 簽章上,用 get_store()
async def fetch_memories(user_id: str) -> list[str]:
    store = get_store()
    items = await store.asearch((user_id, "memories"))
    return [d.value["memory"] for d in items]


# Tool ── LLM 看不到的注入
@tool
async def save_memory(text: str, *, store: Annotated[BaseStore, InjectedStore()]):
    await store.aput(...)
Node 開發的標準姿勢
把前面 State / Runtime / Context / Store 的概念串起來,每次寫節點時可以照這份檢查清單對照——簽章宣告什麼、回傳值怎麼長、哪些事不該在節點裡做。
讀取依賴:從正確的入口拿正確的資料
class AgentState(MessagesState):
    user_intent: str

@dataclass
class Context:
    user_id: str


async def my_node(
    state: AgentState,          # ← 對話內容、計算結果
    runtime: Runtime[Context],  # ← 應用環境、store、stream writer
    config: RunnableConfig,     # ← 想拿 thread_id 等框架 metadata 才加
):
    assert runtime.store is not None, "store must be configured at compile()"

    # ✅ 從 state 拿節點之間流動的資料
    messages = state["messages"]

    # ✅ 從 runtime.context 拿應用層環境
    user_id = runtime.context.user_id

    # ✅ 從 runtime.store 拿跨 thread 記憶
    memories = await runtime.store.asearch((user_id, "memories"), query="...")

    # ✅ 從 config 拿框架 metadata
    thread_id = config["configurable"]["thread_id"]
每個入口的職責對應前面 Context 章節的角色分工表:state 是會變的對話資料、runtime.context 是 run 啟動就固定的環境、runtime.store 是跨 thread 長期記憶、config 是 LangGraph 框架 metadata。
寫入更新:只回傳要更新的欄位,相信 reducer
    # ✅ 只回傳要更新的欄位
    return {"memory_count": state.get("memory_count", 0) + 1}

    # ❌ 不要回傳整個 state(會跟 reducer 行為衝突,例如 operator.add 會重複 append)
    # ❌ 不要在節點內呼叫 graph.update_state(那是 graph 外部的 API)
    # ❌ 不要直接操作 checkpointer(讓 LangGraph 自己管 checkpoint)
節點是 graph 內部的執行單位,責任是「告訴 reducer 這次要改什麼」;超出這個範圍的動作(手動補 checkpoint、模擬另一個節點的執行)都屬於 graph 外部的觀察 / 控制流程,在節點內做會破壞 LangGraph 的執行模型。
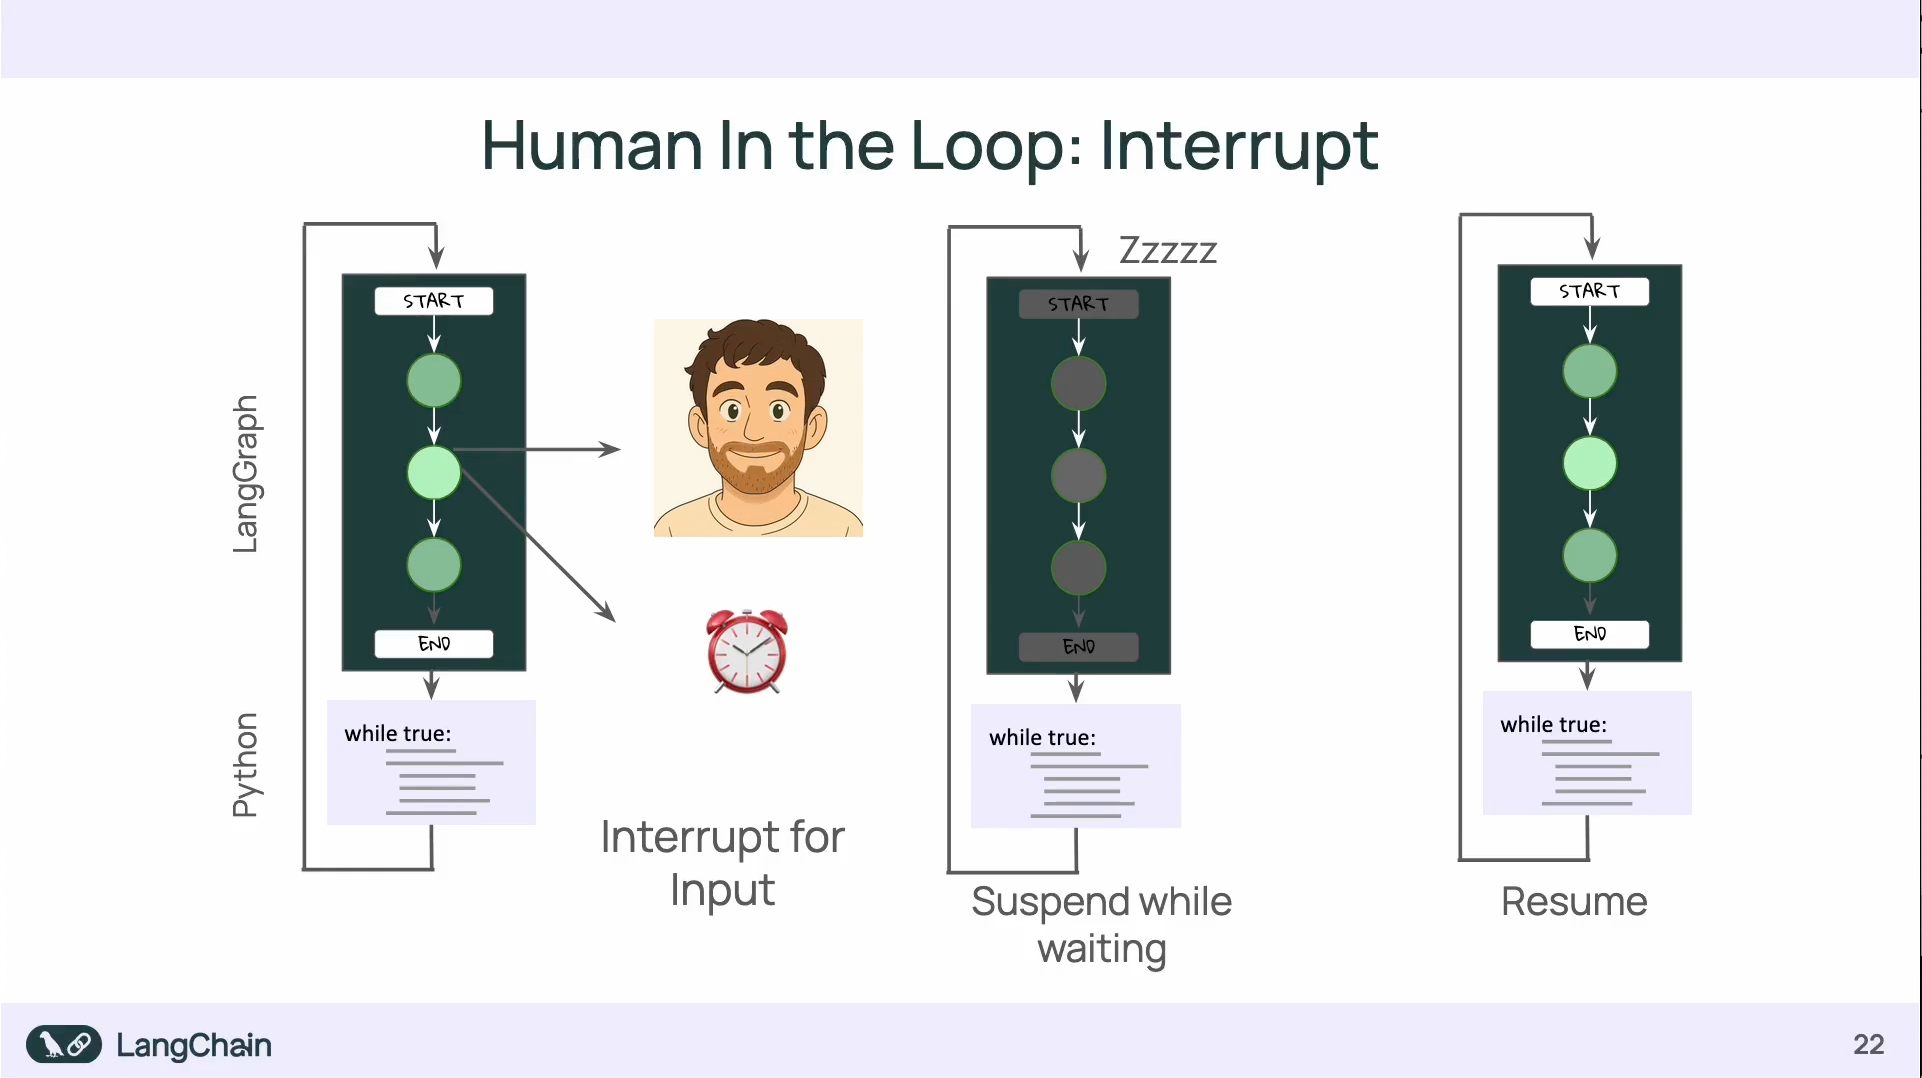
Human in the Loops: Interrupts
透過 Interrupt 可以暫停 graph 的進行:
- interrupt 的使用會需要 checkpointer 來保存暫停前後的資料狀態
Q & A
同樣是裝 langgraph-cli ,使用 Python 3.12 和 Python 3.14 會有不同的效果:
uv add 'langgraph-cli[inmem]'
使用 Python 3.12 可以直接把 jsonschema-rs 下載下來,但使用 Python 3.14 卻會要把 rust 裝下來重新 build。
原因是在 jsonschema-rs 0.29.1 的套件中,沒有定義 Python :: 3.14 ,所以他會去拉 Rust 要自己在 local build(用 Python 3.13 以前的版本就��不會撞到這個問題)
https://github.com/Stranger6667/jsonschema/blob/python-v0.29.1/crates/jsonschema-py/pyproject.toml
但實際上, jsonschema-rs 最新的已經到 v0.37.2,預設就支援 Python 3.14,所以如果是能拉到最新的套件,是不會需要自己 local build 的。