[architecture] Frontend monorepo with Nx
基本概念
在 JavaScript 中,精確來說 monorepo 的定義是該 repo 中有多個 package.json,也就是不同的 package 有獨立的 package.json。
在 Nx 中有些專案有 project.json 但沒有 package.json,因此這並不算是 monorepo;雖然如此,透過 package.json 還是能獲得 Nx 帶來的好處。
在 Nx 中:
- 即使不是 monorepo,也可以透過多個
project.json來做到多個 modules 的管理和加速開發
廣義的 monorepo 來說,也可以是該 repo ��中的多個 "projects" 會共用 root 的 npm modules、ESLint、TypeScript configuration。
使用 nx 的好處:
- 針對 component、library(modules) 已經有既定的資料夾結構和命名慣例
- 透過 nx graph 可以很清楚看出各個套件間的關聯,如何被引用
名詞定義
- Target:定義在
project.json動作的名稱,例如build - Task: 針對一個 project 執行特定的 target,例如
header:build
nx CLI
# --watch
# --skip-nx-cache:不要使用 nx 的 cache
# npm r-t 指的是 --target=xxx
Running Tasks
# nx <target-name> <project-name> <option overrides>

# 針對 products 這個 project 執行 serve 這個 task
$ nx serve products --watch

# 針對 common-ui 這個 project 執行 test 這個 task
$ nx test common-ui
target-name會被定義在project.json中
run-many:同時執行多個 target
# 對所有 project,同時執行多個 target (build, lint, test)
$ nx run-many -t build lint test

# 對所有 project 執行 lint,並且戴上 ESLint 的 quiet option
$ npx nx run-many -t lint --quiet

# 對所有 project 執行 build,且不要使用 cache
$ nx run-many -t build --skip-nx-cache

# 針對 header 和 footer 這兩個 project 同時執行多個 targets
$ nx run-may -t build lint test -p header footer
graph:Visualizing your Project Structure
$ nx graph --watch
affected:檢視目前變更會影響到哪些 package
# 畫出有被影響到的套件
$ nx affected:graph

# 只針對有被影響到的套件執行 task
# -t 指的是 --target=xxx
$ nx affected -t test
$ nx affected -t build
Create a Workspace
Installation
# Create a new Nx workspace
$ npx create-nx-workspace@latest [project-name]

$ npx nx list         # 檢視可以整合的 nx 套件
# npx nx list [plugin]     # 檢視該 nx 套件的資訊
$ npx nx list @nx/react
Project Configuration
- 專案中的
project.json,可以視為強化版的package.json。 - 只有要
project.json檔案的資料夾,都是 "project",不管它是 App、component、或是 library。
{
  "name": "store",
  "$schema": "node_modules/nx/schemas/project-schema.json",
  "sourceRoot": "./src",
  "projectType": "application",
  "tags": []
}
Target
{
  // ...
  "targets": {
    "serve": {
      "executor": "@nx/vite:dev-server",
      "defaultConfiguration": "development",
      "options": {
        "buildTarget": "store:build"
      },
      "configurations": {
        "development": {
          "buildTarget": "store:build:development",
          "hmr": true
        },
        "production": {
          "buildTarget": "store:build:production",
          "hmr": false
        }
      }
    },
    "build": {
      "executor": "@nx/vite:build",
      "outputs": ["{options.outputPath}"],
      "defaultConfiguration": "production",
      "options": {
        "outputPath": "dist/modules/shared/ui"
      },
      "configurations": {
        "development": {
          "mode": "development"
        },
        "production": {
          "mode": "production"
        }
      }
    }
  }
}
- executor:
<plugin>:<executor-name>,例如@nx/vite:dev-server,表示執行@nx/vite這個 plugin 裡的dev-server方法 - outputs:告訴 Nx 有什麼檔案會被建立,如此 Nx 可以把這些檔案加到 cache 中
Task Dependencies(targetDefaults)
{
  ...
  "targetDefaults": {
    "build": {
      "dependsOn": ["^build"]
    }
  }
}
這裡的 build dependsOn ^build 指的是「在執行該 package 本身的 build 時,先執行所有相依套件的 build」。
Generator
使用 nx 的 generator 自動產生檔案。
# 檢視該套件有哪些 generator 和 executor 可以使用
$ nx list @nx/react
$ nx list @nx/js
# 檢視該 generator 可以使用的參數
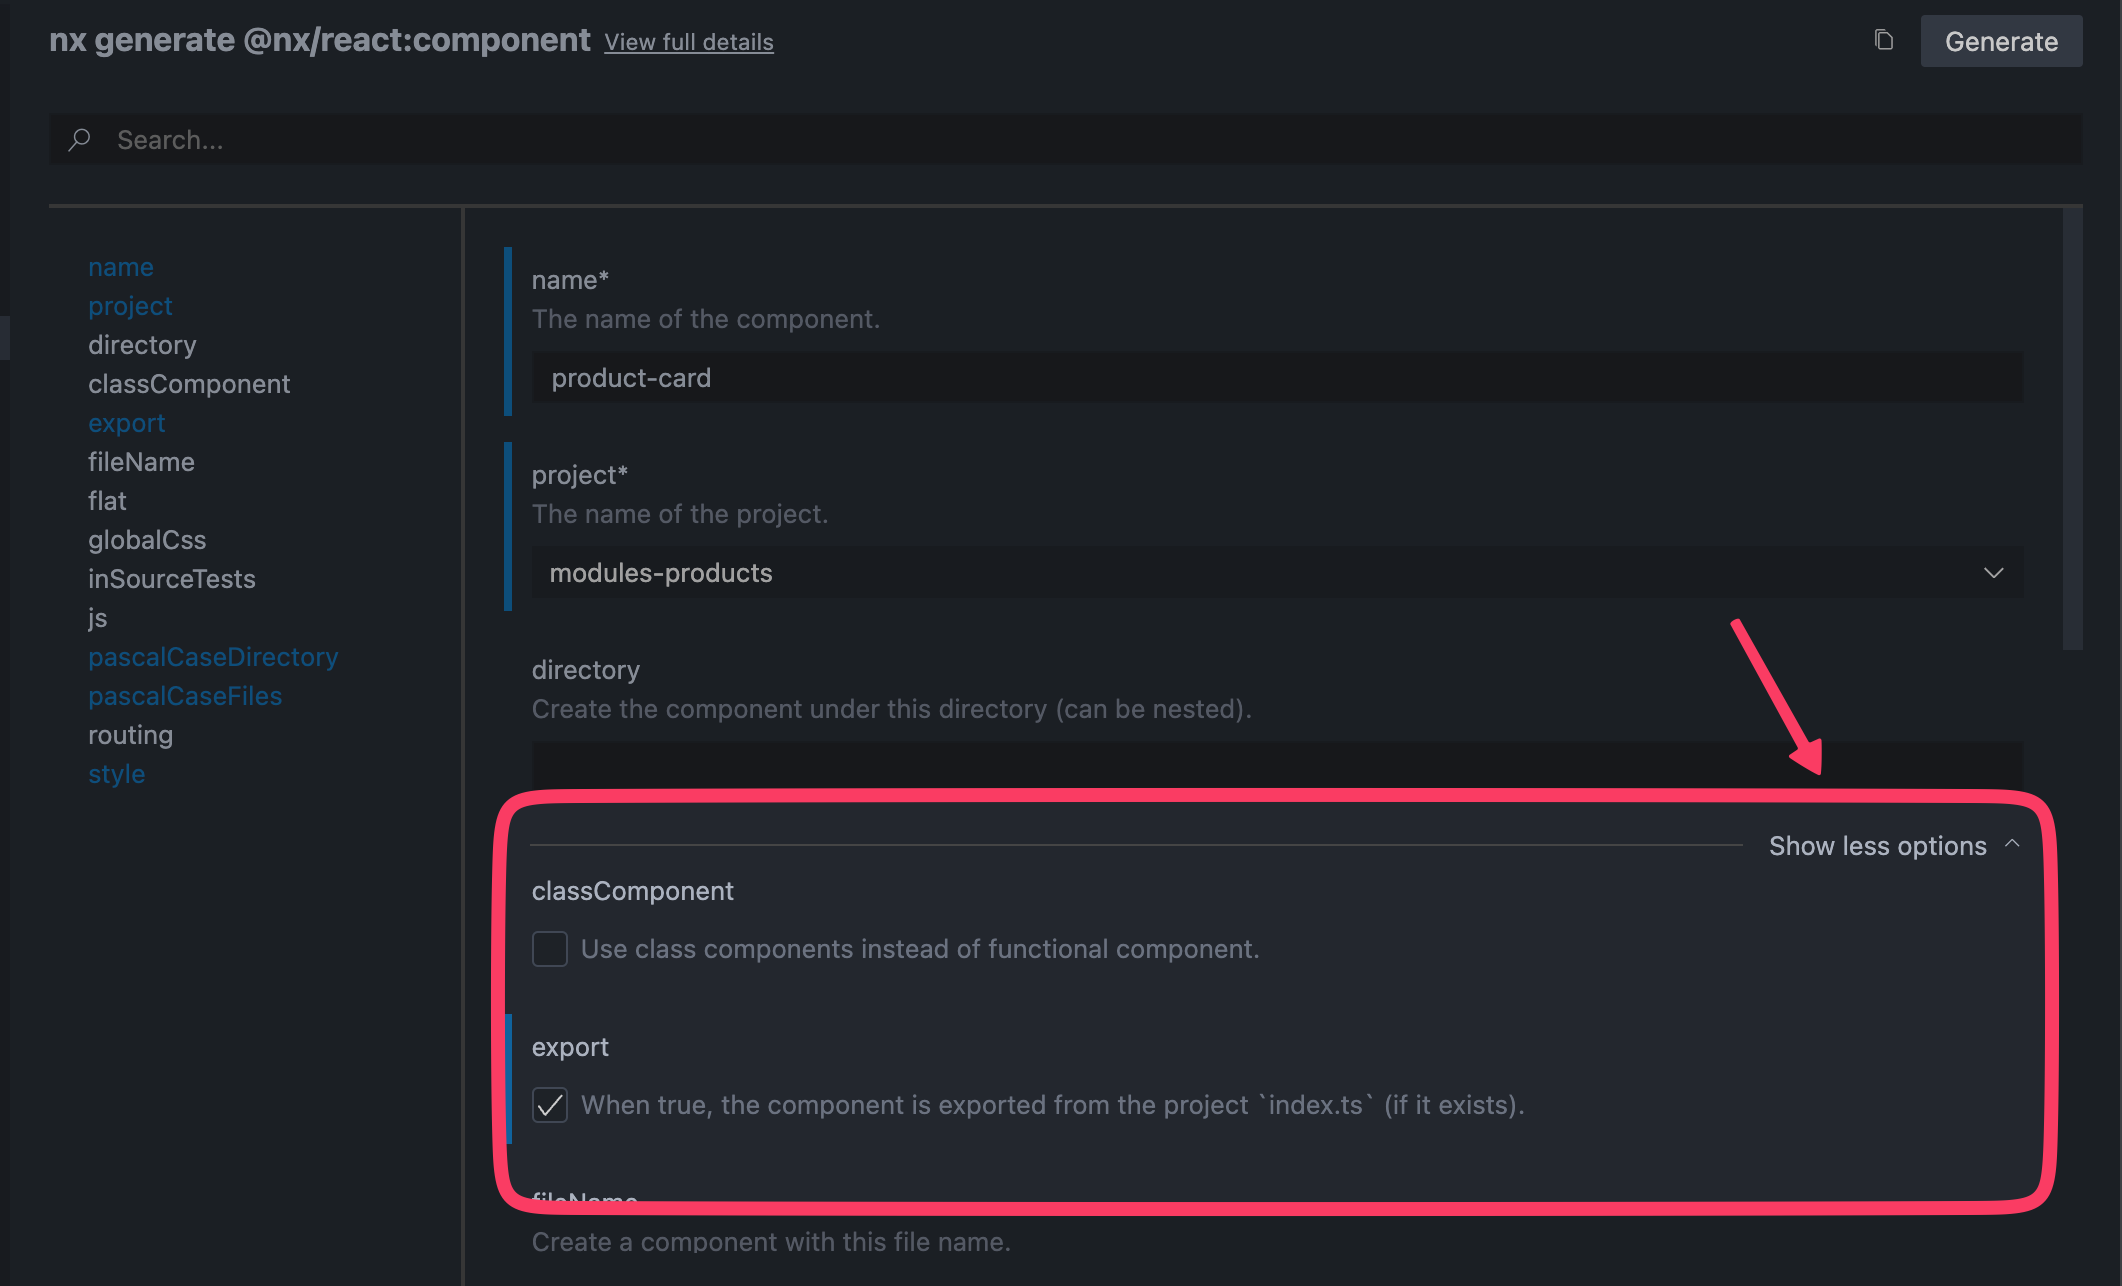
$ nx g @nx/react:component --help
$ nx g @nx/js:library --help
不同的 generator 提供很多不同 options,但要全部記下來不太可能,反倒是可以使用 Nx Console 這個 VSCode 的 plugin,點擊「Show all options」後,即可看到更多的選項:
@nx/react
- React Standalone @ nx > tutorials
- React monorepo Tutorials @ nx
# --dry-run
# --project=foo:在特定 project(library) 中建立元件
# --export:這個元件要暴露出來讓其他模組能用
建立 component
建立 components 的指令和單純,基本上就是產生幾個檔案,例如,banner.tsx、banner.spec.tsx 和 banner.modules.css。
# nx g @nx/react:component <component-name>
$ nx g @nx/react:component hello-world --dry-run

# 在特定 project 中建立 component
# 在 module-products 中,建立 product-list 這個元件
$ nx g @nx/react:component product-list --project=modules-products

# 在 common-ui 這個 project (library) 中,建立 banner 這個元件
$ nx g @nx/react:component banner --project=common-ui --export
建立 library(modules/project)
如果希望這個「東西」包含自己的 project.json,可以獨立執行 test、lint 或 build 的話,則應該要選的是 generate library。同時,Nx 會針對 lib 在 tsconfig.base.json 中自動建立 alias paths 方便開發者使用。
# --directory=<folder-name>:把 library 放在那個資料夾

# npx nx g @nx/react:library <library-name>
$ nx g @nx/react:library products
$ nx g @nx/react:library orders --unitTestRunner=vitest --bundler=none --directory=modules
如果「沒有」選 bundler(即,none),則新產生的 library 中,只會有 project.json 而不會有 package.json,同時也不會有 build 這個 target,因此最後在 build 整個 project 的時候,並不會有對應的檔案出現在 dist 中。
在建立好的 local libraries 中,每一個 library 都會包含
- 自己的
project.json,所以每個 library 可以各自執行對應的指令 - 把跨 module 可以使用的 public API 放在 library 內的
index.ts
由於在 tsconfig.base.json 中已經設定好對應的 alias path,所以如果要在 main App 中使用其他 module 中的元件,只需要用對應的 alias path 即可引用不同 module 的元件:
// src/app/app.tsx
import HelloWorld from './hello-world/hello-world';
import { Route, Routes } from 'react-router-dom';

import { ProductList } from '@store/modules/products';

export function App() {
  return (
    <Routes>
      <Route path="/" element={<HelloWorld />}></Route>
      <Route path="/products" element={<ProductList />}></Route>
    </Routes>
  );
}

export default App;
將不同的 domain logic 放在不同的 library 有這些好處:
- 更好的關注點分離(better separation of concerns)
- 更好的重複利用(better reusability)
- 明確定義跨 domain areas 間可以使用的 public API
- 根據不同的 library 執行 test/lint/build,提供 CI 更好的 scalability
- 不同的團隊可以專注在不同的 libraries,提供團隊更好的 scalability
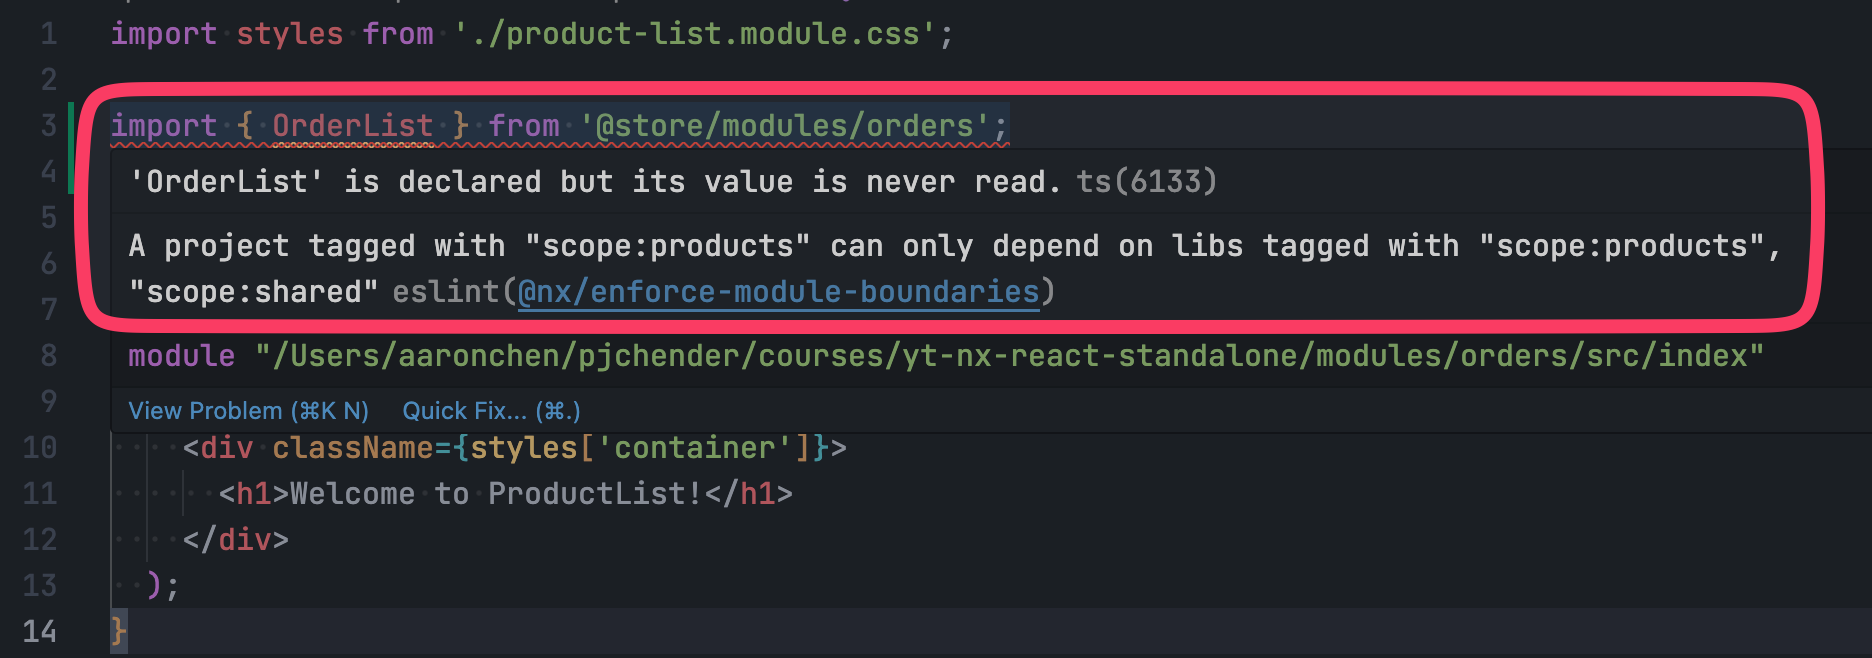
為了避免不同的 module 彼此耦合的太嚴重,盡可能不要發生交互參照的情況,其中一個方式是利用 nx 提供的 tags,並使用 nx 提供的 ESLint,定義帶有特定 tag 的 library 只能被 import 進特定的 library(參考:Imposing Constraints with Module Boundary Rules),以此避免被到處引用:
建立 React App
在一個 monorepo 中如果有多個 react app,可以使用這個指令來建立 React App:
$ nx g @nx/react:app
@nx/js
# --publishable:可以被 publish 的檔案
# --importPath:npm package 的名稱
# nx generate @nx/js:library <package-name>

# 在專案中建立名為 products 的 JavaScript library
$ nx g @nx/js:lib products

# 建立一個可以被 publish 和 import 的 package,名稱為 is-even
$ nx g @nx/js:library is-even --publishable --importPath @pjchender/is-even
使用 Verdaccio 並發布專案
- NEW Nx Verdaccio Support @ Youtube
# setup Verdaccio local registry
$ nx generate setup-verdaccio

# 啟動 Verdaccio
$ npx nx local-registry
接著在 nx 中增加 publish-package 這個 target defaults:
// nx.json
{
  // ...
  "targetDefaults": {
    // ...
    "publish-package": {
      "dependsOn": ["build", "test"]
    }
  }
}
假設要 publish 的 package 是 modules/order,因為我們想要 publish 的是 dist 而不是 source code,所以可以將 project.json 中 build target 的 options.outputPath 改成:
// modules/order/project.json
{
  "targets": {
    // ...
    "build": {
      "executor": "@nx/vite:build",
      "outputs": ["{options.outputPath}"],
      "defaultConfiguration": "production",
      "options": {
        "outputPath": "modules/order/dist"
      }
    }
  }
}
接著在希望能被 publish 的專案中的 package.json 中加上 publish-package 的 script。舉例來說,
// modules/order/package.json
{
  // 如果 private 是 true 要改成 false
  // "private": false,
  "scripts": {
    // ...
    "publish-package": "npm publish"
  },
  "exports": {
    ".": {
      "import": "./dist/index.mjs",
      "require": "./dist/index.js"
    }
  },
  "files": ["dist"]
}
開始 publish:
# 等同於 "-t publish-package"
$ nx run-many --targets=publish-package
Publish 後即可在 Verdaccio 上看到此套件,並且可以在其他專案��中下載並使用。
其他
加上 TypeScript 的 Type Check 功能
在各 package 內(有 tsconfig.json 的地方)的 project.json 中,加上:
// project.json
{
  "targets": {
    "type-check": {
      "executor": "nx:run-commands",
      "options": {
        "commands": ["tsc -p tsconfig.app.json --noEmit"],
        // 這裡要改成 project 的名稱
        "cwd": "apps/react-template",
        "forwardAllArgs": false
      }
    }
  }
}
build --watch 的檔案不完整,改用 nx watch
- nx watch @ nx > documents
- workspace watching @ nx > tips n tricks
雖然在 build 時可以透過 generatePackageJson 這個 option 把專案中的 package.json 複製到 dist 資料夾中(@nx/vite:build),但如果是使用 build --watch,會發現打包的專案並沒有 package.json,或者是檔案改變了,但型別的檔案沒有更新等問題。
如果使用這個 package 的專案很仰賴 package.json 中的 main、types、exports 等欄位來解析正確要載入的檔案,這時候,如果沒有 package.json 就很容易出現 Uncaught ReferenceError: exports is not defined 的錯誤。
其中一個解決的方式是,透過 nx watch,一旦發現 project 中的檔案有改變是,就再次執行 build 指令,例如:
$ npx nx watch --projects=modules-shipment --verbose -- nx run modules-shipment:build
就可以解決這個問題。